Where Is The Dip Switch On Chamberlain Garage Door Opener? If you own an older Chamberlain garage door opener, you may need to adjust the DIP switches to program your remote or wall-mounted control panel. Unlike modern rolling code technology, DIP switches use a fixed code system that requires manual configuration.
But where is the DIP switch on Chamberlain garage door opener, and how do you access and adjust it? This guide will help you locate the DIP switch, explain how it works, and provide step-by-step programming instructions.
What Is a DIP Switch and Why Does It Matter?
A DIP switch (Dual In-line Package switch) is a series of tiny, toggle-style switches that control the frequency code of your garage door opener and remote. These switches allow your remote to communicate with the opener using a specific fixed code.
🔹 Older Chamberlain openers (pre-1993) use DIP switches for manual frequency matching.
🔹 Newer models use rolling code technology (Security+ or MyQ) and do not have DIP switches.
If you have an older Chamberlain opener, it’s crucial to know where the DIP switch is located to program a new remote or troubleshoot connection issues.
Where Is The Dip Switch On Chamberlain Garage Door Opener?
1. Locating the DIP Switch on the Garage Door Opener Motor Unit
If you need to find the DIP switch inside the main garage door opener unit, follow these steps:
1: Check the Motor Unit
- The DIP switch is inside the garage door opener housing, typically mounted on the ceiling of your garage.
2: Find the Access Panel
- Look for a removable panel or cover on the back or side of the opener.
- Some models have the DIP switches behind the light cover (remove the lens cover to access it).
3: Locate the DIP Switch Block
- Inside the opener, you will see a small rectangular block with 9-12 tiny switches.
- These on/off (up/down) switches control the unique access code.
👉 Common Chamberlain models with DIP switches:
- Chamberlain 2500 Series
- Chamberlain 4000 Series
- Chamberlain LiftMaster 61LM
If you do not see DIP switches, your opener likely uses rolling codes and is not compatible with manual DIP switch programming.
2. Locating the DIP Switch on a Chamberlain Remote Control
If you’re programming a new remote, you must match the DIP switch settings inside both the remote and opener.
Step 1: Open the Remote Control
- Most Chamberlain remotes have a small panel or battery compartment on the back.
- Use a screwdriver or slide the cover off to reveal the internal circuit board.
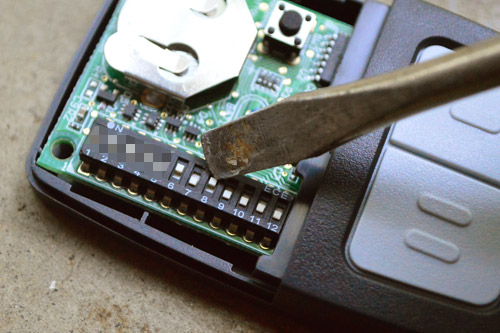
Step 2: Find the DIP Switch Block
- Inside the remote, you’ll see a row of 9-12 small switches (same as the motor unit).
- These switches must match the exact settings inside your garage door opener.
🔹 Common Chamberlain remotes with DIP switches:
- Chamberlain 61LM
- Chamberlain 62LM
- Chamberlain 63LM
Once you’ve located both DIP switches, you can begin programming.
How to Program a Chamberlain Garage Door Opener with DIP Switches
If you need to program a new Chamberlain remote or wall-mounted keypad, follow these steps:
1: Set the DIP Switches on the Motor Unit
- Open the garage door opener housing and locate the DIP switch panel.
- Note the existing switch pattern (or set a new one).
2: Match the DIP Switches on the Remote
- Open the remote control and locate its DIP switch block.
- Adjust the switches to match the pattern inside the motor unit.
3: Test the Remote
- Press the remote button to see if the garage door responds.
- If it doesn’t work, double-check the switch alignment.
4: Adjust the Garage Door Opener Frequency (If Needed)
- If your garage door opener doesn’t respond, try a different DIP switch pattern and reprogram the remote.
This method ensures that your Chamberlain remote and garage door opener are communicating correctly.
Troubleshooting Common DIP Switch Issues
If your garage door opener isn’t responding after setting the DIP switches, try these troubleshooting steps:
1. Ensure the DIP Switches Match
- Both the remote and opener must have identical switch settings.
- Even one incorrect switch position will prevent the remote from working.
2. Check for a Dead Remote Battery
- If the remote isn’t responding, try replacing the 9V or coin-cell battery inside.
3. Verify the Opener’s Power Supply
- Make sure the garage door opener is plugged in and the circuit breaker is not tripped.
4. Clean the DIP Switch Contacts
- Dust and dirt can interfere with switch connectivity.
- Use a small brush or compressed air to clean the DIP switches.
5. Try a New Remote
- If your remote is very old, consider buying a universal remote compatible with DIP switch openers.
FAQs About Chamberlain Garage Door Opener DIP Switches
1. Do all Chamberlain garage door openers have DIP switches?
No, only older models (pre-1993) use DIP switches. Newer Chamberlain models use rolling code technology (Security+ and MyQ) instead.
2. Can I use a universal remote with a Chamberlain DIP switch opener?
Yes! Many universal remotes support DIP switch configurations. Ensure you buy one compatible with fixed code systems.
3. What if my DIP switch remote stops working?
Try replacing the battery, cleaning the DIP switch contacts, or resetting the switch pattern to match the opener.
4. How many DIP switch combinations are possible?
Most Chamberlain openers use 9-12 DIP switches, meaning there are 512 to 4,096 unique combinations.
5. Can I upgrade my old Chamberlain opener to a rolling code system?
Yes! You can install a universal receiver that allows modern rolling code remotes to work with your old DIP switch opener.
Final Thoughts
If you own an older Chamberlain garage door opener, knowing where the DIP switch is located is essential for programming new remotes and troubleshooting connectivity issues.
Key Takeaways:
- The DIP switch on a Chamberlain garage door opener is inside the main motor unit or remote control.
- Matching the DIP switches between the opener and remote is necessary for proper function.
- Older Chamberlain models (pre-1993) use DIP switches, while newer models use rolling codes.
- If you experience issues, try cleaning the switches, replacing the remote battery, or using a universal remote.
By following this guide, you’ll easily find and adjust the DIP switches on your Chamberlain opener, ensuring smooth garage door operation!
Leave a Reply