If you own a Chamberlain garage door opener, you’ve likely asked yourself at some point: What do the buttons on my Chamberlain garage door opener do? With multiple buttons on remotes, wall consoles, and the opener unit itself, it can be confusing to understand what each one is for—especially if you’ve lost the manual or inherited the system from a previous homeowner.
This guide is designed to help you decode every button, feature, and function available on your Chamberlain garage door opener. Whether you’re programming a remote, troubleshooting light settings, or trying to understand the learn button, this article provides everything you need to know.
Read too: How Many Remotes Can A Chamberlain Garage Door Opener Have? Understaanding the Limits and Options
Understanding Your Chamberlain Garage Door Opener System
Chamberlain garage door openers are known for their reliability, safety features, and user-friendly design. However, the system often includes multiple components with different types of buttons:
- Remote control transmitters
- Wall-mounted control panels
- Ceiling-mounted motor unit
- Wireless keypads
Each part may feature various buttons with unique purposes, including programming, light control, door operation, security lock, and more.
Knowing what these buttons do not only simplifies daily use—it also helps prevent accidental resets, ensures proper programming, and improves your system’s safety.
What Do The Buttons On My Chamberlain Garage Door Opener Do?
Let’s break down the functions of the buttons you’ll typically find across Chamberlain devices. We’ll categorize them by location for easier understanding.
1. Motor Unit Buttons (Ceiling-Mounted)
This is the main unit mounted on your garage ceiling. It usually has a small set of buttons behind a panel or on the rear housing.
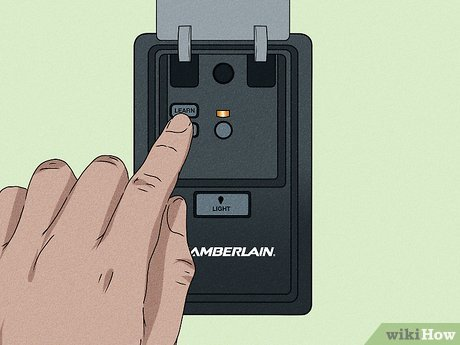
🔵 Learn Button
This is the most important button for programming remotes and keypads.
- Color: Often yellow, purple, red/orange, or green
- Function: Puts the opener into learning mode so you can sync a remote or keypad
- Location: Usually near an LED indicator on the back or side of the motor unit
To program a remote, press and release the Learn button, then press the button on your remote within 30 seconds.
🔴 Adjust/Up/Down Buttons
Some Chamberlain units have arrow buttons for:
- Adjusting force settings
- Setting door travel limits (how far the door opens/closes)
These are used during setup or troubleshooting and shouldn’t be changed unless necessary.
2. Wall Control Panel Buttons
Most Chamberlain garage door openers come with a wired wall-mounted control panel inside the garage. Depending on the model, it can be very basic or include several smart features.
🚪 Main Door Button
- Function: Opens or closes the garage door
- This is the large, central button used for daily operation.
💡 Light Button
- Function: Turns the garage light on or off independently of door operation
- Some units allow you to change the light duration or set automatic motion-detection
🔒 Lock Button
- Function: Disables all remote access when activated
- Often called the “Security+ Lock”, it prevents the door from opening via remote control or keypad
- Great for vacations or added security
To enable/disable:
- Hold the Lock button for 2-3 seconds. An LED will confirm the status.
🚶♂️ Motion Sensor Activation (on select models)
Some advanced control panels include motion sensors that trigger the light when movement is detected.
3. Remote Control Buttons
Depending on your model, your Chamberlain remote may have 1, 2, or 3 buttons.
🔘 Single Button Remote
- Simply opens or closes a single garage door
🔘🔘🔘 Multi-Button Remote
- Can control multiple doors or other MyQ-compatible devices
- One button per door or device
- Some models include a light control function
You can program these via the Learn button on the motor unit. Each remote button must be programmed individually.
4. Wireless Keypad Buttons
Wireless keypads mounted outside the garage offer PIN-based access. The buttons are laid out like a telephone keypad (0–9) and serve multiple functions:
🔢 Numeric Buttons
- Used to enter a 4-digit access code
🔁 Enter Button
- Sends the signal to the motor unit once the code is entered
🔧 Program Button (hidden or used in combo)
- Used to change PINs, program multiple doors, or clear memory
You’ll usually need to follow a specific sequence like:
mathematicaCopyEditEnter new PIN → Press ENTER → Press Learn Button → Enter PIN again
How to Identify the Learn Button Color and Its Meaning
Different Chamberlain models use different Learn button colors, which correspond to specific frequencies and compatibility details:
| Color | Frequency | Remote Type |
|---|---|---|
| Yellow | 390 MHz | Security+ 2.0 |
| Purple | 315 MHz | Security+ |
| Red/Orange | 390 MHz | Security+ |
| Green | 390 MHz | Billion Code |
When troubleshooting or buying a replacement remote, always match the Learn button color to ensure compatibility.
Tips for Using the Buttons on Your Chamberlain Opener
Here are a few useful tips to keep your garage door system working smoothly:
✅ Label Your Remotes
If you have multiple doors, label each button so you don’t get confused.
✅ Use the Lock Feature for Security
Going on vacation or want to disable the opener overnight? Activate the Lock feature to block all wireless access.
✅ Replace Batteries Regularly
Remote and keypad buttons may become unresponsive due to low battery power. Most remotes use CR2032 or CR2016 coin cell batteries.
✅ Don’t Hold the Learn Button Too Long
Holding the Learn button too long (over 6 seconds) will erase all programmed remotes—use caution!
Troubleshooting Button Issues
If you’re finding that one or more buttons aren’t working, consider these common problems:
🚫 Wall Button Doesn’t Work
- Check for power to the opener
- Inspect wires on the back of the wall control
- Replace the wall control panel if needed
🔋 Remote Buttons Not Responding
- Replace battery
- Reprogram the remote
- Interference from LED bulbs or nearby devices may cause signal issues
🔐 Can’t Unlock the Wall Control
- Hold the Lock button for 2–3 seconds to toggle the lock state
- Confirm with the LED light
Frequently Asked Questions
❓ Can I program multiple remotes to the same opener?
Yes! You can program several remotes and keypads to a single opener—just repeat the process using the Learn button.
❓ Why is the garage door opener light staying on?
It could be triggered by motion or stuck in the “on” position via the light button. Check timer settings on the wall control or reset the system.
❓ Is it safe to use the Lock button regularly?
Absolutely. It’s a recommended security feature that ensures no unauthorized remote access.
❓ What if I press the Learn button too long?
Holding it down will erase all programmed devices. You’ll need to reprogram all remotes and keypads afterward.
Final Thoughts: What Do The Buttons On My Chamberlain Garage Door Opener Do?
So, what do the buttons on my Chamberlain garage door opener do? The answer depends on the component:
- The motor unit’s Learn button is key to programming
- The wall control offers access to door, light, lock, and motion features
- Remotes and keypads provide wireless, customizable access
- Each button contributes to the overall safety, convenience, and automation of your garage door system
Understanding these buttons empowers you to use your Chamberlain garage door opener more effectively—and troubleshoot common issues without guesswork.
Leave a Reply