Garage door openers have evolved from simple mechanical devices to complex systems packed with smart technology. Among the most trusted brands is Chamberlain, known for reliability, durability, and user-friendly features. But if you’ve ever looked at the control panel or remote and asked yourself, “What are the buttons on Chamberlain garage door opener?”, you’re not alone.
Whether you’re programming a remote, adjusting settings, or troubleshooting, understanding the role of each button is essential. This guide will walk you through every button found on a Chamberlain garage door opener—on the wall console, remote control, and the motor unit itself. We’ll explain what they do, how to use them, and why they matter for both convenience and safety.
Read too: How Many Remotes Can A Chamberlain Garage Door Opener Have? Understaanding the Limits and Options
What Are The Buttons On Chamberlain Garage Door Opener?
Let’s break down the key components to answer the central question: What are the buttons on Chamberlain garage door opener, and how do you use them effectively?
Types of Chamberlain Opener Buttons and Where They’re Located
Chamberlain garage door openers have several types of buttons located in different areas:
- Motor Unit (Ceiling-Mounted)
- Wall Console (Mounted Inside Garage)
- Remote Controls (Keychain or Visor Style)
- Wireless Keypad (Exterior Access)
Each of these components includes unique buttons that serve a specific function.
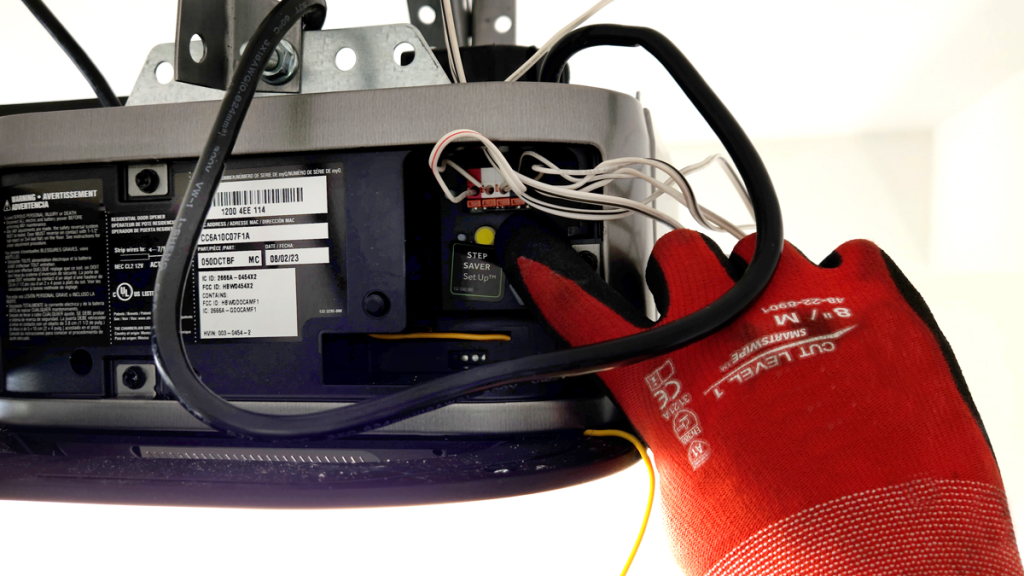
1. Learn Button – The Heart of Programming
One of the most critical buttons on your Chamberlain system is the Learn button, typically found on the back or side of the motor housing.
Color-coded functionality:
- Yellow: Security+ 2.0 (most modern units)
- Purple: Security+ 315 MHz
- Red/Orange: Security+ 390 MHz
- Green: Legacy or early Security+ systems
Purpose of the Learn Button:
- Program new remotes or keypads
- Sync HomeLink systems (in-car remotes)
- Clear existing memory or codes
How to Use It:
- Press and release to enter programming mode.
- LED light comes on for 30 seconds.
- Press your remote or keypad button to sync.
- LED blinks or the light flashes to confirm success.
Important: Holding the Learn button for 6–10 seconds will erase all codes from the opener’s memory.
2. Remote Control Buttons
Chamberlain remotes typically feature 1 to 3 buttons, depending on the model.
Button Functions:
- Main Button (1, 2, or 3): Each can be programmed to a separate garage door or gate opener.
- LED Indicator Light: Confirms signal transmission and battery strength.
How to Program:
- Press the Learn button on the motor unit.
- Within 30 seconds, press and hold the desired remote button.
- Release when the garage light blinks or you hear a click.
Multi-door functionality: If you have a 3-button remote, each button can control a separate opener, perfect for homes with multiple garage bays.
3. Wall Control Panel Buttons
The interior wall-mounted control panel often includes multiple buttons, depending on the model:
Common Buttons Include:
- Main Door Control Button: Opens or closes the garage door.
- Light Button: Turns garage opener light on/off manually.
- Lock Button: Disables all remote access (useful for vacations or added security).
- Timer-to-Close (TTC): Allows automatic closure of the garage after a preset time (available in advanced models).
- Menu/Settings Buttons (Smart Panels): Used to navigate programmable features.
Security Feature – Lock Button:
Activating the lock function disables all remote controls but allows wall panel operation. It’s ideal for when you’re away or during the night.
How to Enable/Disable Lock:
- Press and hold the Lock button for 2–3 seconds.
- A blinking light or beep may confirm the status.
4. Wireless Keypad Buttons
Mounted outside the garage door, this keypad allows access via PIN code.
Keypad Layout:
- Numeric Keys (0–9)
*(Clear)#(Enter/Confirm)- LED or backlight indicator
Features:
- Temporary PIN setup
- Multi-door control (for advanced models)
- Light control (some models)
Programming a Keypad (General Steps):
- Press the Learn button on the motor unit.
- Enter your desired 4-digit PIN on the keypad.
- Press the
#orEnterkey (depending on model). - The opener should respond with a light blink or sound.
If you’re using a keypad without an Enter button, alternative keys like
#often act as the confirmation input.
Buttons in Smart Chamberlain Models (with myQ®)
Modern Chamberlain models feature smart capabilities via the myQ® app. The unit itself may also include:
- Wi-Fi Indicator Button
- Settings/Menu Navigation Buttons
- Test Buttons for Sensors
myQ® Enabled Buttons:
- Connect your opener to a smartphone
- Set recurring open/close schedules
- Enable push notifications
Resetting Wi-Fi on Smart Models:
- Hold the Settings button until the LED blinks.
- Reconnect through the myQ® app by following on-screen prompts.
How to Identify Button Types Based on Model
If you’re unsure what the buttons on Chamberlain garage door opener do, check the model number and look up the user manual online at Chamberlain’s support page. Model numbers are often found on:
- The back panel of the motor unit
- Inside battery compartments (on remotes or keypads)
- The wall console faceplate
You can also distinguish by button layout and color.
Tips for Using Chamberlain Buttons Efficiently
- Label Your Remotes: If you have multiple remotes or use multiple buttons, label them for clarity.
- Test After Programming: Always verify that each programmed button works as expected.
- Use the Lock Button When Away: Activate it for additional peace of mind.
- Change Keypad Codes Regularly: For better security.
Safety Considerations
- Keep remotes out of reach of children.
- Never program remotes or keypads while the garage door is in motion.
- Always perform routine checks of your garage door’s motion and safety sensors.
Frequently Asked Questions
Q: Why does my remote have three buttons?
A: To control up to three different garage doors or gates with a single remote.
Q: What happens if I hold the Learn button too long?
A: It will erase all previously programmed devices—requiring reprogramming from scratch.
Q: Is the Lock button the same as disabling the system?
A: Not entirely. It disables remotes but still allows use of the wall panel and keypad.
Q: Can I reprogram the buttons myself?
A: Yes, most Chamberlain openers are designed for DIY setup. Just follow the correct Learn-button procedure.
Final Thoughts
So, what are the buttons on Chamberlain garage door opener? They’re the keys to customizing your garage system for maximum convenience, security, and control. From the Learn button on the motor to smart panel options and keypad inputs, each serves a clear purpose.
Understanding your Chamberlain system empowers you to troubleshoot, enhance security, and ensure seamless operation—whether you’re using a basic remote or a smart myQ® unit.
If you ever get stuck, Chamberlain’s support resources and manuals are a great place to find model-specific guidance.
Leave a Reply