The chain mechanism is a vital component of the Chamberlain garage door opener, ensuring smooth and reliable operation of your garage door. However, like any mechanical system, the chain can sometimes develop issues that affect the opener’s performance. If you’re experiencing problems with your garage door opener, focusing on the chain could be the key to a quick fix.
In this comprehensive article, we’ll explore everything you need to know about trouble shooting the chain on the Chamberlain garage door opener. From identifying common problems to step-by-step repair techniques, you’ll gain the confidence to handle most chain-related issues yourself. Whether your chain is noisy, loose, or stuck, this guide has you covered.
Understanding the Role of the Chain in Your Chamberlain Garage Door Opener
Before diving into troubleshooting, it’s important to understand the function of the chain in your Chamberlain garage door opener:
- The chain is responsible for transferring the motor’s power to the garage door, allowing it to open and close smoothly.
- It runs along a rail and is connected to the trolley, which pushes or pulls the door.
- Chains are favored in many Chamberlain models due to their durability and ability to handle heavy garage doors.
Although sturdy, chains can wear out or develop problems over time, such as slack, misalignment, or damage. Recognizing these issues early helps prevent bigger mechanical failures.
Common Signs You Need Trouble Shooting The Chain On The Chamberlain Garage Door Opener
If your Chamberlain garage door opener is acting up, the chain might be the culprit. Look out for these signs:
- Excessive noise or rattling during door operation
- The garage door moves unevenly or jerks unexpectedly
- The chain feels loose or sags noticeably
- The opener struggles to lift or close the door completely
- Visible rust, dirt, or damage on the chain
If you notice one or more of these symptoms, it’s time to inspect and troubleshoot the chain.
Trouble Shooting The Chain On The Chamberlain Garage Door Opener – Step-by-Step Guide
Step 1: Safety First – Disconnect Power and Secure the Door
Before inspecting or working on the chain, ensure your safety:
- Unplug the garage door opener from the power source to prevent accidental activation.
- If possible, close the garage door completely and secure it to prevent it from falling.
Step 2: Inspect the Chain for Wear, Rust, or Damage
- Look closely at the chain along the entire rail.
- Check for any broken links, excessive rust, or dirt buildup.
- Rust or dirt can cause friction and noisy operation.
- Broken links or stretched sections can lead to chain slipping or failure.
If the chain is heavily corroded or damaged, replacement might be necessary.
Step 3: Check the Chain Tension
- A common issue is improper chain tension — either too loose or too tight.
- To test tension, gently press the chain midway along the rail. It should have a slight give, roughly 1/4 to 1/2 inch of slack.
- If the chain sags more than that, it’s too loose and can slip during operation.
- If it’s too tight, it puts excessive strain on the motor and gears, causing premature wear.
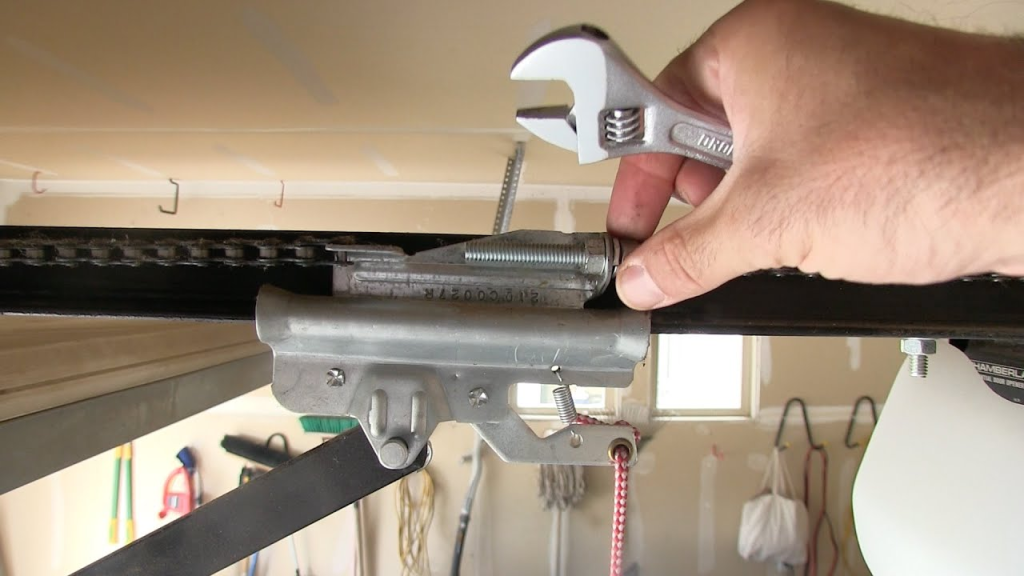
Step 4: Adjust the Chain Tension Correctly
To adjust the chain tension on most Chamberlain models:
- Locate the tension adjustment bolt or mechanism on the opener’s rail.
- Use a wrench or screwdriver (depending on model) to turn the bolt clockwise to tighten or counterclockwise to loosen the chain.
- Adjust gradually and re-check slack by pressing the chain.
- Aim for a balance: not too tight to cause strain and not too loose to cause slipping.
Step 5: Lubricate the Chain Properly
- Lubrication reduces friction, noise, and wear on the chain.
- Use a silicone-based or garage door specific lubricant (avoid WD-40 as it can attract dirt).
- Apply lubricant evenly along the entire length of the chain.
- Wipe away excess to prevent dirt buildup.
Step 6: Inspect the Sprockets and Drive Components
- The chain runs over sprockets connected to the motor.
- Check the sprockets for wear, missing teeth, or damage.
- Worn sprockets can cause the chain to skip or derail.
- If sprockets are damaged, replace them to avoid further chain issues.
Step 7: Test the Garage Door Operation After Adjustments
- Plug the garage door opener back in.
- Open and close the garage door several times to observe the chain’s behavior.
- Listen for unusual noises and watch for smoothness.
- If problems persist, re-check tension, lubrication, and sprockets.
Additional Tips for Trouble Shooting The Chain On The Chamberlain Garage Door Opener
- Regular maintenance: Schedule chain inspections and lubrication every six months to prolong life.
- Keep the rail clean: Dirt or debris can affect chain performance.
- Check mounting bolts: Loose bolts on the opener or rail can cause misalignment.
- Avoid over-tightening: Too much tension leads to motor strain and noisy operation.
When to Call a Professional
If you’ve tried the above steps and still face issues such as persistent noise, chain slipping, or the door failing to open fully, it’s best to contact a professional garage door technician. Complex problems may require:
- Chain replacement
- Gear and sprocket repairs
- Motor inspections or replacements
Attempting advanced repairs without expertise can lead to safety risks or further damage.
Conclusion: Keep Your Chamberlain Garage Door Opener Chain Running Smoothly
Trouble shooting the chain on the Chamberlain garage door opener is essential to ensure reliable and quiet operation of your garage door. By regularly inspecting, adjusting tension, lubricating, and addressing early warning signs, you can prevent costly repairs and extend the life of your opener.
Following this guide will empower you to solve most chain-related problems efficiently. Remember to prioritize safety, take your time with adjustments, and seek professional help when needed.
Leave a Reply