If you’ve ever been stuck in your garage during a power outage, you already know how frustrating it can be. Fortunately, Chamberlain garage door openers offer a practical solution: battery backup. In this comprehensive guide, we’ll walk you through installing the backup battery in the Chamberlain garage door opener, so you can keep your garage functional even when the lights go out.
This guide is perfect for homeowners looking to install a backup battery for the first time or replace an old one. We’ll explain everything from choosing the right battery to step-by-step installation instructions, troubleshooting, and maintenance tips.
Read too: How Many Remotes Can A Chamberlain Garage Door Opener Have? Understaanding the Limits and Options
Why You Need a Backup Battery in Your Chamberlain Garage Door Opener
Before diving into the actual process of installing the backup battery in the Chamberlain garage door opener, let’s take a moment to understand why it’s important.
1. Reliable Operation During Power Outages
A backup battery ensures your garage door will open and close up to 20 times during a power outage, providing continued access to your home and enhancing safety.
2. Compliance with Local Laws
In states like California, legislation mandates that all newly installed garage door openers include battery backup systems. Staying compliant with these laws is crucial if you’re selling your home or installing a new opener.
3. Security and Emergency Access
During storms, outages, or emergencies, being able to open your garage manually or remotely with battery support can be life-saving—especially if it’s your main exit point.
What You’ll Need Before You Begin
Installing the battery is simple, but having the right tools and materials on hand will make the process easier and faster:
- Chamberlain-compatible backup battery (model 41A6357-1 or newer)
- Flathead screwdriver
- Phillips screwdriver
- Clean cloth or rag
- User manual (specific to your model)
⚠️ Note: Not all Chamberlain models support battery backup. Make sure your opener is compatible before proceeding.
Installing The Backup Battery In The Chamberlain Garage Door Opener Step-by-Step
Let’s now focus on the actual task of installing the backup battery in the Chamberlain garage door opener. The process is fairly straightforward and should take about 10–15 minutes.
Step 1: Disconnect Power to the Opener
Before beginning, unplug your garage door opener from the electrical outlet to avoid electric shock or accidental operation. Safety always comes first.
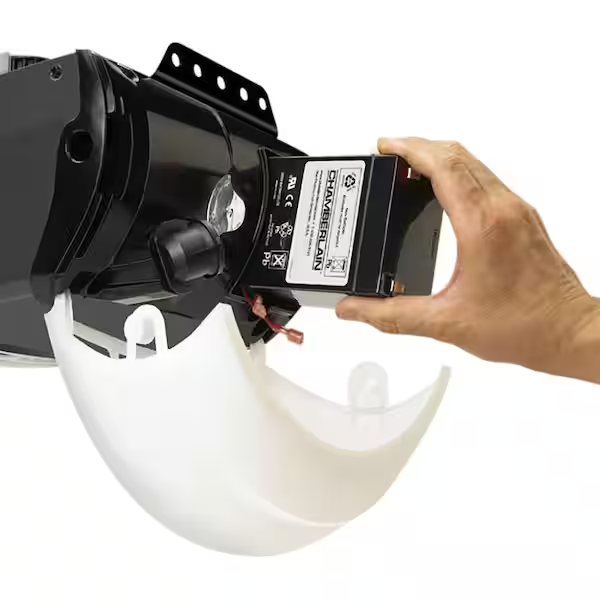
Step 2: Locate the Battery Compartment
Depending on the model, the battery compartment is usually located on:
- The side of the motor unit (for newer models)
- Behind a removable plastic cover
- Inside the light lens housing
Check your Chamberlain opener’s manual for the exact location.
Step 3: Open the Battery Door
Use a flathead screwdriver to gently pry open the battery compartment. Some models might have a small screw you need to remove first. Be cautious not to crack the housing.
Step 4: Insert the Battery
Take your backup battery and insert it into the compartment. Most batteries have labeled terminals to help guide installation. Make sure:
- Red wire connects to red terminal
- Black wire connects to black terminal
The connections should be snug and secure. Loose connections may cause failure or limited operation during power loss.
Step 5: Close the Battery Door
Once installed, secure the cover or panel back in place, either by snapping it shut or tightening the screw, depending on the model.
Step 6: Reconnect the Power
Plug your garage door opener back into the outlet. Wait a few seconds for the system to boot up.
Confirming the Installation Was Successful
After reconnecting the power, your opener should recognize the battery automatically. Here’s how to check:
- Battery Status LED: Most Chamberlain openers have an LED indicator.
- Solid green means the battery is fully charged.
- Flashing green means charging is in progress.
- Solid red indicates battery failure or low voltage.
- Test Power Loss Operation: Unplug the opener and try operating the door. If the battery works, the door should still open and close at a slightly slower speed.
Common Mistakes to Avoid
When learning about installing the backup battery in the Chamberlain garage door opener, many homeowners encounter avoidable issues. Here are a few common pitfalls:
- Installing an incompatible battery – Always check the model compatibility.
- Loose wire connections – Improper connections may result in battery not charging.
- Using a damaged battery – Swollen or corroded batteries must be discarded.
- Ignoring battery orientation – Always align positive and negative terminals correctly.
How Long Does a Backup Battery Last?
On average, a Chamberlain backup battery will last 1–2 years depending on usage, temperature, and charging habits. Most systems alert you with a beep or red light when it’s time for a replacement.
To extend battery life:
- Keep the garage at moderate temperatures.
- Avoid frequent full discharges.
- Test operation every few months.
Maintenance Tips for Your Battery Backup System
To ensure your battery continues to function properly, follow these simple maintenance guidelines:
- Test Monthly: Unplug the opener and verify the door works using battery power.
- Inspect Visually: Check for corrosion or leakage around the battery terminals.
- Clean Terminals: Use a dry cloth to clean terminals during inspection.
- Replace Promptly: Swap out dead batteries to prevent opener damage or malfunctions.
Troubleshooting Backup Battery Issues
If you’re experiencing problems even after installing the backup battery in the Chamberlain garage door opener, consider these troubleshooting tips:
Opener Beeps Every 30 Seconds
- This usually means the battery is low or not charging.
- Check that the wires are securely attached and the battery is seated properly.
No LED Light
- This may indicate no power or a blown circuit board.
- Unplug and reset the unit. If the problem persists, consult the manual or Chamberlain support.
Short Battery Runtime
- Batteries degrade over time.
- Replace the battery if it’s older than two years or no longer holds a charge.
Do All Chamberlain Models Support Battery Backup?
No, only certain Chamberlain models support battery backup. These typically include:
- Chamberlain B550, B970, RJO20
- Most models ending in “W” or “WD”
- Units labeled “Battery Backup Capable” on the motor housing
If unsure, look up your model number online or consult the owner’s manual.
When Should You Replace the Backup Battery?
Signs it’s time to replace your battery include:
- Audible beeping from the motor unit
- Red LED light that doesn’t change to green
- Door doesn’t open during a power outage
- Battery is more than 2–3 years old
Replacement is easy and follows the same steps as initial installation.
Conclusion: Be Ready for Any Power Outage
Installing the backup battery in the Chamberlain garage door opener is one of the smartest and simplest upgrades you can make to your home. Not only does it protect you from getting locked in or out during a blackout, but it also gives you peace of mind knowing your home remains accessible and secure no matter what.
By following the step-by-step guide above and conducting regular maintenance, your battery backup system will serve you reliably for years. And remember—preparedness starts with power, even when the grid goes down.
Leave a Reply