Installing a Chamberlain garage door opener in a prewired home can feel intimidating at first. However, if your garage is already prewired, you’re in luck—much of the heavy lifting has been done. This step-by-step guide will walk you through how to wire Chamberlain garage door opener in prewired home safely and effectively, helping you make the most of your pre-installed infrastructure.
Whether you’re upgrading an old system, replacing a broken opener, or setting up a brand-new Chamberlain unit, understanding how to take advantage of prewired systems will save you time, reduce errors, and improve the overall installation experience.
Read too: How Many Remotes Can A Chamberlain Garage Door Opener Have? Understaanding the Limits and Options
Why Prewired Homes Make Installation Easier
Modern homebuilders often prewire garages for convenience and safety. Prewiring includes running low-voltage wires inside the garage walls to points like the wall control location, safety sensor mounts, and sometimes even ceiling-mounted power outlets. This infrastructure makes installing a garage door opener significantly faster and neater.
With Chamberlain garage door openers being among the most popular models in the US, understanding how to wire Chamberlain garage door opener in prewired home is essential for homeowners seeking a seamless installation.
What’s Typically Prewired in a Home Garage
Before starting the installation, it’s essential to identify what’s already available in your prewired garage. Here’s what you should check for:
- Wall control wiring running from the wall switch area to the opener mounting point.
- Safety sensor wiring along the lower parts of the door frame.
- Ceiling power outlet near the garage door motor unit location.
- Ground wire or junction box in case hardwiring is required by local code.
Knowing where these wires go will help you connect them properly to your Chamberlain opener.
Tools and Materials You’ll Need
Even in a prewired garage, you’ll need a few basic tools and accessories to complete the wiring process:
- Chamberlain garage door opener (with instruction manual)
- Wire stripper/cutter
- Screwdriver set
- Voltage tester
- Electrical tape
- Step ladder
- Drill (if you need to adjust mounting points)
Optional: Multimeter for checking continuity and wire mapping
How To Wire Chamberlain Garage Door Opener In Prewired Home Step by Step
Now, let’s walk through the process of how to wire Chamberlain garage door opener in prewired home, starting with preparation and moving all the way to testing the system.
Step 1: Turn Off the Power
Always start by turning off the circuit breaker to your garage’s power source. This is crucial for your safety during wiring.
Step 2: Mount the Garage Door Opener
Follow Chamberlain’s mounting instructions to attach the main unit to the ceiling. This will involve connecting it to the garage door rail and ensuring it is securely supported from the ceiling joists.
Step 3: Identify and Label Prewired Leads
Locate the low-voltage wires coming out of the wall near the ceiling. There should be:
- Two wires for the wall control panel
- Four wires (two for each sensor) for safety sensors
- A power source (outlet or hardwire point)
Label them for clarity: Wall Control, Sensor Left, Sensor Right.
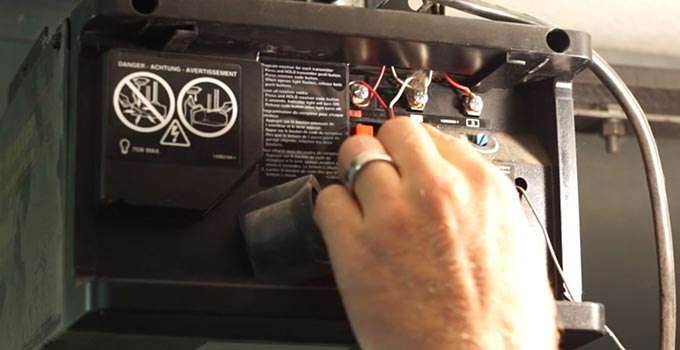
Step 4: Connect Wall Control Wires
Most Chamberlain units use a two-wire system for the wall control. Here’s how to wire it:
- Strip ½ inch of insulation from the ends of the wall control wires.
- On the opener unit, locate the RED and WHITE terminals.
- Connect:
- RED wire from the wall to the RED terminal
- WHITE wire to the WHITE terminal
At the wall switch, connect the same two wires to the back of the Chamberlain wall control using the quick-connect tabs or screws.
Step 5: Connect Safety Sensor Wires
Prewired garages usually have sensor wires running through the walls to each side of the garage door frame. Follow these steps:
- At the opener, identify the BLACK and WHITE terminals labeled for the safety sensors.
- Group and connect the wires:
- All WHITE sensor wires to the WHITE terminal
- All BLACK or striped wires to the BLACK terminal
Use the same color wire for each side to avoid confusion.
- Mount the safety sensors 6 inches above the floor, aligning them directly across from each other. A solid green light indicates successful alignment.
Step 6: Connect the Power Source
Most prewired homes have a ceiling outlet near the garage door motor. Simply plug in the Chamberlain unit. If hardwiring is necessary, follow local electrical codes, and consider hiring an electrician if unsure.
Use a surge protector to guard against electrical damage.
Step 7: Program the Opener and Test
Once all wiring is complete:
- Turn the power back on.
- Press the wall control button to activate the garage door.
- Test the safety sensors by blocking the beam while closing—door should stop and reverse.
- Pair remotes and wireless keypads by using the Learn button on the unit.
Troubleshooting Tips for Prewired Installations
Wall Control Not Working
- Check for reversed polarity on the RED and WHITE wires.
- Ensure wires are fully inserted into the terminals.
- Test continuity using a multimeter.
Safety Sensors Blinking
- Misalignment is the most common cause.
- Check wire continuity.
- Confirm that each sensor is connected to the correct terminals.
Opener Not Responding to Power
- Test the ceiling outlet using another device.
- Check the opener’s internal fuse (if equipped).
- Verify the circuit breaker is supplying power.
Wiring Diagram: Chamberlain in Prewired Garage
Though your Chamberlain manual includes a specific wiring diagram, here’s a quick overview adapted for prewired setups:
| Component | Wire Color | Connects To |
|---|---|---|
| Wall Control | Red & White | Red/White terminals on opener |
| Left Sensor | White & Black | White/Black sensor terminals |
| Right Sensor | White & Black | Same as above |
| Power Source | N/A | Grounded outlet or junction |
Label and organize your wires neatly using clips or cable guides.
Additional Considerations for Smart Garage Setups
Chamberlain garage door openers like the MyQ series can be integrated with smart home systems. Prewired garages support this integration easily with:
- LAN cable routing for Ethernet-connected hubs
- Wiring for external cameras
- Battery backup wiring if required
Make sure your Wi-Fi signal is strong in the garage for optimal MyQ performance.
When to Hire a Professional
While most DIYers can handle how to wire Chamberlain garage door opener in prewired home successfully, you should consider professional help if:
- You’re unsure of wiring identifications
- The opener requires modifications to the ceiling supports
- The home’s electrical wiring is outdated or damaged
- You’re installing multiple openers in a complex layout
Routine Maintenance for Long-Term Wiring Health
Even after installation, periodic checks ensure optimal performance:
- Inspect visible wiring for wear or corrosion
- Test wall control and safety sensors monthly
- Check for loose terminal connections every six months
- Replace remote and wall panel batteries annually
Conclusion: Smooth and Safe Installation for Prewired Homes
Installing a garage door opener doesn’t have to be complicated. If your home is already prewired, you’re halfway there. Understanding how to wire Chamberlain garage door opener in prewired home can save you time, money, and frustration.
From identifying existing wires to correctly connecting wall controls and safety sensors, this guide ensures you wire your opener correctly the first time. With proper setup and maintenance, your Chamberlain system will deliver years of quiet, reliable service.
Leave a Reply