How To Tighten Chain On Garage Door Opener Chamberlain Liftmaster? A well-maintained garage door opener ensures the safety and longevity of your system, making it crucial to know how to tighten the chain on a garage door opener. The Chamberlain Liftmaster series is one of the most popular garage door openers on the market, known for its durability and reliable performance. However, over time, the chain on your garage door opener may become loose, leading to issues such as loud operation, jerky movements, or even potential damage to other parts of the opener.
If you’re wondering how to tighten the chain on your Chamberlain Liftmaster garage door opener, you’re in the right place. This detailed guide will walk you through the necessary steps to adjust the chain properly, ensuring your opener functions smoothly for years to come. Whether you’re dealing with a new installation or a problem that has developed over time, understanding this simple but essential task can save you money on repairs.
Read too: How Many Remotes Can A Chamberlain Garage Door Opener Have? Understaanding the Limits and Options
Why Tightening the Chain is Important
The chain on your Chamberlain Liftmaster garage door opener plays a crucial role in the operation of your garage door. It connects the motor to the trolley, which is responsible for moving the door up and down. Over time, the chain can become loose due to normal wear and tear, or it may lose tension after extensive use. A loose chain can cause several problems:
- Increased Noise: A loose chain often results in a noisy operation, which can be irritating.
- Slower Operation: A slack chain can lead to jerky or sluggish door movement, impacting the overall performance.
- Potential Damage: If left unaddressed, a loose chain can damage other parts of the garage door opener, such as the motor or trolley.
To prevent these issues and ensure smooth operation, it’s essential to know how to tighten the chain on your garage door opener Chamberlain Liftmaster.
How To Tighten Chain On Garage Door Opener Chamberlain Liftmaster: Step-by-Step Guide
Tightening the chain on your Chamberlain Liftmaster garage door opener is a relatively simple process, but it does require some basic knowledge and a few tools. Here’s a comprehensive, step-by-step guide to help you through the procedure.
1. Safety First
Before starting any repair or maintenance on your garage door opener, it’s important to prioritize safety:
- Disconnect the Power: Unplug the garage door opener from the electrical outlet to prevent accidental activation.
- Secure the Door: Make sure the garage door is closed and secure. You can manually lock the door if necessary to prevent it from moving while you work.
2. Inspect the Chain
Before tightening the chain, you should first inspect it for any visible damage. Look for any signs of wear, such as fraying or breaks. If the chain is damaged, it may need to be replaced. However, if the chain looks intact and is simply loose, you can proceed to the next step.
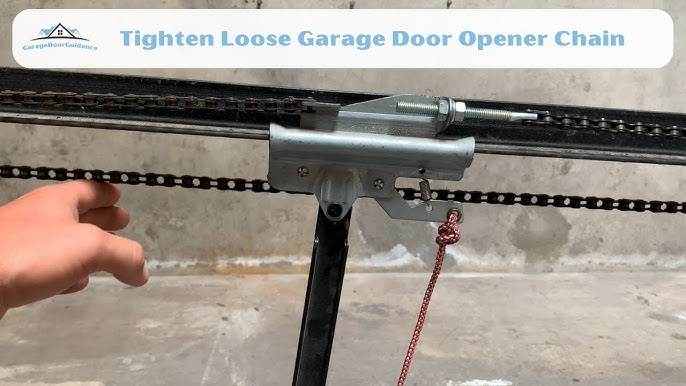
3. Locate the Tension Adjustment Mechanism
To tighten the chain, you need to locate the tension adjustment mechanism. On Chamberlain Liftmaster models, this is typically found on the back of the opener motor unit, near where the chain connects to the trolley.
There are usually two types of adjustment mechanisms:
- Adjustment Bolt: Some models have a bolt that allows you to adjust the tension directly.
- Adjustment Nut: Other models use a nut and screw system that can be tightened to create more tension on the chain.
Refer to your owner’s manual to determine which mechanism your model uses. Once you’ve identified the adjustment mechanism, you are ready to proceed.
4. Loosen the Chain Tensioner
If there’s any existing tension on the chain, you’ll need to loosen the tensioner slightly to allow you to make adjustments. Use a wrench or socket set to loosen the nut or bolt.
- For adjustment bolts, simply turn them counterclockwise to relieve some tension.
- For adjustment nuts, use the appropriate wrench to loosen them.
5. Tighten the Chain
Once you have loosened the tensioner, you can begin tightening the chain. Grab the adjustment mechanism and turn it clockwise to add tension to the chain. You should aim for a slight amount of slack in the chain — about 1/4 to 1/2 inch of play in the middle of the chain.
When tightening, make small adjustments and periodically check the tension. Too much tension can cause unnecessary strain on the motor, while too little can lead to poor door movement.
6. Check the Chain’s Slack
After tightening the chain, check for proper tension. The chain should be tight enough that it moves smoothly along the sprockets but should still have a small amount of slack. To test this, try to lift the chain gently in the middle. If there’s too much slack or if the chain is too tight, readjust the tension until it feels just right.
7. Tighten the Tensioner
Once the chain is at the desired tension, use your wrench or socket to tighten the adjustment mechanism back into place. Ensure that the bolt or nut is securely tightened to prevent the chain from loosening again.
8. Test the Garage Door Opener
After you’ve completed the adjustment, plug the opener back into the electrical outlet. Test the garage door opener by running the door through a few cycles. Make sure the door opens and closes smoothly and that the motor operates quietly.
Listen for any unusual noises, which could indicate that the chain is still too loose or too tight. If everything seems to be working correctly, congratulations! You’ve successfully tightened the chain.
Troubleshooting Common Chain Issues
While tightening the chain on your Chamberlain Liftmaster garage door opener is a simple task, there are a few common issues that might arise. Here’s how to troubleshoot them:
1. Chain Is Still Too Loose After Tightening
If the chain remains loose after you’ve tightened it, there may be an issue with the sprockets, the trolley, or the tensioning mechanism itself. Check for any worn-out parts, and consider replacing them.
2. The Chain Is Too Tight
If the chain is too tight, it may place unnecessary stress on the motor, causing overheating or damage. If the chain is overly tight, loosen the tension slightly and recheck the slack.
3. Unusual Noises During Operation
If you hear grinding or clanking noises, it could be due to debris or dirt in the chain or sprockets. Clean the chain and lubricate the moving parts to ensure smooth operation.
Maintenance Tips to Prevent Future Chain Issues
To prevent the chain from loosening again in the future, consider the following maintenance tips:
- Lubricate the Chain Regularly: Use a silicone-based lubricant to keep the chain moving smoothly. Apply the lubricant every 3 to 6 months to prevent wear.
- Inspect the Chain Periodically: Regularly check the chain for any signs of wear or damage. This will allow you to address problems before they worsen.
- Adjust Tension as Needed: Over time, the chain may naturally loosen again. Check the tension every few months and adjust as necessary.
Conclusion
Knowing how to tighten the chain on your Chamberlain Liftmaster garage door opener is an essential skill for maintaining your opener and ensuring smooth operation. By following this simple, step-by-step guide, you can avoid costly repairs and improve the performance of your garage door opener.
Remember to perform regular maintenance checks, lubricate the chain, and address any issues promptly. With proper care, your Chamberlain Liftmaster garage door opener will continue to serve you reliably for many years to come.
Leave a Reply