Setting up a smart garage door opener may sound complex, but with Chamberlain’s user-friendly technology, the process can be surprisingly simple. Whether you’re installing it for the first time or upgrading to a smart home setup, learning how to set up Chamberlain smart garage door opener will allow you to enjoy greater control, security, and convenience right from your smartphone.
In this comprehensive guide, we’ll walk you through everything you need to know—from unpacking your device to syncing it with the myQ app, integrating with smart assistants, and troubleshooting common setup issues.
Why Choose a Chamberlain Smart Garage Door Opener?
Before diving into how to set up Chamberlain smart garage door opener, let’s understand why this product is trusted by homeowners across the U.S.:
- myQ Technology: Allows smartphone-based control, real-time alerts, and scheduling.
- Secure Access: Grant digital keys to family, friends, or delivery drivers.
- Voice Assistant Compatibility: Works with Google Assistant, Amazon Alexa (via IFTTT), and more.
- Simple Installation: Chamberlain designs their systems for easy DIY setup.
- Smart Home Integration: Seamlessly fits into your smart home ecosystem.
Whether you’re using a new B970, C870, RJO70, or adding the Smart Garage Hub to an existing opener, this setup guide will cover it all.
What You’ll Need Before You Begin
To successfully complete the setup, ensure you have the following:
- A Wi-Fi signal (2.4GHz only; 5GHz is not supported)
- Your Chamberlain smart garage door opener or myQ Smart Garage Hub
- A smartphone or tablet with Bluetooth and internet access
- A myQ account (can be created during setup)
- Basic tools (screwdriver, ladder, drill—depending on model)
Optional: Google Assistant, Amazon Alexa, Apple HomeKit, or IFTTT integration if desired.
How To Set Up Chamberlain Smart Garage Door Opener Step by Step
Follow these step-by-step instructions to ensure your Chamberlain smart garage door opener is properly installed and connected:
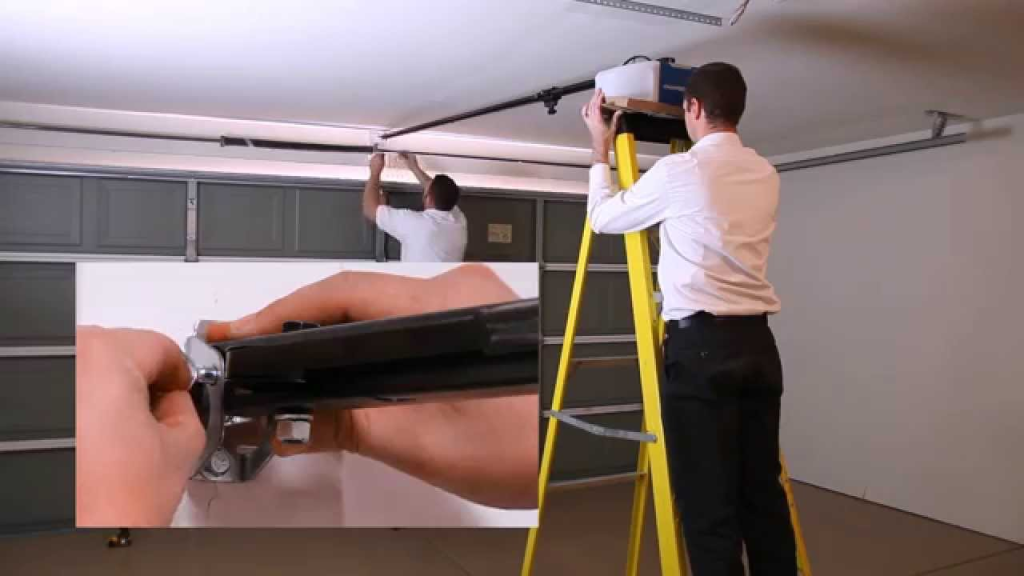
Step 1: Install the Opener (For New Garage Door Units)
If you’re using a Chamberlain garage door opener with built-in smart features (like B970, RJO20, etc.), follow the installation instructions in the manual. The process generally includes:
- Mounting the garage motor unit to the ceiling
- Installing the rail and trolley system
- Connecting the door arm to the garage door
- Installing safety sensors near the bottom of the door
- Connecting power supply
Make sure everything is wired and tested properly before proceeding to the smart setup.
If you’re using the myQ Smart Garage Hub, skip physical installation steps and go straight to mounting the smart hub device in the next step.
Step 2: Download the myQ App
Go to the App Store (iOS) or Google Play Store (Android) and download the official myQ app by Chamberlain Group.
- Launch the app and tap “Sign Up” if you’re a new user.
- Fill in your name, email, and password to create an account.
- Log in and allow the app to access Bluetooth, Wi-Fi, and notifications.
The myQ app is your central control system. You’ll use it to open/close your garage door, view activity logs, and manage guest access.
Step 3: Connect the Garage Door Opener to Wi-Fi
Once you’re logged into the app:
- Tap “Add Device” or the plus icon (+).
- Select “Garage Door Opener With Wi-Fi” or “Smart Garage Hub” based on your setup.
- Follow the prompts to:
- Enable Bluetooth for device detection
- Power cycle the garage door opener (if prompted)
- Scan the QR code on the opener or hub
When the LED indicator blinks blue, your Chamberlain device is in Wi-Fi pairing mode. Connect your smartphone to the Wi-Fi signal broadcasted by the opener, then return to the app and choose your home Wi-Fi network.
Note: Use a 2.4GHz Wi-Fi network—5GHz is not compatible.
Enter your password, and the app will pair the opener with your network. When successful, the LED will turn solid green.
Step 4: Test the Opener from Your Phone
Once connected, you’ll be able to see the garage door listed in your myQ dashboard. Try:
- Opening and closing the door remotely
- Naming the garage door (e.g., “Main Garage” or “Back Garage”)
- Setting up push notifications for door activity
You can also configure schedules, like auto-closing the door every night at 10 PM or receiving an alert if the door stays open for more than 10 minutes.
Step 5: Sync With Smart Home Assistants (Optional)
Want to control your garage with your voice or automation routines? Here’s how to link your Chamberlain smart garage opener:
Google Assistant
- Open the Google Home app
- Tap “+” > “Set up device” > “Works with Google”
- Search for “myQ” and log in using your myQ credentials
Amazon Alexa (via IFTTT or myQ subscription)
- Install IFTTT or enable myQ Smart Garage Control Skill
- Note: myQ’s direct Alexa support may require a myQ subscription
Apple HomeKit (select models only)
- Scan the HomeKit pairing code found on the opener
- Use the Apple Home app to assign scenes or automations
These integrations allow commands like “Alexa, open the garage” or “Hey Google, is my garage door closed?”
Tips for a Smooth Setup Experience
To ensure a smooth process when learning how to set up Chamberlain smart garage door opener, keep these helpful tips in mind:
- Strong Wi-Fi signal: Your garage should have at least 2 bars of Wi-Fi.
- Avoid metal obstructions: Metal surfaces may interfere with Bluetooth/Wi-Fi.
- Charge your phone fully: Setup can take 10–20 minutes.
- Firmware updates: Let the opener auto-update through the myQ app after pairing.
- Label your devices clearly if you have multiple smart garage doors.
Troubleshooting Setup Problems
Encountered a hiccup during installation? Here are a few common problems and solutions:
| Problem | Solution |
|---|---|
| Can’t connect to Wi-Fi | Ensure 2.4GHz network is used, restart router |
| LED not blinking | Hold the Learn button again for 6–10 seconds |
| App not detecting opener | Enable Bluetooth, restart both phone and device |
| Voice assistant not syncing | Re-authenticate accounts, relink myQ service |
| Door doesn’t respond | Check safety sensor alignment and door balance |
Benefits After Setup
Once you’ve finished setting up your Chamberlain smart garage opener, you unlock:
- Remote access from anywhere
- Real-time alerts and activity logs
- Guest sharing with digital keys
- Voice control with smart assistants
- Scheduled routines for safety and convenience
Plus, it adds significant value to your smart home ecosystem and boosts your home’s security profile.
Final Thoughts
Learning how to set up Chamberlain smart garage door opener is a game-changer for homeowners who want convenience, safety, and tech-savvy control over their garages. The step-by-step process is designed to be intuitive, even for users with limited technical skills. With the power of myQ and reliable Wi-Fi, managing your garage becomes easier than ever—whether you’re at home, at work, or on vacation.
Once your setup is complete, you’ll wonder how you ever lived without it.
Leave a Reply