If you’re looking for a reliable and efficient garage door opener, Chamberlain is one of the best brands on the market. Known for its durability, smart features, and smooth operation, a Chamberlain garage door opener can transform your home’s accessibility and security. But before you can enjoy the convenience, you need to know how to set up a Chamberlain garage door opener correctly. This comprehensive guide will walk you through everything you need to know to install, program, and troubleshoot your Chamberlain opener with ease.
Understanding Your Chamberlain Garage Door Opener
Chamberlain offers various models of garage door openers, from basic chain-drive units to advanced belt-drive models with smart home integration. Regardless of the model, the installation process shares many common steps. Before diving into the setup, it’s crucial to review the package contents and understand the basic components:
- Motor unit: The main opener that powers the garage door.
- Rail and trolley system: Connects the motor to the door.
- Remote control: Allows wireless operation.
- Wall control panel: Mounted inside the garage for manual control.
- Safety sensors: Prevent the door from closing on objects or people.
Having a solid grasp of these parts will make the setup smoother.
Read too: How Many Remotes Can A Chamberlain Garage Door Opener Have? Understaanding the Limits and Options
How To Set Up A Chamberlain Garage Door Opener: Step-by-Step Instructions
Setting up your Chamberlain garage door opener can seem daunting, but by following the right steps, you can complete the installation confidently and safely.
Step 1: Prepare Your Tools and Workspace
Before starting, gather necessary tools like a power drill, screwdrivers, a ladder, a tape measure, and pliers. Clear the garage space and disconnect any existing door opener to avoid confusion during installation.
Step 2: Assemble the Rail and Attach It to the Motor Unit
Most Chamberlain models come with a rail that needs to be assembled. Attach the rail to the motor unit as per the manufacturer’s instructions. Make sure the connections are tight and secure to avoid operational issues.
Step 3: Install the Motor Unit on the Ceiling
Find the proper mounting location on your garage ceiling, generally centered above the garage door. Use the provided mounting brackets and hardware to secure the motor unit. Ensure it is level and firmly attached to a solid structure like ceiling joists.
Step 4: Attach the Rail to the Wall Above the Garage Door
Using the included wall bracket, secure the end of the rail to the wall above the garage door. This step stabilizes the rail and keeps the trolley aligned correctly.
Step 5: Connect the Door Bracket and Attach the Door Arm
Attach the door bracket to your garage door’s top panel. Then, connect the door arm between the trolley on the rail and the door bracket. This connection is crucial for smooth door movement.
Step 6: Install the Safety Sensors
Chamberlain openers include safety sensors that need to be mounted on both sides of the door, about 6 inches above the floor. These sensors detect obstructions and stop the door from closing if something is in the way.
Step 7: Wire the Wall Control and Safety Sensors
Run the wires from the motor unit to the wall control panel and safety sensors. Follow the wiring diagram provided in the instruction manual to ensure proper connections. Proper wiring guarantees your opener will respond accurately to commands.
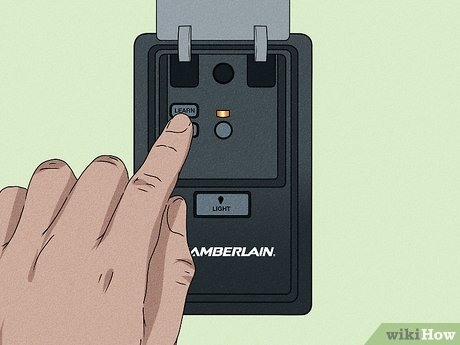
Step 8: Program Your Remote Controls and Wall Panel
This is a critical part of how to set up a Chamberlain garage door opener. Most models use a “Learn” button on the motor unit to sync remotes and wall controls. Press the Learn button, then press a button on the remote or wall control to program it. Repeat for any additional remotes.
Step 9: Test the Door Operation
After programming, test the garage door opener by using the remote and wall panel to open and close the door. Ensure the door operates smoothly without any jerks or unusual noises.
Step 10: Adjust the Travel and Force Settings
Use the adjustment screws on the motor unit to set the door’s travel limits (how far it opens and closes) and force (how much power it uses). Proper adjustment ensures safety and prevents damage to the door or opener.
Tips and Best Practices When Setting Up Your Chamberlain Garage Door Opener
- Read the Manual Carefully: Every Chamberlain model might have slight variations. Following the specific manual saves time and avoids mistakes.
- Check Safety Sensor Alignment: Misaligned sensors are a common cause of malfunction. Ensure the indicator lights on both sensors are steady.
- Keep the Area Clear: Make sure the garage door path is free of obstacles before testing.
- Use the Emergency Release Cord: Familiarize yourself with the red emergency release cord to manually operate the door during power outages.
- Consider Professional Help: If you’re unsure or uncomfortable with electrical wiring or heavy lifting, hiring a professional installer is always a good option.
Troubleshooting Common Issues with Your Chamberlain Garage Door Opener
Even with perfect setup, you might face occasional problems. Here are solutions to common issues:
- Door Doesn’t Respond to Remote: Reprogram the remote or replace the batteries.
- Opener Runs But Door Doesn’t Move: Check the door arm connection or the trolley system.
- Door Reverses Before Closing Completely: Adjust the force or travel limits; check sensor alignment.
- Safety Sensors Won’t Stop Door Closing: Clean the sensor lenses and realign them carefully.
- Motor Unit Doesn’t Turn On: Confirm power supply and circuit breaker status.
Conclusion: Mastering How To Set Up A Chamberlain Garage Door Opener
Setting up your Chamberlain garage door opener doesn’t have to be overwhelming. By following the detailed steps and paying close attention to safety and programming, you can have a fully functional garage door opener ready in a few hours. This installation not only adds convenience but also enhances the security of your home.
Remember, always refer to your model-specific manual and don’t hesitate to seek expert assistance if needed. With the right approach, you’ll enjoy hassle-free operation and the benefits of modern garage door technology.
Leave a Reply