How To Replace Worm Gear On Chamberlain Garage Door Opener? Garage door openers, especially those from trusted brands like Chamberlain, are built to last—but that doesn’t mean they’re immune to wear and tear. One of the most commonly worn-out parts in a Chamberlain garage door opener is the worm gear. This small but powerful component transfers rotational force from the motor to the main drive gear, which in turn moves the chain or belt that opens and closes the garage door.
Over time, the worm gear can wear down due to friction, heat, or poor lubrication. When this happens, the motor may run, but the garage door won’t budge. If this sounds like your situation, you’ve come to the right place. This detailed guide will walk you through how to replace worm gear on Chamberlain garage door opener—safely, correctly, and without needing to call a technician.
Read too: How Many Remotes Can A Chamberlain Garage Door Opener Have? Understaanding the Limits and Options
What Is a Worm Gear and What Does It Do?
The worm gear is part of a gear assembly inside your garage door opener’s motor housing. It resembles a threaded screw (the worm) that meshes with a round gear (commonly nylon) to convert high-speed motor rotation into torque powerful enough to lift and lower a garage door.
Why It Fails:
- Lack of lubrication
- Friction over time
- Extreme temperatures
- Excessive door weight
- Improper alignment or tension
These issues cause the worm gear’s teeth to wear down, resulting in system failure.
Signs You Need to Replace the Worm Gear
Before learning how to replace worm gear on Chamberlain garage door opener, it’s important to confirm that this is the issue. Common symptoms include:
- Motor runs, but the garage door does not move
- Loud grinding noises coming from the opener
- Burnt smell near the motor unit
- Plastic or metal shavings inside the opener casing
- Chain or belt remains stationary while motor hums
If your Chamberlain unit shows these symptoms, chances are your worm gear needs replacement.
Tools and Materials You’ll Need
To complete this repair job efficiently, gather the following items:
- Replacement worm gear kit (specific to your Chamberlain model)
- Phillips and flathead screwdrivers
- 1/4” nut driver or socket wrench
- Needle-nose pliers
- Snap ring pliers (optional but helpful)
- White lithium grease or silicone-based lubricant
- A clean rag or paper towels
- Ladder or step stool
- Safety gloves and goggles
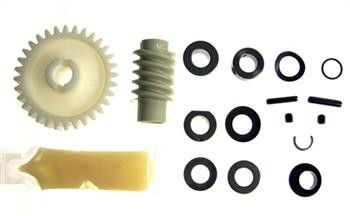
Make sure the replacement kit includes the worm gear, drive gear, bushings, washers, retaining clips, and a grease pack.
Safety Precautions Before You Start
Before diving into how to replace worm gear on Chamberlain garage door opener, take some crucial safety steps:
- Unplug the power to the garage door opener to avoid electric shock.
- Disengage the garage door from the opener by pulling the red emergency release cord.
- Secure the garage door in the closed position with locking pliers if necessary.
- Wear protective gloves and eyewear throughout the process.
Step-by-Step Guide: How To Replace Worm Gear On Chamberlain Garage Door Opener
This process will walk you through the entire worm gear replacement from disassembly to reassembly.
1: Remove the Opener Cover
Locate the screws on the housing cover (typically four to six) and remove them using a screwdriver or nut driver. Carefully take off the cover to expose the internal parts.
2: Locate the Worm Gear Assembly
The worm gear is usually attached directly to the motor shaft and positioned horizontally inside the opener. It resembles a small threaded rod made from plastic or metal.
3: Disconnect the Motor
You’ll need access to the worm gear shaft. Remove the motor mounting screws and carefully disconnect the motor from the internal frame. Unplug any wire connectors if needed (take a photo for reference when reconnecting later).
4: Remove the Old Worm Gear
- Pull off any retaining clips or snap rings using pliers.
- Slide out the worm gear shaft. Be mindful of bushings, washers, and spacers, which must be replaced in the correct order later.
- Clean the surrounding area with a rag to remove debris or worn gear shavings.
5: Install the New Worm Gear
- Apply a generous amount of white lithium grease to the new gear.
- Insert the gear shaft and secure it with any clips or washers included in the kit.
- Ensure the gear is correctly aligned with the motor and drive gear.
6: Reattach the Motor
Reinstall the motor to the opener frame and reconnect any wires or terminals using the reference photo. Make sure all screws are tightly fastened.
7: Reassemble the Opener Housing
Put the cover back in place and secure it using the original screws. Double-check that no components are left out and that everything is snug and aligned.
8: Reconnect Power and Test
Plug the opener back in. Pull the emergency release cord to re-engage the trolley and press the garage door opener button. If everything was done correctly, the door should now open and close smoothly.
Time and Difficulty Level
Replacing a worm gear typically takes about 1.5 to 2 hours for someone with moderate mechanical skills. It’s more complex than changing the drive gear but still achievable as a DIY project.
Post-Replacement Maintenance Tips
Now that you’ve learned how to replace worm gear on Chamberlain garage door opener, make sure your effort lasts by following these maintenance suggestions:
- Lubricate the gear assembly twice a year
- Keep the opener motor area clean and dry
- Inspect chain or belt tension every few months
- Use a surge protector for the opener to prevent electrical damage
Selecting the Right Worm Gear Kit
Before ordering a kit, check the model number of your Chamberlain opener (usually located on the back or side of the unit). Not all gear kits are universal. Look for a universal gear and sprocket kit compatible with your model or order directly from Chamberlain’s official parts catalog.
Most kits include:
- Worm gear
- Drive gear
- Helical gear (in some models)
- Bearings or bushings
- Snap rings and washers
- Grease packet
Common Mistakes to Avoid
- Forgetting to disconnect power – A dangerous oversight.
- Mixing up gear components – Lay out old parts as you remove them to remember their order.
- Using petroleum-based grease – These can degrade nylon gears.
- Not cleaning the motor shaft – Dirt or debris can prevent smooth gear operation.
Avoiding these errors ensures a long-lasting and safe repair.
When to Call a Professional
While this guide on how to replace worm gear on Chamberlain garage door opener is designed for DIYers, there are situations where professional help is recommended:
- If your opener is still under warranty (self-repair might void it)
- If you notice damaged motor components or a burnt smell
- If the gear failure was caused by electrical issues
Professional service can also verify proper opener alignment and motor calibration.
Final Thoughts: Master Your Garage Opener Repair
Understanding how to replace worm gear on Chamberlain garage door opener empowers you to handle one of the most common garage door opener failures. By following this guide, you save money, avoid downtime, and extend the life of your unit.
This repair may seem intimidating at first, but with the right tools, safety precautions, and a little patience, you’ll have your garage door opener working like new again in just a couple of hours.
Leave a Reply