Chamberlain garage door openers are known for their reliability and advanced features. However, like all mechanical and electronic systems, they can encounter issues over time. One of the most crucial components of a Chamberlain garage door opener is the logic board. This small yet powerful circuit board controls the entire operation of your garage door opener, from motor control to communication with remote controls. If your Chamberlain opener is malfunctioning, or the lights are blinking in a pattern indicating a logic board failure, you may need to replace the logic board. In this article, we will walk you through how to replace the logic board on a Chamberlain garage door opener so you can restore functionality to your garage door.
What is a Logic Board and Why is It Important for Your Chamberlain Garage Door Opener?
The logic board, also known as the control board, is the brain of your Chamberlain garage door opener. This board is responsible for processing signals from your remote control, safety sensors, and other components. It controls the operation of the motor, lights, and sensors, as well as managing communication between the opener and the remote. Without a properly functioning logic board, your garage door opener will not operate as expected, and you might experience issues such as:
- The garage door failing to open or close
- Unresponsive remotes or wall buttons
- Blinking lights or error codes
- Random door movements
Given the importance of the logic board in the overall operation of your opener, replacing it when it malfunctions is essential for the continued functionality of your garage door system.
How To Replace Logic Board On Chamberlain Garage Door Opener: Step-by-Step Guide
Step 1: Gather Tools and Materials
Before you start, it’s important to have all the necessary tools and replacement parts on hand to ensure the process goes smoothly. Here’s a list of what you’ll need:
- A replacement logic board compatible with your Chamberlain garage door opener model
- A screwdriver (usually Phillips or flathead depending on your opener model)
- A ladder to access the opener’s motor unit
- A wrench or socket set to remove screws or bolts
- A multimeter to test the electrical connections (optional)
- Electrical tape or zip ties for securing wires (optional)
- A small brush or can of compressed air for cleaning the logic board area
It’s important to ensure that the replacement logic board you purchase is specifically designed for your Chamberlain model. This information can usually be found in the owner’s manual or by checking the model number on the opener.
Step 2: Disconnect the Power to the Garage Door Opener
For safety reasons, before working on the logic board or any electrical components, you must disconnect the power. There are two ways to do this:
- Unplug the Opener: If your garage door opener is plugged into an electrical outlet, simply unplug it.
- Turn Off the Circuit Breaker: If the opener is hardwired into your home’s electrical system, you’ll need to turn off the circuit breaker that powers the garage door opener.
Make sure that the power is fully disconnected before proceeding to avoid the risk of electric shock or accidental activation of the opener.
Step 3: Access the Logic Board
The next step is to access the logic board. To do this, you’ll need to locate the motor unit of your Chamberlain garage door opener. This is usually installed on the ceiling of your garage. Once you’ve located the motor unit, follow these steps:
- Step 3A: Remove the cover: Most Chamberlain models have a cover that protects the logic board. Use a screwdriver to remove any screws securing the cover and carefully take it off. Some models may also have clips or latches, so be sure to check for those.
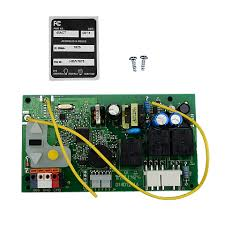
- Step 3B: Locate the logic board: Once the cover is removed, you should see the logic board mounted inside the opener. It is typically a rectangular circuit board with various wires connected to it.
Note that the logic board is usually secured with screws or bolts. You’ll need to remove these to free the logic board from the opener’s housing.
Step 4: Disconnect the Wiring
Before removing the old logic board, you must disconnect all the wires attached to it. Take note of where each wire is connected, as you’ll need to connect them to the new logic board later. It’s a good idea to take a photo or make a diagram of the wiring setup for reference.
- Step 4A: Disconnect the power wires: These wires are usually black (live) and white (neutral), and they connect the logic board to the electrical power supply.
- Step 4B: Disconnect the sensor and remote control wires: These may include wires from the safety sensors, wall buttons, or remote control receivers.
- Step 4C: Disconnect any other connections: Some models may have additional wires or connectors, such as lights or motor connections. Be sure to disconnect all of them carefully.
If you’re unsure about any of the wiring, refer to the user manual for guidance or consult a professional for help.
Step 5: Remove the Old Logic Board
Once all the wires are disconnected, you can remove the old logic board. Carefully unscrew or unclip the logic board from its mounting bracket, and gently lift it out of the opener. Be cautious when handling the board, as it can be delicate and easily damaged.
Dispose of the old logic board properly and keep the screws or bolts for installing the new one.
Step 6: Install the New Logic Board
Now it’s time to install the new logic board. Begin by positioning the new logic board in the same place as the old one. Use the screws or bolts that you removed earlier to secure the logic board in place. Make sure the board is mounted securely and that there is no chance of it moving around inside the opener.
- Step 6A: Connect the wires: Using the diagram or photo you took earlier, reconnect the wires to the corresponding terminals on the new logic board. Be sure to connect the power wires (black and white) first and then proceed with the other connections (safety sensors, remotes, etc.).
- Step 6B: Double-check the connections: Once all the wires are connected, ensure that each one is secure and there are no loose connections. Poor connections can lead to malfunction or even damage to the new logic board.
Step 7: Test the New Logic Board
Before replacing the cover and reattaching the opener’s components, it’s important to test the new logic board to ensure everything is working properly.
- Step 7A: Reconnect the power: Plug in the opener or turn the circuit breaker back on to restore power to the garage door opener.
- Step 7B: Test the opener: Use your remote or wall button to operate the garage door. The door should open and close smoothly, and the remote controls should be responsive.
If the garage door operates correctly, you’ve successfully replaced the logic board. If you encounter any issues, double-check the wiring and connections to make sure everything is secure.
Step 8: Reattach the Cover and Clean Up
Once the logic board is functioning correctly, replace the cover or any other components you removed from the opener. Secure the cover with screws or clips, and ensure everything is tightly fitted to prevent dust or debris from entering the opener.
Clean up your tools and any debris from the work area, and dispose of the old logic board safely.
How To Replace Logic Board On Chamberlain Garage Door Opener: Troubleshooting Tips
If you encounter any issues after replacing the logic board, here are a few troubleshooting tips:
- Check the Wiring: Ensure all wires are connected to the correct terminals. If in doubt, consult the user manual for your specific model.
- Test the Power Supply: If the logic board isn’t powering up, check your home’s circuit breaker or fuse to make sure the opener is receiving power.
- Inspect the Remote Controls: If the remotes aren’t working, try resetting the opener by holding down the “learn” button on the opener unit and reprogramming the remotes.
Conclusion
Replacing the logic board on your Chamberlain garage door opener may seem like a complicated task, but with the right tools and some careful attention to detail, you can restore your garage door’s functionality in no time. Always follow safety procedures, take note of the wiring connections, and don’t hesitate to consult the user manual or a professional if needed.
By following the steps outlined in this guide, you can ensure that your Chamberlain garage door opener continues to serve you reliably for years to come.
Leave a Reply