How To Replace Drive Gear On Chamberlain Garage Door Opener? A Chamberlain garage door opener is a reliable piece of equipment found in millions of homes. But like all mechanical systems, parts can wear out over time—especially the drive gear, which is a common failure point. If you’ve noticed your garage door opener motor runs but the door doesn’t move, your drive gear might be stripped.
In this article, we’ll teach you how to replace drive gear on Chamberlain garage door opener safely and efficiently. This guide is perfect for DIYers and homeowners who want to save on repair costs while gaining the satisfaction of fixing things themselves.
Read too: How Many Remotes Can A Chamberlain Garage Door Opener Have? Understaanding the Limits and Options
What is a Drive Gear and What Does It Do?
The drive gear is a central component inside your Chamberlain garage door opener that transfers the motor’s power to the chain or belt, which then moves the door. Over time, this gear—usually made of nylon—can wear down due to friction and stress.
Symptoms of a Worn Drive Gear:
- Motor runs but the door doesn’t move
- Grinding noise inside the opener
- Visible plastic shavings inside the opener cover
- Chain or belt remains stationary during motor operation
When these signs appear, it’s time to learn how to replace drive gear on Chamberlain garage door opener.
Tools and Materials You’ll Need
Before you start, gather the following tools and supplies:
- Replacement drive gear kit (ensure it’s compatible with your Chamberlain model)
- Flathead screwdriver
- Phillips screwdriver
- 1/4″ nut driver or socket set
- Adjustable wrench
- Needle-nose pliers
- White lithium grease or similar lubricant
- Clean rag
- Ladder or step stool
- Safety glasses and gloves
Having everything ready will make the process smoother and safer.
Safety First: What to Do Before You Begin
Before jumping into how to replace drive gear on Chamberlain garage door opener, it’s crucial to prioritize safety.
- Unplug the opener: This avoids any risk of electric shock or unexpected motor movement.
- Disconnect the garage door: Pull the emergency release cord to disengage the opener from the door.
- Check for tension: If your unit has torsion springs, avoid adjusting or touching them, as they can be dangerous under tension.
Step-by-Step: How To Replace Drive Gear On Chamberlain Garage Door Opener
Now that you’re prepped, let’s dive into the main process.
1: Remove the Outer Cover
Use a screwdriver or socket wrench to remove the screws holding the motor cover. Carefully pull off the cover to reveal the internal components.
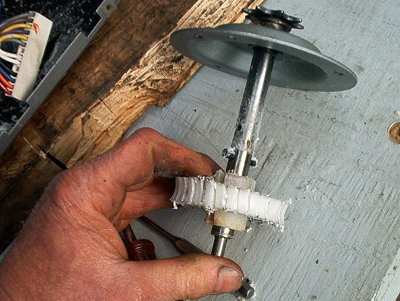
2: Locate the Drive Gear Assembly
The drive gear is usually located in the center of the opener, connected to the motor shaft and surrounded by the helical gear or worm gear. Inspect it—if the teeth are worn smooth or broken, it’s confirmed that a replacement is needed.
3: Remove the Old Gear
- Detach the chain/belt from the gear sprocket.
- Use pliers or a wrench to remove the gear retainer clip.
- Slide the old gear out from its shaft. Be cautious of washers or bushings that may fall out.
- Clean the area thoroughly using a rag to remove old grease and plastic debris.
4: Install the New Drive Gear
- Apply fresh lubricant to the new gear.
- Slide it into place, ensuring alignment with the motor shaft.
- Secure it with the retainer clip or screws as per your model.
- Reattach any washers or spacers in the correct order.
5: Reconnect Chain or Belt
Ensure the chain or belt is tensioned properly after reconnecting it to the sprocket. A too-tight or too-loose chain can lead to additional wear or operational issues.
6: Replace the Cover and Test
Put the cover back on, secure it with screws, and plug in the opener. Reconnect the garage door to the opener using the emergency release mechanism.
Now test the opener. The door should move smoothly, and any grinding sounds should be gone.
How Long Does the Replacement Take?
Replacing a drive gear typically takes 60–90 minutes for someone with basic mechanical skills. If it’s your first time, give yourself about two hours.
Maintenance Tips After Replacement
After learning how to replace drive gear on Chamberlain garage door opener, it’s good to adopt a few maintenance habits:
- Lubricate moving parts every six months
- Check chain or belt tension regularly
- Listen for unusual noises during operation
- Inspect gear condition annually
Doing so can significantly extend the life of your new drive gear.
Choosing the Right Drive Gear Kit
Make sure the gear replacement kit matches your Chamberlain model number. Most kits come with:
- Nylon drive gear
- Helical gear
- Grease packet
- Roll pins or retaining clips
- Replacement bushings
If you’re unsure which kit fits your model, refer to your opener’s manual or look up the model online.
When to Call a Professional
While this guide shows how to replace drive gear on Chamberlain garage door opener at home, some cases may warrant professional help:
- If your opener has complex electronics
- If you’re uncomfortable working with tools
- If other parts (like circuit boards) are also damaged
Calling a certified technician can be the safer route if you’re unsure about your ability to complete the repair.
Environmental Considerations
Dispose of the old gear properly—many recycling centers accept small mechanical parts. Avoid throwing them into general waste, especially if lubricants are still on them.
Common Mistakes to Avoid
- Skipping the unplug step – Always cut power to avoid electrical accidents.
- Not cleaning debris – Leftover plastic can cause future mechanical failure.
- Incorrect gear alignment – Leads to premature wear and poor performance.
- Using the wrong grease – Always use non-petroleum-based lubricants suitable for plastic.
Conclusion: Get More Life Out of Your Garage Opener
Now that you know how to replace drive gear on Chamberlain garage door opener, you can save time, money, and frustration. With the right tools, a bit of patience, and a focus on safety, this common repair is absolutely achievable for most homeowners.
Performing your own repairs not only restores function but also builds your confidence in maintaining other home systems.
Leave a Reply