Garage door openers are essential for the smooth operation of your garage door, and Chamberlain is a popular brand known for its durability and reliability. However, like all mechanical systems, even the best garage door openers will eventually experience wear and tear. One of the most common parts to need replacement is the drive belt. If you’re experiencing a slipping or broken drive belt on your Chamberlain garage door opener, you might be wondering how to replace it.
In this article, we will guide you through the process of replacing the drive belt on your Chamberlain garage door opener. We’ll explain the necessary tools, step-by-step instructions, and helpful tips to make sure the job is done efficiently and correctly. Whether you’re a seasoned DIYer or this is your first time working on a garage door opener, this guide will walk you through everything you need to know.
Why You Might Need to Replace the Drive Belt on Your Chamberlain Garage Door Opener
Before diving into the replacement process, it’s important to understand why the drive belt may need replacement in the first place. Over time, your garage door opener’s drive belt can wear out due to constant use, exposure to dust and dirt, and environmental factors such as temperature changes. Some common signs that indicate it’s time to replace the drive belt include:
- Slipping or Sticking: The door may fail to open or close smoothly, or you may hear grinding noises.
- Visible Damage: The belt may appear cracked, frayed, or have broken sections.
- No Movement: If the door doesn’t respond when you try to open or close it, the belt might have snapped.
- Unusual Noises: Squealing or screeching sounds during operation could indicate a problem with the belt.
If you notice any of these issues, it’s best to replace the drive belt sooner rather than later to avoid further damage to your garage door opener system.
How To Replace Drive Belt On Chamberlain Garage Door Opener: Step-by-Step Guide
Replacing the drive belt on your Chamberlain garage door opener may seem like a daunting task, but with the right tools and instructions, it can be a manageable DIY project. Here’s a detailed step-by-step guide to help you get the job done.
Tools and Materials Needed
Before beginning, gather the necessary tools and materials to ensure a smooth replacement process. You will need:
- Replacement Drive Belt: Make sure to purchase the correct belt for your Chamberlain model. The product manual or Chamberlain’s website can help you identify the right one.
- Ladder: To reach the garage door opener mounted on the ceiling.
- Socket Wrench Set: For removing bolts and screws.
- Screwdrivers: A flathead and Phillips screwdriver will be useful for removing fasteners.
- Pliers: To help with gripping and removing certain parts.
- Utility Knife or Scissors: If you need to cut or trim the old belt.
- Lubricant: To lubricate moving parts during reassembly and ensure smooth operation.
Step 1: Disconnect Power and Safety Precautions
Safety is always the top priority when working on garage door openers. Begin by disconnecting the power supply to your Chamberlain garage door opener. This can be done by either unplugging the opener or switching off the circuit breaker to the garage door opener. This ensures you don’t accidentally activate the door while you’re working on it.
Next, place the ladder underneath the opener and ensure that it’s stable and secure. You’ll be working overhead, so take extra care to maintain your balance and use proper lifting techniques.
Step 2: Remove the Cover of the Garage Door Opener
The next step is to remove the cover of your Chamberlain garage door opener to gain access to the internal components, including the drive belt. Using a screwdriver, remove the screws that hold the cover in place. Once the screws are removed, gently pull the cover off. If the cover is stubborn, gently wiggle it until it comes free.
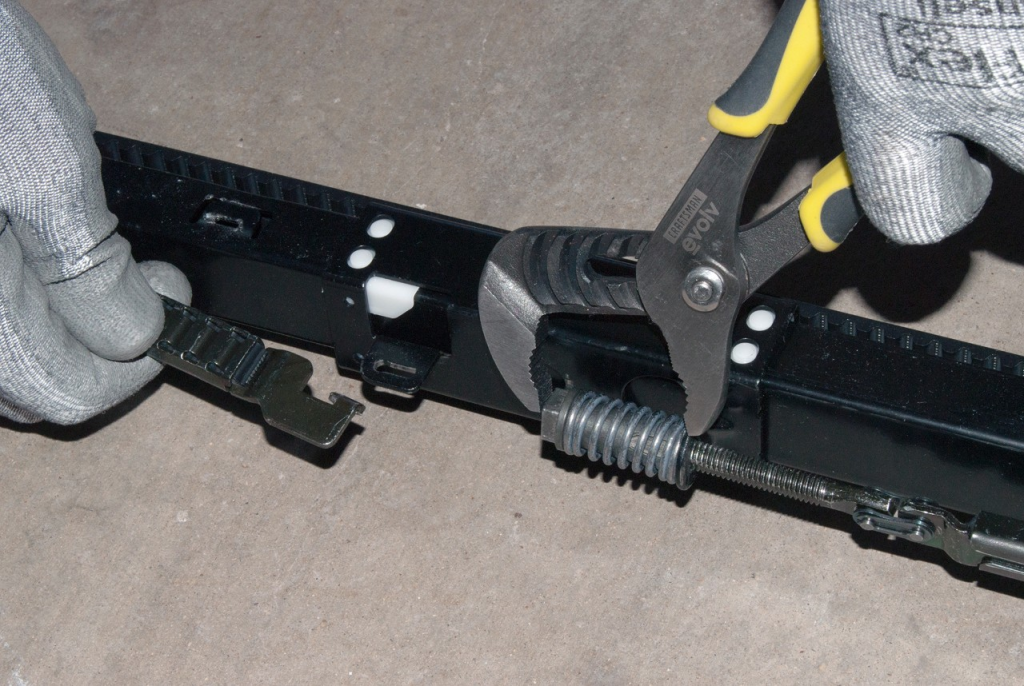
Step 3: Loosen the Tension on the Old Drive Belt
The drive belt is under tension to ensure the door moves smoothly. Before removing the old belt, you need to relieve the tension. Look for the tension adjustment bolts or knobs on either side of the opener. These are typically located near the motor unit.
Using a socket wrench, loosen the tension bolts slowly to release the pressure on the belt. Be cautious during this process to avoid any sudden movements or snapping of the belt.
Step 4: Remove the Old Drive Belt
With the tension released, it’s time to remove the old drive belt. Depending on your Chamberlain model, there may be a few screws or bolts securing the belt to the pulleys or motor. Use a socket wrench and screwdriver to remove these fasteners.
Once the fasteners are removed, carefully slide the old drive belt out of the pulleys and motor. If the belt is damaged, you may need to use pliers to help remove it. If the belt is intact but worn out, be mindful of any debris or dust that may have accumulated on the old belt.
Step 5: Install the New Drive Belt
Now, it’s time to install the new drive belt. Begin by threading the new belt around the pulleys, making sure that it is aligned correctly. The belt should sit securely in place without twisting or overlapping.
Once the belt is in position, carefully attach it to the motor and other components by securing the fasteners back into place. Be sure to follow the manufacturer’s instructions to ensure the belt is attached properly.
Step 6: Adjust the Tension on the New Drive Belt
Once the new drive belt is installed, you’ll need to adjust the tension. This step is crucial because the correct tension ensures that the door opens and closes smoothly.
Using the tension adjustment bolts, tighten the belt gradually. It should feel firm but not overly tight. You want the belt to be taut enough to operate effectively but not so tight that it strains the motor or other components.
Step 7: Test the Garage Door Opener
With the new drive belt installed and the tension properly adjusted, it’s time to test the garage door opener. Plug the opener back into the power source and turn the circuit breaker back on.
Test the door by pressing the button to open and close it. Observe how the door moves – it should open and close smoothly without any strange noises. If the door operates properly, you’ve successfully replaced the drive belt!
Step 8: Reassemble the Opener and Final Check
Once the new drive belt is working correctly, replace the cover of the garage door opener and secure it with the screws you removed earlier. Take a final look to ensure everything is in place and there are no loose parts.
Troubleshooting Tips:
If you encounter any issues during the replacement process or notice unusual behavior after replacing the belt, here are some troubleshooting tips:
- Excessive Noise: If the door makes grinding or squeaking noises, the belt might not be properly aligned or tensioned.
- Door Not Moving Smoothly: Ensure the tracks and rollers are clean and properly lubricated. If the opener struggles to lift the door, check the motor’s performance.
- Broken Belt: If the belt snaps again soon after installation, check the weight of the door or look for obstructions in the tracks.
Conclusion
Replacing the drive belt on your Chamberlain garage door opener is a straightforward task if you follow the correct steps. By taking your time and carefully following the instructions, you can restore your garage door opener to full functionality without the need for a professional technician.
Remember to regularly maintain your garage door opener by checking the belt for wear and keeping the motor and tracks lubricated. This will extend the lifespan of your garage door opener and keep it operating smoothly for years to come.
Leave a Reply