Garage door openers are essential for convenience and security, but when the circuit board in your Chamberlain garage door opener malfunctions, it can halt your garage door’s operation entirely. A damaged or malfunctioning circuit board often manifests through issues like the door not responding to commands, the opener running without stopping, or a complete failure to operate. While this might seem like a daunting issue, replacing the circuit board in your Chamberlain garage door opener can be a straightforward task, as long as you follow the right steps.
This guide will walk you through the process of replacing the circuit board in your Chamberlain garage door opener, providing step-by-step instructions, necessary precautions, and tips to make the replacement easy. Whether you’re dealing with a faulty circuit board or upgrading your system, this article will help you understand everything you need to know to replace the circuit board effectively.
Read too: How Many Remotes Can A Chamberlain Garage Door Opener Have? Understaanding the Limits and Options
Why Should You Replace the Circuit Board in Your Chamberlain Garage Door Opener?
The circuit board in your Chamberlain garage door opener is responsible for controlling several key functions, including the opening and closing of the door, safety mechanisms, and communication between the opener and remote controls. If your garage door opener starts acting erratically or stops working altogether, a malfunctioning circuit board may be the culprit.
Some common signs that indicate you may need to replace the circuit board in your Chamberlain garage door opener include:
- The door doesn’t open or close when you press the remote button or wall switch.
- The opener runs continuously without responding to commands.
- Strange clicking or buzzing sounds from the opener unit.
- The door reverses or stops halfway during operation.
Replacing the circuit board restores your garage door opener’s functionality, but this task requires some basic knowledge of electrical components and the proper tools. Let’s dive into the process of replacing the circuit board.
How to Replace Circuit Board in Garage Door Opener Chamberlain: A Step-by-Step Guide
Replacing the circuit board in a Chamberlain garage door opener is not a difficult task if you follow the proper steps. Below is a comprehensive guide that covers all the necessary actions to replace the faulty circuit board.
1. Gather Your Tools and Replacement Parts
Before starting the replacement, ensure you have the following tools and materials:
- Replacement circuit board: Make sure to get the correct part for your Chamberlain garage door opener model.
- Screwdrivers (Phillips and flathead)
- Socket wrench
- Multimeter (optional, for testing)
- Rubber gloves (for safety)
- Step ladder (if needed for reaching the unit)
- Tape or marker (for labeling wires)
Ensure that you have the correct replacement circuit board that matches your model. Chamberlain openers vary in design, so using the correct part is crucial for proper operation.
2. Disconnect the Power Supply
Safety should always come first when working with electrical components. Before replacing the circuit board in your Chamberlain garage door opener, unplug the opener from the power source or switch off the circuit breaker that powers it. This prevents any electrical hazards while you’re working.
3. Remove the Cover of the Opener Unit
Locate your Chamberlain garage door opener unit, which is usually mounted on the ceiling of your garage. You’ll need to remove the cover to access the internal components.
- Use a screwdriver to remove any screws securing the cover.
- Lift the cover off gently to expose the internal parts, including the circuit board, motor, and wiring.
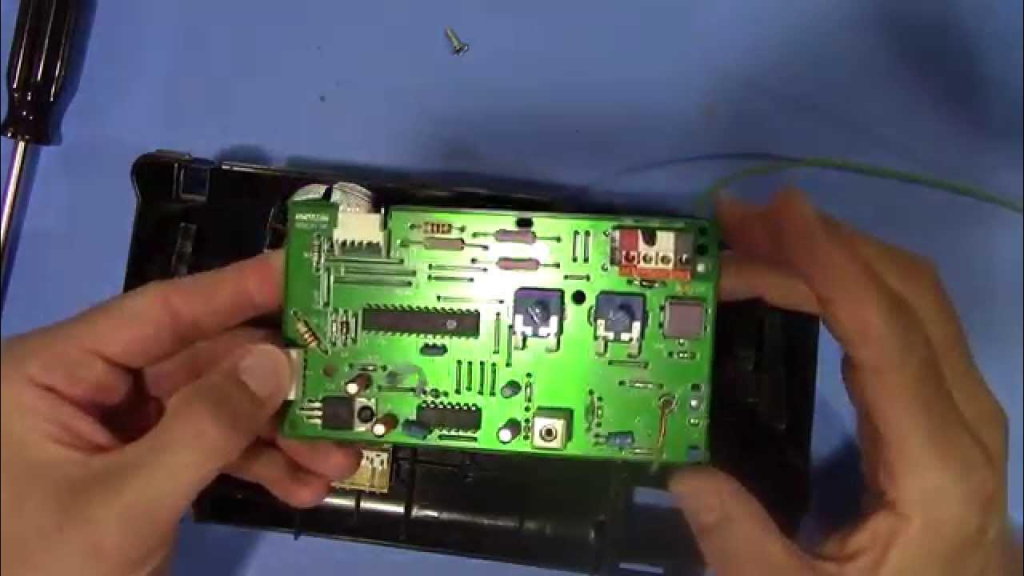
4. Locate the Faulty Circuit Board
Now that the cover is removed, you should be able to see the circuit board inside the opener unit. It is usually located near the top or side of the opener housing and is connected to several wires.
- Identify the faulty circuit board by inspecting it for visible damage, such as burnt areas, damaged capacitors, or broken components.
- If you suspect the circuit board is malfunctioning but can’t see any visible damage, you can use a multimeter to test the components for continuity.
5. Disconnect the Wires from the Old Circuit Board
Before removing the circuit board, you need to disconnect the wires that are connected to it. Take note of where each wire is connected, as you’ll need to reattach them to the new circuit board in the same locations.
- Label the wires with tape or a marker to remember which wire goes where.
- Use a flathead screwdriver or your fingers to disconnect the wires gently.
- Take a photo of the connections for reference.
6. Remove the Faulty Circuit Board
Once the wires are disconnected, you can proceed to remove the faulty circuit board.
- Loosen any screws or bolts that are holding the circuit board in place.
- Remove the circuit board carefully from the unit. Be cautious not to damage any surrounding components.
- Check for any other issues before proceeding with the new installation, such as damaged wiring or other components.
7. Install the New Circuit Board
Now that the old circuit board is removed, it’s time to install the new one.
- Place the new circuit board into the same position where the old board was located.
- Secure the circuit board with screws or bolts as necessary to hold it in place.
- Reconnect the wires to the new circuit board in the same order that you noted earlier. Make sure the connections are secure and tight.
8. Test the New Circuit Board
After installing the new circuit board, it’s important to test it to ensure everything is working correctly.
- Reconnect the power supply to the opener.
- Test the garage door opener by using the wall control or remote. The door should open and close smoothly without any issues.
- Listen for any abnormal sounds or issues. If the door operates correctly, then the replacement is successful.
9. Reattach the Cover
Once the new circuit board is installed and the opener is working, it’s time to reattach the cover.
- Place the cover back onto the opener unit.
- Screw it back into place to secure it.
- Clean up your workspace, removing any tools or debris from the area.
Troubleshooting After Replacing the Circuit Board
If the garage door opener still isn’t functioning correctly after replacing the circuit board, consider these troubleshooting steps:
- Check the wiring: Ensure all wires are securely connected and there are no loose connections.
- Check the power supply: Ensure the opener is receiving power and the circuit breaker is turned on.
- Test with a multimeter: Use a multimeter to check for continuity on the circuit board and other components.
If the issues persist, it might be necessary to check for other internal components that could be faulty or consult a professional.
Conclusion
Replacing the circuit board in your Chamberlain garage door opener is an essential skill for DIY homeowners who want to save money on repairs. By following this step-by-step guide, you can restore your opener’s functionality and ensure that your garage door operates smoothly again. Remember to always prioritize safety and use the proper tools and parts when performing this replacement.
By keeping up with regular maintenance and addressing issues promptly, you can extend the life of your Chamberlain garage door opener and avoid costly repairs.
Leave a Reply