How To Replace A Chamberlain Wall Mount Garage Door Opener? Replacing your Chamberlain Wall Mount Garage Door Opener might seem like a daunting task, but with the right tools, instructions, and a little patience, you can easily handle this home improvement project yourself. The wall mount system is unique because it is mounted on the wall rather than the ceiling, saving space and giving your garage a cleaner look. Whether your current opener is malfunctioning, outdated, or you’re upgrading to a newer model, this guide will walk you through the process of replacing your Chamberlain wall mount garage door opener.
In this article, you’ll find everything you need to know about replacing your Chamberlain wall mount garage door opener, including the necessary tools, the step-by-step procedure, and helpful tips to ensure a smooth installation. Let’s dive in!
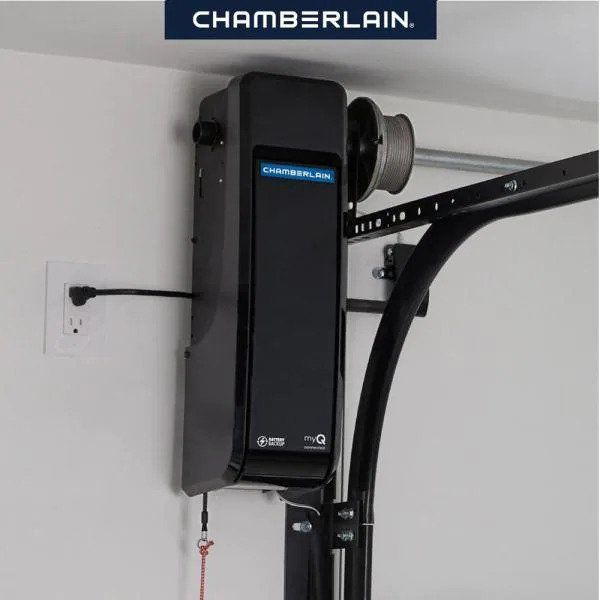
What is a Chamberlain Wall Mount Garage Door Opener?
A Chamberlain wall mount garage door opener is an advanced garage door system that operates by mounting the opener on the wall rather than on the ceiling. This type of opener is often favored for its space-saving design and quieter operation, making it ideal for garages with low ceilings or those with storage systems that take up ceiling space.
Unlike traditional garage door openers, the Chamberlain wall mount opener is more compact and works by using a motor that directly drives the garage door via a rail and trolley system. Replacing this system requires some technical knowledge, but with this guide, you’ll be able to complete the installation in no time.
How to Replace a Chamberlain Wall Mount Garage Door Opener
Replacing a Chamberlain wall mount garage door opener involves several key steps. Whether you’re upgrading to a new model or replacing a faulty unit, follow these steps for a successful installation:
1. Gather the Necessary Tools and Materials
Before you begin, make sure you have the proper tools and materials needed for the job. Having everything prepared in advance will make the process much smoother. Here’s a list of tools you will need:
- New Chamberlain Wall Mount Garage Door Opener
- Ladder (for accessing the wall mount and garage door opener)
- Socket set and wrenches
- Screwdrivers (Phillips and flathead)
- Tape measure
- Level
- Pencil
- Drill with bits
- Stud finder
- Safety glasses
- Gloves
Make sure to wear safety gear to avoid injury during the installation process, as you will be handling tools and working in a high area.
Read too: How Many Remotes Can A Chamberlain Garage Door Opener Have? Understaanding the Limits and Options
2. Remove the Old Garage Door Opener
If you’re replacing an existing Chamberlain wall mount garage door opener, the first step is to remove the old unit. Follow these instructions:
- Disconnect the Power: Start by unplugging the old opener from the power outlet to avoid any electrical hazards. If your system is hardwired, turn off the circuit breaker.
- Disengage the Garage Door from the Opener: Manually lift the garage door until it’s fully open. Disengage the door from the opener’s drive system by pulling the emergency release cord (usually a red cord hanging from the trolley).
- Remove the Wall-Mounted Bracket: Use a wrench or screwdriver to loosen and remove any screws securing the wall-mounted bracket to the wall. This bracket holds the opener motor in place.
- Take Down the Opener Motor: Once the bracket is detached, remove the motor unit carefully. You may need a ladder to access it. Have a partner help if the motor is heavy.
- Disconnect the Power and Wiring: If the opener is connected to a power supply or has any wiring, disconnect it by unscrewing the connections.
- Remove the Rail and Trolley System: The rail system that connects the opener motor to the garage door needs to be removed next. Unscrew and detach any parts that are fastened to the garage door track.
- Clear the Area: Once all parts are removed, clean the area and ensure there’s no debris or leftover parts that could interfere with the new opener installation.
3. Prepare for the New Opener Installation
Before installing your new Chamberlain wall mount garage door opener, it’s essential to ensure that the area is ready. Follow these steps:
- Install the Wall Mount Bracket: Attach the new wall mount bracket where the old one was located. Use a level to ensure that the bracket is straight. Mark the positions for the screws using a pencil, then drill pilot holes and attach the bracket using screws.
- Check the Door’s Balance: Before installing the new opener, check that the garage door is properly balanced. Manually open and close it to ensure that it moves smoothly. If there are any issues with the balance or door tracks, fix them before proceeding.
- Install the New Rail and Trolley System: Assemble the new rail and trolley system according to the instructions provided by the manufacturer. Attach the trolley system to the garage door and make sure that it moves freely along the track.
4. Install the New Chamberlain Wall Mount Garage Door Opener
Once your garage door and wall mount are prepared, it’s time to install the new opener:
- Mount the Motor Unit: Carefully lift the motor unit and position it on the newly installed wall mount bracket. Make sure it’s securely fastened and level.
- Attach the Drive Rail: Connect the rail system to the motor unit, making sure that the trolley is aligned with the tracks. Ensure that the drive system is aligned properly and operates smoothly.
- Connect the Wiring: Reconnect the power wiring if necessary. Follow the manufacturer’s instructions for making the electrical connections. If the opener is hardwired, ensure that the connections are secure and insulated properly.
- Test the Garage Door Movement: Once everything is connected, test the door by using the remote control or wall button to operate the door. Ensure that it opens and closes smoothly and without any obstructions.
5. Program the New Opener
To finish the installation, you’ll need to program your new Chamberlain wall mount garage door opener:
- Program the Remote Control: Press the “Learn” button on the opener’s motor unit and then press the button on your remote control to pair it with the opener.
- Set the Limits: Set the open and close limits on the opener. This ensures that the door stops at the correct height when fully open or closed.
- Test the Remote and Wall Control: Once programmed, test both the remote and wall control to make sure they work correctly. Adjust settings if needed.
- Final Safety Check: Check the safety features of the opener, such as the auto-reverse mechanism and sensors. Test the door by closing it and ensuring that it reverses if it detects an obstacle.
Tips for a Successful Replacement
- Take Your Time: Replacing a wall mount garage door opener can be a complex process. Take your time to ensure everything is installed properly and that all components are securely attached.
- Follow Manufacturer Instructions: Always follow the specific instructions provided by the manufacturer for your model of opener. This ensures a safe and proper installation.
- Get Help When Needed: If you’re dealing with a heavy motor unit or are unsure about handling electrical connections, don’t hesitate to ask for help from a friend or a professional.
Conclusion
Replacing your Chamberlain wall mount garage door opener can be a rewarding project that not only enhances the functionality of your garage but also adds value to your home. By following this comprehensive guide, you can confidently replace your opener and enjoy smooth, reliable performance for years to come.
Remember to gather the necessary tools, remove the old unit carefully, and follow the manufacturer’s instructions for the new opener. Don’t forget to test the opener and adjust the settings for optimal performance.
Leave a Reply