When dealing with Chamberlain garage door openers, one of the most crucial components for programming and syncing remotes, keypads, and other accessories is the Learn button. The Learn button enables you to sync your devices with the opener, allowing for seamless and secure access to your garage. Without this button, it would be difficult to set up additional remotes or resolve issues with your opener.
However, many people often find it challenging to locate or reach the Learn button on their Chamberlain garage door opener, especially when the opener is installed in a high or difficult-to-reach spot. In this article, we will explain how to reach the Learn button on a Chamberlain garage door opener, its function, and how to use it effectively.
Read too: How Many Remotes Can A Chamberlain Garage Door Opener Have? Understaanding the Limits and Options
Understanding the Learn Button on Chamberlain Garage Door Openers
The Learn button is a small but critical component on your Chamberlain garage door opener that plays a vital role in the programming process. It is designed to “teach” or sync devices such as remotes, keypads, or additional openers to your main garage door system. This makes it essential to know exactly where the Learn button is and how to reach it when setting up or troubleshooting your system.
There are a few things to know about the Learn button:
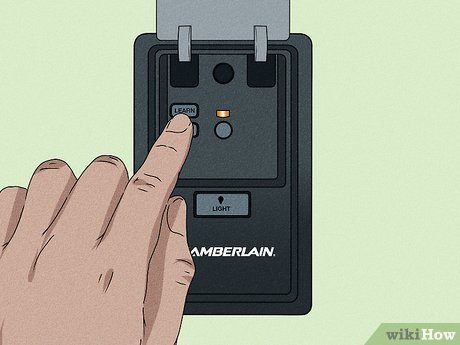
- Location: The Learn button is typically located on the garage door opener motor unit, which is mounted on the ceiling of the garage. The exact location may vary depending on your model, but it is generally found near the light cover or antenna.
- Color of the Learn Button: Chamberlain uses different colored buttons for different opener models, including red, yellow, green, and purple. The color helps identify the type of system you have and assists with troubleshooting and programming compatibility.
- Function: Pressing the Learn button activates a learning mode, which allows your opener to “learn” the signal from a remote, keypad, or other wireless device.
Understanding how to access and use this button is essential for programming and troubleshooting any issues with your Chamberlain system.
How To Reach Learn Button On Chamberlain Garage Door Opener – A Step-by-Step Guide
Now that you know the purpose of the Learn button, let’s dive into the steps you need to take to reach it and make use of its functions.
Step 1: Get Ready and Prepare the Area
Before you attempt to locate the Learn button, take a moment to prepare the area. This ensures safety and helps avoid accidents during the process.
- Gather the necessary tools: In many cases, a ladder will be required to reach the garage door opener if it is installed high up. Make sure your ladder is stable and placed securely.
- Clear the space: Ensure that there are no obstructions around the garage door opener that could hinder your access to the Learn button.
- Safety precautions: Always be cautious when working around electrical devices. Make sure the garage door opener is turned off, or better yet, unplugged while you’re working on it.
Step 2: Identify the Location of the Learn Button
Once you’ve prepared the area and gathered the necessary tools, the next step is to locate the Learn button. As mentioned, the button is usually located on the motor unit of the garage door opener. Here’s how you can find it:
- Look near the light cover: The Learn button is often located just behind the light cover on the opener motor. The light cover is typically clear, and you may need to remove it or adjust it to expose the button.
- Check near the antenna: In some models, the Learn button can be found next to the antenna. This is another common spot for the button.
- Different button colors: As previously mentioned, the color of the Learn button can vary. Be sure to check the user manual for your specific Chamberlain model to identify which color Learn button your system has.
Step 3: Use the Ladder to Reach the Learn Button
If your Chamberlain garage door opener is installed at a height, using a ladder is often necessary to access the Learn button. Here’s how to safely reach it:
- Set up a stable ladder: Ensure that your ladder is tall enough to allow you to comfortably reach the opener motor.
- Climb the ladder carefully: Always make sure that the ladder is stable before climbing. Use both hands to steady yourself while ascending.
- Locate the button: Once you are at a safe height, look for the Learn button near the light cover or antenna, as described earlier.
Step 4: Press the Learn Button to Activate the Programming Mode
Once you’ve successfully reached the Learn button, you can now begin the programming or syncing process.
- Press the Learn button: For programming, simply press and release the Learn button. The LED light next to the button will begin to blink, indicating that the opener is in programming mode.
- Follow the instructions: Depending on what you are programming (e.g., a remote or keypad), follow the appropriate steps outlined in your manual. The blinking light will remain active for about 30 seconds, giving you enough time to sync your devices.
Step 5: Complete the Setup or Troubleshooting Process
After pressing the Learn button and entering programming mode, follow the instructions to program your remote or keypad. If you’re troubleshooting an issue, such as the opener not responding to your remote, you may need to reset the system by pressing and holding the Learn button for several seconds to erase all programmed devices.
After completing the setup, make sure to test the system to ensure that everything is working correctly. You may need to repeat the programming process if the system doesn’t respond on the first try.
Troubleshooting: What to Do if You Can’t Reach the Learn Button
If you’re having trouble accessing the Learn button, there are a few things you can try:
- Check your ladder: If the ladder isn’t tall enough or stable, it may prevent you from accessing the button. Consider using a taller, more stable ladder or having a second person assist you.
- Use a step stool or extension pole: If your opener is installed too high for a ladder, a step stool or an extension pole with a hook might help you reach the Learn button.
- Consider relocating the opener: If the button is placed in an awkward spot or the ladder doesn’t allow you to reach it safely, you might consider relocating the garage door opener to a more accessible location. This is a more involved solution but can be useful in the long run.
Why Knowing How to Reach the Learn Button Is Important
The Learn button is integral to the functionality of your Chamberlain garage door opener. Without it, programming and troubleshooting would be difficult. Whether you’re syncing a new remote or keypad, or performing general maintenance on your system, the Learn button is your gateway to managing your garage door’s functionality.
Knowing how to reach the Learn button and understanding its role in programming can save you a lot of time and effort when setting up or troubleshooting your garage door system.
Conclusion: Mastering the Learn Button for Seamless Operation
In conclusion, understanding how to reach the Learn button on your Chamberlain garage door opener is crucial for successfully programming your opener and maintaining its performance. By following the steps outlined in this guide, you’ll be able to easily locate and access the Learn button, enabling you to sync remotes, keypads, and other devices with your system.
Remember, safety is key when working around high-mounted devices like garage door openers. If you’re unable to safely reach the Learn button, consider using a taller ladder or asking for assistance. Once you have access to the button, programming and troubleshooting will become a straightforward task that ensures your garage door works as intended.
By mastering the Learn button, you will have greater control over your garage door system, enhancing both security and convenience in your daily routine.
Leave a Reply