How To Program Travel Limits On Chamberlain Garage Door Opener? A properly functioning garage door opener is crucial for the safety and convenience of your home. One of the key features in maintaining an efficient and safe garage door is ensuring that the travel limits on your Chamberlain garage door opener are correctly programmed. These travel limits control the distance your garage door travels when opening and closing, ensuring it operates smoothly and safely.
In this article, we will walk you through the step-by-step process of how to program travel limits on Chamberlain garage door opener. This guide is designed for homeowners who want to ensure their garage doors function optimally, avoid damage to the opener, and keep the system running smoothly for years to come.
What Are Travel Limits?
Before diving into the programming process, it’s essential to understand what travel limits are and why they are important for your Chamberlain garage door opener.
Travel limits refer to the positions the garage door reaches when opening or closing. The opener is programmed to stop the door at specific points during its cycle—usually the fully open and fully closed positions. Properly adjusting the travel limits ensures that:
- The door opens and closes completely without damaging the opener or the door itself.
- The door does not continue to move after reaching its full open or closed position, preventing unnecessary wear on the motor.
- The safety features of the door are functioning correctly, ensuring the door stops or reverses if it encounters an obstruction.
Incorrectly set travel limits can lead to the door opening too far, not fully closing, or even causing damage to the door and opener system. Therefore, programming the travel limits correctly is essential for safety and longevity.
How To Program Travel Limits On Chamberlain Garage Door Opener: Step-by-Step Guide
Now that you understand the importance of travel limits, let’s dive into the process of how to program travel limits on Chamberlain garage door opener. Follow these steps carefully to ensure your garage door operates efficiently and safely.
Step 1: Prepare the Opener for Programming
Before you start adjusting the travel limits, make sure your Chamberlain garage door opener is powered on and ready for programming.
- Turn off the power: Although it’s not always necessary to turn off the power, it’s a good idea to unplug the opener for safety when you first begin.
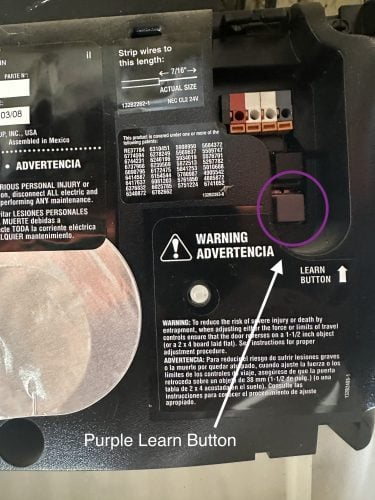
- Locate the “Learn” button: The Learn button is typically located on the opener motor unit. You will need this button to program the limits.
- Open the garage door: Start by manually opening the door all the way (if it isn’t already). This will give you a reference point for setting the fully open limit.
Step 2: Access the Limit Adjustment Mechanism
Most Chamberlain garage door openers have limit adjustment dials or screws that allow you to change the travel limits.
- Locate the adjustment screws: There are typically two adjustment screws or dials labeled “Up” (for the door opening direction) and “Down” (for the door closing direction). These are usually located on the side of the motor unit.
- Identify the travel limits: The Up limit adjusts the door’s fully open position, and the Down limit sets the fully closed position.
Step 3: Adjust the Up (Opening) Travel Limit
Adjusting the up limit is the first step. This ensures the door opens to the correct height.
- Turn the “Up” adjustment screw: Using a flathead screwdriver, rotate the Up screw clockwise to decrease the travel distance (for a shorter opening height) or counterclockwise to increase the distance (for a higher opening height).
- Test the door: After adjusting the up limit, use the opener to open the door. Check if it stops at the desired height. Repeat the adjustment if necessary.
- Ensure no obstruction: Be sure the door opens freely without hitting any obstacles. If there’s resistance, adjust the limit again until the door opens smoothly.
Step 4: Adjust the Down (Closing) Travel Limit
Next, you’ll need to adjust the down limit, which controls how far the door travels when closing.
- Turn the “Down” adjustment screw: Rotate the Down screw clockwise to reduce the travel distance or counterclockwise to increase the distance.
- Close the door: Test the door by using the opener to close the door. Ensure that it stops at the correct closed position without forcing itself into the ground or leaving a gap.
- Test the limit: If the door is not fully closed or does not stop where it should, repeat the adjustment.
Step 5: Test and Fine-Tune
Once you’ve adjusted both the up and down travel limits, it’s essential to test the door several times to ensure it operates smoothly and safely.
- Open and close the door multiple times: Activate the garage door opener and observe its performance. It should open fully without straining the motor, and it should close completely without leaving any gaps.
- Check for any abnormal behavior: If the door reverses unexpectedly, or if it doesn’t fully open or close, the travel limits may need further fine-tuning.
Additional Tips for Travel Limit Adjustment
While the steps above should guide you through most programming situations, here are a few additional tips to make sure your Chamberlain garage door opener is optimized:
- Don’t over-tighten the screws: Over-tightening the adjustment screws can cause strain on the system. Adjust gently to avoid damaging the motor.
- Check the door for balance: Ensure the door is balanced properly before adjusting the travel limits. If the door is unbalanced, it may cause the opener to struggle during operation, affecting the travel limit settings.
- Inspect the rollers and tracks: If the door is not traveling smoothly, inspect the rollers, tracks, and springs. Worn-out parts can cause uneven movement and affect the travel limits.
- Regular maintenance: Make it a habit to inspect and adjust the travel limits periodically, especially if you notice that the door is not opening or closing properly.
Troubleshooting Common Issues
While the process of adjusting travel limits is straightforward, you may encounter some issues along the way. Here are a few common problems and their solutions:
Problem 1: The Door Doesn’t Open or Close Completely
If the door doesn’t open or close all the way:
- Check the limit adjustment screws: They might need further adjustment. Make sure both the up and down limits are set correctly.
- Inspect the door’s path: Check for obstructions or dirt in the tracks that could prevent smooth movement.
Problem 2: The Door Reverses Before Reaching Its Limit
If the door reverses before reaching the fully closed position:
- Check the safety sensors: Make sure the safety sensors are aligned and unobstructed. Misaligned sensors can cause the door to reverse prematurely.
- Check for a malfunctioning spring: If the spring is worn out, the opener may have difficulty closing the door fully.
Conclusion
Programming the travel limits on Chamberlain garage door opener is an essential maintenance task that ensures the smooth operation of your garage door. By following the simple steps outlined in this guide, you can adjust the up and down travel limits on your opener, ensuring that your garage door opens and closes correctly without causing damage to the system.
Remember, a well-programmed opener enhances both the safety and functionality of your garage door, so it’s important to perform these adjustments periodically. If you encounter any issues, don’t hesitate to troubleshoot or consult your Chamberlain garage door opener manual.
Leave a Reply