Programming a Chamberlain Garage Door Opener can seem like a daunting task for some, especially if you’re not familiar with the device’s features. However, many Chamberlain garage door openers are equipped with Dip Switches, which offer an easy and secure way to program the opener. Dip switches allow you to set a unique code for your garage door opener, enhancing its security and ensuring that only your remotes can open the door.
In this article, we’ll provide a comprehensive guide on How to Program Chamberlain Garage Door Opener With Dip Switches, along with some important tips and troubleshooting techniques to help you along the way. Whether you’re programming a new opener or reprogramming one after a battery change, this step-by-step guide will make the process straightforward.
What Are Dip Switches and How Do They Work?
Before diving into the programming process, it’s important to understand what Dip Switches are and how they work. Dip switches are small, physical switches located inside your Chamberlain Garage Door Opener unit. These switches work together to create a unique code, which is then used to communicate with your remote controls and keypads. Each combination of on/off positions for the switches creates a different code, and by setting the switches in the same position on both the opener and the remote, you synchronize the two devices.
Dip switches are often used for security purposes, as they make it more difficult for unauthorized individuals to gain access to your garage. This is because, unlike rolling code technology, dip switches generate a static code that doesn’t change automatically. While this can be less secure than rolling codes, it is still effective for many homeowners.
How to Program Chamberlain Garage Door Opener With Dip Switches
Now that you have a basic understanding of what dip switches are and how they function, let’s go through the step-by-step process of programming your Chamberlain Garage Door Opener With Dip Switches. Follow these instructions carefully to ensure a successful programming process.
Step 1: Gather the Necessary Equipment
Before you begin, make sure you have the following:
- Your Chamberlain Garage Door Opener
- A remote control (or remotes, if you are programming multiple)
- A flathead screwdriver (or a similar tool to open the remote control)
- A ladder (if necessary, to reach the opener unit)
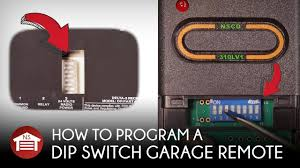
Step 2: Locate the Dip Switches on the Opener Unit
The first thing you need to do is locate the dip switches on the Chamberlain Garage Door Opener. Typically, the dip switches are housed in a small compartment inside the opener motor. To access this compartment:
- Turn off the power to your garage door opener by unplugging it from the electrical outlet.
- Remove the light cover or housing of the opener to access the internal components.
- Look for a row of small switches, which are usually marked as SW1, SW2, etc. These are the dip switches that you will use to program the opener.
Step 3: Locate the Dip Switches on the Remote Control
Next, you’ll need to locate the dip switches inside your remote control. To do this:
- Open the remote control by removing the battery cover and using a small tool (like a flathead screwdriver) to open the remote’s casing.
- Inside, you should see a similar set of dip switches. The number of switches inside your remote will match those on the opener unit.
Step 4: Set the Dip Switches on the Opener Unit
Once you’ve accessed the dip switches on both the opener and remote control, you can begin setting them to the same position.
- Choose a code: The Chamberlain Garage Door Opener typically has 8 or 12 dip switches. You will need to set them in a specific on/off pattern to create a unique code. Make sure the code is not the same as others in your neighborhood to avoid potential interference.
- Flip the switches: Using your finger or a small flathead screwdriver, set the dip switches on the opener to the desired on/off pattern. For example, you might set switches 1, 4, and 7 to “on,” and the rest to “off.”
- Record your settings: Write down the exact pattern you’ve chosen for future reference, in case you need to reprogram the opener.
Step 5: Set the Dip Switches on the Remote Control
Now that the opener’s dip switches are set, it’s time to match them with the remote control:
- Look at the dip switch settings on the opener.
- Set the dip switches in your remote to the exact same pattern. Be sure to match each switch position to the opener’s settings.
- Replace the remote control’s battery cover once the switches are set.
Step 6: Test the Garage Door Opener
Once you’ve set the dip switches on both the opener and remote, plug the Chamberlain Garage Door Opener back in and test the remote:
- Stand a few feet away from the opener and press the remote control button to test the connection.
- The door should open or close as expected. If it does, congratulations, you’ve successfully programmed your opener!
Step 7: Troubleshooting
If the door doesn’t respond, double-check that the dip switches on the opener and remote match exactly. If the problem persists, here are some troubleshooting steps:
- Check the battery in the remote to ensure it’s not dead.
- Ensure that the remote control is within range of the opener.
- Reset the opener: If all else fails, you may need to reset the Chamberlain Garage Door Opener to its factory settings and try the process again.
Benefits of Using Dip Switches to Program Your Opener
Now that you know how to program your Chamberlain Garage Door Opener With Dip Switches, let’s look at some of the advantages of using this method:
- Easy to Program: The process is straightforward and doesn’t require advanced knowledge of technology.
- Improved Security: Setting a unique code with dip switches adds an extra layer of security to your garage.
- Reliable Communication: With a static code, you don’t have to worry about interference or signal dropouts.
- Cost-Effective: Programming with dip switches doesn’t require additional costs or devices—just the opener and remote.
Additional Tips for Using Your Chamberlain Garage Door Opener
- Regular Maintenance: To ensure smooth operation, clean the opener’s components and lubricate moving parts regularly.
- Replacing the Remote: If you need to replace your remote control, simply follow the same steps to program the new one.
- Security Considerations: If you suspect that someone else may have access to your opener, it’s best to reprogram the dip switches regularly to maintain security.
Conclusion
Programming your Chamberlain Garage Door Opener With Dip Switches is a relatively simple process that can be done in just a few steps. By setting the dip switches on both the opener and the remote control to the same pattern, you can ensure that only your devices will operate the garage door. This method provides added security and convenience, allowing you to control access to your garage effortlessly.
By following the steps outlined in this guide, you can program your garage door opener with ease. If any issues arise, be sure to consult the troubleshooting tips to help resolve the problem quickly. With your opener properly programmed, you can enjoy seamless operation for years to come.
Leave a Reply