Programming your Chamberlain garage door opener wall button might seem daunting at first, but it’s actually a simple process that can be completed in just a few steps. Whether you’ve recently installed a new garage door opener or you need to reset the wall button for a different reason, this guide will teach you how to program Chamberlain garage door opener wall button without any hassle.
In this article, we’ll explore how to easily program your Chamberlain garage door opener wall button, discuss common issues, and provide tips to ensure your opener works smoothly. With clear instructions and expert advice, you’ll be able to complete the process in no time!
Why You Might Need to Program Your Wall Button
There are several reasons you may need to program your Chamberlain garage door opener wall button:
- Replacing a Wall Button: If the wall button on your garage door opener is faulty or damaged, you’ll need to program a new one.
- Adding Additional Wall Buttons: If you’ve added an extra button for a second garage door or to control the opener from another location in your garage.
- Factory Reset: Sometimes, you may need to reset the opener or button settings, particularly if there have been issues with operation.
- Reprogramming After Power Outages: Occasionally, after a power failure, the settings for the wall button may need to be restored to function properly.
No matter the reason, it’s good to know how to program Chamberlain garage door opener wall button without causing any confusion. Let’s dive into the steps!
How To Program Chamberlain Garage Door Opener Wall Button Without Complications
Follow these simple steps to program your Chamberlain garage door opener wall button without any issues:
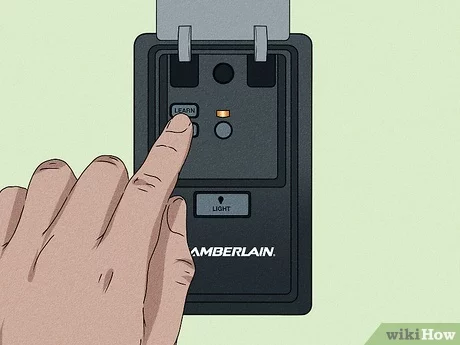
1: Locate the Learn Button on Your Garage Door Opener
Before you start programming, ensure that the garage door opener is powered on and functioning properly. Next, locate the Learn button on your Chamberlain garage door opener. This button is typically found on the back or side of the motor unit. It is often located near the antenna wire and might be a small, colored button.
- Note: The Learn button on Chamberlain openers is usually green, red/orange, yellow, or purple, depending on the model and year of manufacture.
Once you’ve found the Learn button, you’ll be ready to begin the programming process.
2: Press and Hold the Learn Button
With your wall button nearby, press and hold the Learn button for about 6 seconds until the indicator light next to the button turns off. This action will erase any previous programming from the opener and reset it to its default settings.
- Tip: If you don’t see the light turning off, release the button and try again. Ensure the opener is powered on before proceeding.
3: Program the Wall Button
Once the Learn button light has turned off, it’s time to pair your wall button with the garage door opener.
- Press the Button on the Wall Control: Hold the wall button’s signal button for a few seconds until the lights on the opener begin to blink.
- Wait for Confirmation: Once the light on the opener turns solid, release the wall button and the process is complete. The opener and wall button should now be successfully paired.
4: Test the Wall Button
After programming the wall button, test the system to ensure everything is working correctly. Press the newly programmed wall button and verify that your garage door opens and closes as expected. If the door operates properly, then the programming was successful!
- Troubleshooting: If the door doesn’t open or close, you may need to repeat the programming steps or verify that your wall button is correctly wired and functioning.
Troubleshooting Common Issues with Wall Button Programming
If you encounter any issues while programming your Chamberlain garage door opener wall button, here are a few troubleshooting tips:
1. The Garage Door Opener Doesn’t Respond After Programming
If the garage door opener doesn’t respond after programming the wall button, ensure the following:
- Check the Wiring: Verify that the wall button is wired correctly. If you’ve recently replaced or installed the wall button, check the wiring to make sure it is securely connected to the opener.
- Reset the Opener: If programming didn’t work the first time, try resetting the garage door opener by pressing and holding the Learn button again for 6 seconds.
- Inspect the Wall Button: Make sure the wall button isn’t defective. If it is broken, you may need to replace it.
2. The Wall Button Light Doesn’t Turn Off When Pressing the Learn Button
If the Learn button’s indicator light doesn’t turn off, try the following:
- Ensure Power Is On: Make sure your garage door opener is plugged in and powered on before attempting the programming process.
- Try Again: It may take a few tries for the Learn button to reset. Hold it down for a bit longer if needed.
- Check for Obstructions: Ensure there are no obstructions near the opener’s sensors or antenna that could interfere with programming.
3. Programming Multiple Wall Buttons
If you want to program multiple wall buttons, follow the same steps for each individual button. Each wall button must be programmed separately. However, once they are programmed, they will operate in sync with the garage door opener.
4. MyQ Compatibility Issues (For Smart Wall Controls)
Some Chamberlain openers are equipped with MyQ technology that allows for integration with smart devices. If you’re programming a smart wall control, ensure the opener is connected to Wi-Fi, and follow the instructions in the MyQ app for syncing.
Additional Tips for Programming Chamberlain Garage Door Opener Wall Button
Here are some extra tips that can help ensure a smooth and successful programming process:
1. Keep the Manual Handy
The manual for your Chamberlain garage door opener should have specific instructions for programming the wall button. If you have a unique model, check the manual for the exact steps tailored to your unit.
2. Avoid Overloading the System
Chamberlain garage door openers have a limited capacity for the number of remote controls and wall buttons they can accommodate. If you’re programming multiple devices, make sure you haven’t exceeded the opener’s limit.
3. Perform Regular Maintenance
Once the programming is complete, don’t forget to perform regular maintenance on your garage door opener. Keep the wall button and opener clean, ensure the tracks are lubricated, and check that all connections are secure. This will help avoid future issues.
Conclusion
Programming your Chamberlain garage door opener wall button without complications is a simple and straightforward process that can save you time and effort. By following the steps outlined in this guide, you can easily reset or add a new wall button to your garage door opener system. Whether you’re replacing a faulty button or reprogramming after a reset, these steps will help ensure that your opener is working smoothly.
If you encounter any issues during the programming process, don’t hesitate to consult the troubleshooting tips or refer to the manual. With the right knowledge and a little patience, you’ll have full control of your Chamberlain garage door opener in no time.
Leave a Reply