If you’re looking for a way to add convenience and control to your garage, learning how to program Chamberlain 3 button remote garage door opener is a simple and effective solution. Whether you just bought a new remote or need to reprogram an existing one after battery replacement or system reset, this guide will walk you through every step of the process.
In this comprehensive tutorial, we’ll explain what a Chamberlain 3-button remote is, how it works, and exactly how to program it to your garage door opener system. We’ll also address common issues and how to resolve them quickly.
Read too: How Many Remotes Can A Chamberlain Garage Door Opener Have? Understaanding the Limits and Options
What is the Chamberlain 3 Button Remote?
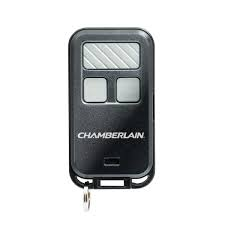
The Chamberlain 3-button garage door opener remote is a popular wireless device that allows users to control up to three separate garage doors or gate systems. It’s compatible with most Chamberlain openers made after 1993 that use Security+®, Security+ 2.0®, or MyQ® technology.
Key Features:
- Controls up to three garage doors or gates
- Long range signal (up to 1,500 ft.)
- Visor clip for easy vehicle installation
- LED indicator lights
- Compatible with yellow, purple, green, and orange Learn buttons
Benefits of Programming a 3 Button Chamberlain Remote
Before we dive into how to program Chamberlain 3 button remote garage door opener, let’s understand the benefits:
- Convenience: One remote for multiple doors or properties
- Security: Rolling code technology prevents hacking
- Flexibility: Works with a variety of Chamberlain and LiftMaster systems
- Ease of use: Simple setup with the Learn button
What You Need Before You Start
Before programming, ensure the following:
- You have a working Chamberlain garage door opener
- The remote is compatible with your opener (check the Learn button color)
- A ladder if you need to reach the opener’s control panel
- You know which button on the remote will be assigned to which door
How To Program Chamberlain 3 Button Remote Garage Door Opener
Here’s the step-by-step guide on how to program Chamberlain 3 button remote garage door opener for a smooth setup.
Step 1: Locate the “Learn” Button on Your Opener
- Go to your garage door opener motor unit, usually mounted on the ceiling.
- Remove the light lens cover (if necessary) to access the “Learn” button.
- Identify the color of the Learn button – typically yellow, purple, green, or orange. This determines compatibility and programming method.
✅ Tip: The Learn button is often near the antenna wire.
Step 2: Prepare the Remote
Decide which of the three buttons you want to program to your garage door opener.
- Button 1 – Garage Door 1
- Button 2 – Garage Door 2 (if applicable)
- Button 3 – Gate or Additional Door
Step 3: Program the Remote
- Press and release the “Learn” button on the motor unit. The LED indicator will light up for 30 seconds.
- Within those 30 seconds, press and hold the desired button on your Chamberlain remote.
- Hold the button until the opener light blinks or you hear a click. This usually takes about 3–5 seconds.
- Release the button.
Your remote is now programmed!
💡 You can repeat this process for each additional button if you’re using the remote for more than one opener.
Step 4: Test the Remote
Press the programmed button. The garage door should open or close. If it doesn’t, repeat the steps and ensure you’re within range.
Programming Multiple Doors with One Remote
If you have multiple garage doors, you can program each button separately:
- For Garage Door 2: Repeat the same steps using a different button on the remote and the Learn button of the second opener.
- You can also use one button for your gate opener, as long as it’s compatible.
How to Erase All Remote Controls
Need to start from scratch?
- Press and hold the Learn button on the opener until the LED light turns off (about 6–10 seconds).
- This will erase all remotes and keypads from the opener’s memory.
- Reprogram each remote as needed.
Troubleshooting Programming Issues
Sometimes, things don’t go as planned. Here are common issues and solutions:
Remote Not Working After Programming
- Make sure the opener’s Learn light turned on when you pressed it.
- Ensure you’re within range (15–30 feet).
- Check battery in the remote.
- Reprogram with the correct timing.
Door Opens but Doesn’t Close
- Check safety sensor alignment near the floor.
- Clear any obstructions blocking the sensor beams.
- Ensure wires are intact.
Remote Only Works Occasionally
- Weak battery or interference from metal or electronics.
- Replace battery or reposition remote in vehicle.
Tips for Maintaining Your Chamberlain Remote
- Replace the battery every 1–2 years.
- Keep the remote clean and free from dust or moisture.
- Store a spare battery in your vehicle or garage.
- Label buttons if using for multiple doors.
When to Reset Your Garage Door Opener
Sometimes resetting your opener can help resolve persistent issues:
- Unplug the opener for 60 seconds.
- Press and hold the Learn button to wipe all programming.
- Reprogram your remotes and keypads.
- Test for full functionality.
Alternative Ways to Program (Without a Learn Button)
If your opener is connected to MyQ® Smart Garage Hub or Wi-Fi, you may also be able to program the remote using the MyQ app:
- Add a device under settings
- Choose “Remote Control”
- Follow prompts to pair
This method may not apply to all remotes or openers. Always refer to your model’s manual.
Final Thoughts on How To Program Chamberlain 3 Button Remote Garage Door Opener
Programming your Chamberlain 3 button garage door opener remote is easier than it sounds. With a little time and the right steps, you can set up and control up to three garage doors or gates using a single device. It’s a cost-effective way to boost convenience and ensure secure access to your garage.
Whether you’re a homeowner, property manager, or renter, this guide has everything you need to know about how to program Chamberlain 3 button remote garage door opener—no technician required.
Leave a Reply