In today’s connected world, smart home technology continues to make life more convenient. One of the most practical upgrades you can make is automating your garage with a MyQ Smart Garage Door Opener. Whether you’re coming home late at night or simply want peace of mind knowing your garage is secure, installing a Chamberlain Hub adds a new layer of control and accessibility. In this guide, we’ll show you how to install MyQ Smart Garage Door Opener Chamberlain Hub with easy-to-follow steps that anyone can handle, even without technical experience.
What Is a MyQ Smart Garage Door Opener?
Before we dive into how to install MyQ Smart Garage Door Opener Chamberlain Hub, let’s understand what it is. The MyQ system, developed by
, allows homeowners to monitor, open, and close their garage doors from anywhere using their smartphones. With real-time alerts and scheduling features, it provides both convenience and enhanced home security.
The system typically includes the MyQ Smart Garage Control Hub and a door sensor. It’s compatible with most garage door openers manufactured after 1993 that use standard safety sensors.
Why Choose the Chamberlain MyQ Smart Garage Hub?
Here are some benefits of the Chamberlain MyQ Hub that make it a worthy investment:
- Remote Access: Control your garage door from anywhere using the MyQ app.
- Real-Time Alerts: Get notifications when your garage door opens or closes.
- Scheduling: Automatically open or close your garage door at specific times.
- Compatibility: Works with Google Assistant, Amazon Alexa (via IFTTT), and even Amazon Key for in-garage deliveries.
- Security: Check if your garage door is closed from anywhere, adding a layer of security to your home.
Tools and Materials You’ll Need
To make your installation process smooth, gather the following tools and materials beforehand:
- MyQ Smart Garage Hub (Chamberlain)
- Wi-Fi connection (2.4 GHz)
- Smartphone with MyQ app installed
- Ladder
- Power outlet near the garage door opener
- Phillips screwdriver or drill (optional)
- Mounting hardware (usually included in the box)
Step-by-Step Guide: How To Install MyQ Smart Garage Door Opener Chamberlain Hub
Now let’s break down the process step by step. Follow these instructions to get your MyQ system up and running smoothly.
1: Download and Set Up the MyQ App
- Visit the App Store (iOS) or Google Play Store (Android).
- Search for “MyQ” and download the app.
- Open the app and create an account or log in.
- Select “Add Device” and choose “Smart Garage Hub” as the product.
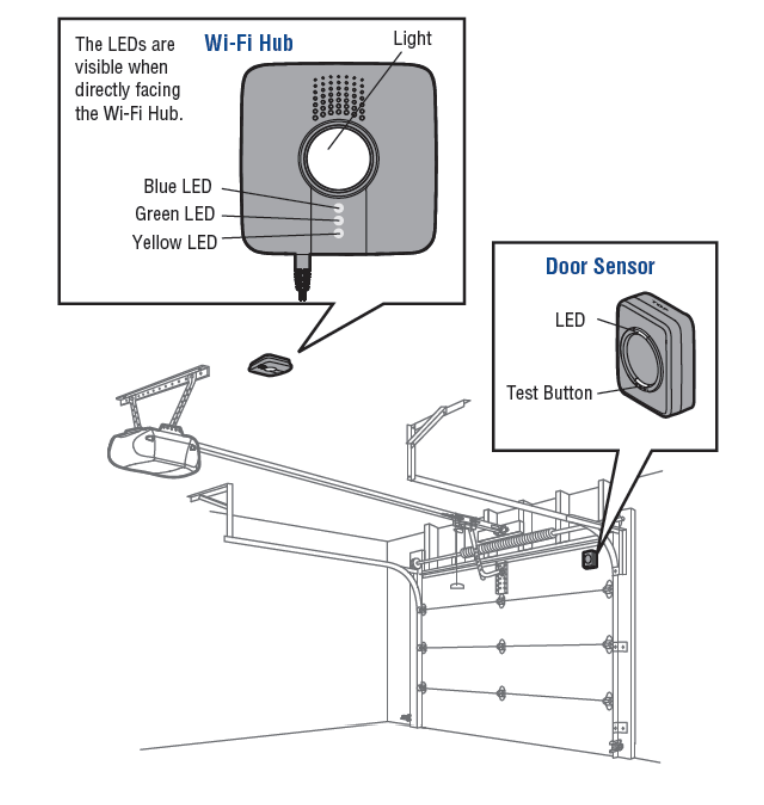
2: Connect the MyQ Hub to Power
- Plug the MyQ Smart Garage Hub into a power outlet.
- You’ll see a blinking blue light indicating it’s ready to be set up.
- Keep the hub close to your Wi-Fi router during this part of the setup for better signal reception.
3: Connect to Wi-Fi
- In the MyQ app, follow the prompts to connect the hub to your home Wi-Fi network.
- Ensure you’re on a 2.4 GHz Wi-Fi network; 5 GHz is not supported.
- Once connected, the light on the hub will turn solid blue or green.
4: Mount the MyQ Hub
- Use the included mounting bracket or screws to secure the hub to the ceiling near your garage door opener.
- Ensure the hub is within range of both your Wi-Fi signal and garage door opener.
- Aim the hub toward the door so the flashing light during operation is visible for safety compliance.
5: Install the Door Sensor
- The door sensor is a crucial part of how the system knows whether the garage door is open or closed.
- Mount the sensor on the top panel of your garage door using the adhesive strips or screws provided.
- Ensure it’s aligned properly—usually horizontally in the middle of the top panel.
6: Sync the Door Sensor with the Hub
- In the MyQ app, follow the instructions to pair the sensor.
- Open and close the garage door manually when prompted to test functionality.
- Once synced, the app should display the door’s status accurately.
7: Test the System
After completing all steps, it’s time to test:
- Use the app to open and close the door.
- Walk through the door’s path to ensure sensors stop it from closing (safety test).
- Confirm alerts and notifications are working on your phone.
Troubleshooting Common Installation Issues
While learning how to install MyQ Smart Garage Door Opener Chamberlain Hub, you might run into a few snags. Here are common issues and fixes:
Weak Wi-Fi Signal
- Move your router closer or use a Wi-Fi range extender in your garage.
Hub Not Connecting
- Double-check Wi-Fi credentials.
- Ensure your phone’s Bluetooth is on during setup.
Door Not Responding
- Ensure the sensor is properly aligned.
- Check power supply to the hub and garage opener.
Tips for a Smooth Installation
- Check Compatibility: Use the MyQ compatibility tool on Chamberlain’s website before purchasing.
- Label Everything: If you have multiple garage doors, label each sensor and hub accordingly.
- Keep Firmware Updated: Regular updates fix bugs and add new features.
- Use Voice Control: Link MyQ with Google Assistant or Alexa (via third-party apps) for voice commands.
How to Maintain Your MyQ Garage System
Once installed, minimal maintenance is required:
- Replace door sensor batteries yearly.
- Check for firmware updates in the app.
- Inspect mounting brackets annually to ensure they’re secure.
- Clean sensors occasionally to remove dust and debris.
Final Thoughts
Knowing how to install MyQ Smart Garage Door Opener Chamberlain Hub can significantly upgrade your home’s convenience and security. With just a few tools and around 30–45 minutes of your time, you can transform your standard garage into a smart, connected entry point. Whether you’re a tech-savvy homeowner or a DIY novice, this step-by-step guide ensures you’re on the right track from start to finish.
Ready to make your garage smarter? Follow these steps and enjoy total control—right from your phone.
Leave a Reply