Installing a garage door opener might seem like a job best left to the pros, but with the right instructions and tools, it’s a project that many homeowners can handle themselves. One of the most popular models on the market today is the Chamberlain 3/4-HP chain garage door opener—a reliable, heavy-duty unit perfect for most residential garage doors.
In this detailed guide, we’ll show you exactly how to install Chamberlain 3/4-HP chain garage door opener from start to finish. Whether you’re replacing an old system or starting from scratch, this walkthrough will help you get the job done safely, efficiently, and correctly.
Read too: How Many Remotes Can A Chamberlain Garage Door Opener Have? Understaanding the Limits and Options
Tools and Materials You’ll Need
Before you get started, make sure you have the following tools and materials on hand. Having everything ready will make your project go much smoother.
Tools:
- Step ladder
- Cordless drill
- Drill bits (various sizes)
- Socket wrench set
- Adjustable wrench
- Flathead and Phillips screwdrivers
- Level
- Pencil or marker
- Tape measure
- Safety goggles
- Pliers
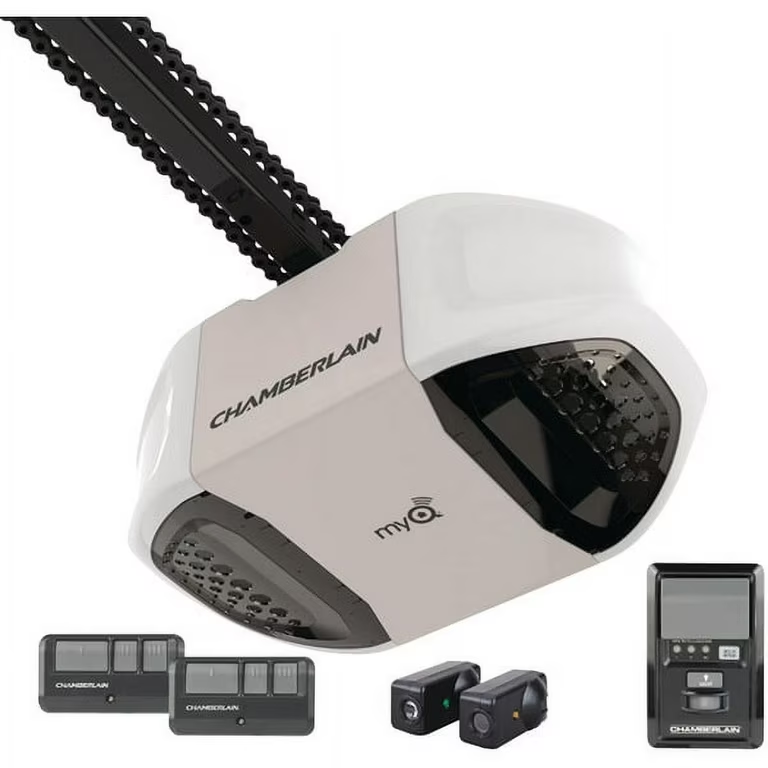
Included with your Chamberlain 3/4-HP opener:
- Rail sections
- Chain and cable
- Motor unit
- Mounting hardware
- Safety sensors
- Wall control panel
- Remote controls
- Instruction manual
Step 1: Prepare the Garage Door
Before installing the Chamberlain 3/4-HP chain garage door opener, inspect the garage door for damage or wear.
- Check Door Balance: Lift the garage door manually to see if it opens smoothly and stays in place. An unbalanced door can put strain on the opener.
- Inspect Tracks and Rollers: Make sure the tracks are straight and clear of debris. Replace any worn-out rollers.
- Lubricate Moving Parts: Apply garage door lubricant to the hinges, springs, and rollers to ensure smooth operation.
Step 2: Assemble the Rail and Chain System
The next step in how to install Chamberlain 3/4-HP chain garage door opener is to assemble the rail system, which connects the motor to the door.
- Connect the Rail Sections: Lay them on the floor and snap or bolt them together following the manual.
- Thread the Chain: Run the chain along the rail, attaching it to the trolley and sprocket system as directed. Use the provided tension system to ensure it’s tight.
- Secure the Chain: Tighten the chain just enough that there’s a small amount of slack when the trolley is centered. Over-tightening can lead to wear and noise.
Step 3: Mount the Rail to the Motor
Now, attach the assembled rail system to the motor unit.
- Lift and Position the Motor: You may need an extra pair of hands here. Set the motor on a sturdy surface or ladder while you attach the rail.
- Secure the Rail to the Motor: Use bolts provided in the kit to fasten the rail to the motor. Make sure everything is snug and properly aligned.
Step 4: Install the Header Bracket
The header bracket holds the front of the rail to the wall above your garage door.
- Measure and Mark: The center of the garage door should align with the center of the bracket. Use a level to ensure accuracy.
- Install with Lag Screws: Drill pilot holes and fasten the bracket using the lag screws provided. Make sure the bracket is mounted into a solid header beam.
Step 5: Position and Mount the Opener
Now comes the main part of how to install Chamberlain 3/4-HP chain garage door opener: hanging the motor and rail assembly.
- Lift the Assembled Unit: Carefully raise the opener and align the rail with the header bracket.
- Insert the Rail Pin: Slide the rail into the bracket and secure it with the pin or bolt included in the kit.
- Mount the Motor: Use angle iron or the hanging straps included to attach the motor to ceiling joists. Ensure the motor is level and securely fastened.
Step 6: Attach the Door Bracket and Arm
- Install the Door Bracket: Fasten the bracket to the top panel of your garage door using screws and bolts.
- Connect the Door Arm: Attach the curved and straight arms together and then connect them to both the trolley and the door bracket.
Step 7: Install the Safety Sensors
Your Chamberlain opener comes with safety sensors that must be installed near the floor on either side of the door.
- Position the Sensors: Place the sensors about 6 inches from the ground.
- Wire the Sensors: Run the wiring back to the motor unit, keeping it neat and out of the way.
- Align the Beams: The LEDs on each sensor should light up when they are correctly aligned. Adjust if needed.
Step 8: Set Up the Wall Control and Wiring
The wall-mounted control unit allows you to operate the door from inside your garage.
- Mount the Control Panel: Choose a location at eye level, usually next to the door to your house.
- Run the Wire: Connect the control panel wire to the back of the opener unit, following the manual.
- Secure the Wire: Staple the wire neatly along the wall and ceiling joists.
Step 9: Plug In and Program the Opener
You’re almost done learning how to install Chamberlain 3/4-HP chain garage door opener—now it’s time to power up!
- Plug It In: Use a grounded outlet and avoid extension cords.
- Program Remote Controls: Use the Learn button on the motor to sync your remotes.
- Set Travel Limits: Follow the instructions to set how far the door opens and closes.
- Test the Safety Reversal System: Place an object in the door’s path. It should reverse upon contact.
Step 10: Final Checks and Maintenance Tips
- Tighten Bolts and Screws: Go over each component to make sure everything is secure.
- Test Multiple Times: Operate the door several times and listen for any unusual sounds.
- Maintain Regularly: Lubricate the chain and moving parts every six months. Check alignment and door balance annually.
Why Choose the Chamberlain 3/4-HP Chain Drive?
This opener is known for:
- Powerful lifting capacity for heavy garage doors
- Durability with steel-reinforced chains
- Security+ 2.0 technology to prevent hacking
- Compatible with MyQ smart home systems
- Budget-friendly without compromising performance
Troubleshooting Common Issues
If you run into problems after installation:
- Door doesn’t open or close fully: Adjust the limit settings.
- Door reverses immediately: Check alignment of safety sensors.
- No response from remote: Reprogram or replace battery.
- Loud noise during operation: Lubricate the chain and inspect for loose hardware.
Conclusion
Now that you’ve followed each step on how to install Chamberlain 3/4-HP chain garage door opener, your garage is ready for smooth, powerful, and reliable operation. With just a few tools and a bit of time, you can save money and gain the satisfaction of a successful DIY installation. Enjoy the peace of mind that comes with a professionally installed quality garage door opener—done by you!
Leave a Reply