How To Hook Up Chamberlain Garage Door Opener To Wifi? In today’s world, smart home devices have become an integral part of daily living, and your garage door opener is no exception. Connecting your Chamberlain Garage Door Opener to your home’s Wi-Fi network opens the door (literally and figuratively!) to a world of convenience. Whether you’re looking to remotely control your garage door from anywhere, monitor it in real-time, or simply integrate it into your smart home ecosystem, knowing how to hook up Chamberlain garage door opener to Wi-Fi is a vital skill.
In this article, we’ll take you through the process of setting up your Chamberlain garage door opener to Wi-Fi, highlight key features you’ll enjoy after the connection, and discuss troubleshooting tips along the way.
Read too: How Many Remotes Can A Chamberlain Garage Door Opener Have? Understaanding the Limits and Options
Why Connect Your Chamberlain Garage Door Opener to Wi-Fi?
Before diving into the technicalities of how to hook up your Chamberlain garage door opener to Wi-Fi, let’s discuss the advantages of making the connection:
- Remote Access: With the opener connected to Wi-Fi, you can control your garage door from anywhere using the Chamberlain myQ app. Whether you’re at work, running errands, or on vacation, you can ensure that your garage door is securely opened or closed as needed.
- Smart Home Integration: Connecting to Wi-Fi allows your Chamberlain opener to be part of your smart home setup. It can work with Alexa, Google Assistant, and other smart devices, providing seamless voice control.
- Notifications and Alerts: Get real-time updates on the status of your garage door. If you forget to close it or need to check remotely, you’ll receive an alert straight to your phone.
- Increased Security: Know exactly when your garage door opens and closes, and even monitor who accessed it.
How To Hook Up Chamberlain Garage Door Opener To Wifi: Step-by-Step Instructions
Now that you understand the benefits of connecting your Chamberlain garage door opener to Wi-Fi, let’s walk through the setup process. This step-by-step guide will help you hook up your opener quickly and easily, even if you’re not a tech expert.
Step 1: Prepare Your Wi-Fi Network
Before getting started, ensure that your Wi-Fi network is ready for the connection. Here’s what you need to do:
- Check Wi-Fi Compatibility: Chamberlain garage door openers only work with 2.4 GHz Wi-Fi networks. If you have a dual-band router, make sure you’re connected to the 2.4 GHz band, as 5 GHz bands are not supported.
- Ensure Stable Internet: Make sure your Wi-Fi signal is stable and strong enough to support the connection. If necessary, move your router closer to the garage or use a Wi-Fi extender.
- Have Your Wi-Fi Details Ready: You’ll need your network name (SSID) and password, so have those handy before you begin.
Step 2: Download the myQ App
To control and manage your garage door opener, you’ll need to download the myQ app. The app is available on both iOS and Android devices.
- Go to the App Store (for iOS) or Google Play Store (for Android).
- Search for myQ and download the app.
- Once installed, create a myQ account if you don’t have one, or log in if you already do.
Step 3: Prepare Your Chamberlain Garage Door Opener
Before you connect your Chamberlain opener to Wi-Fi, ensure that it’s ready for the setup process:
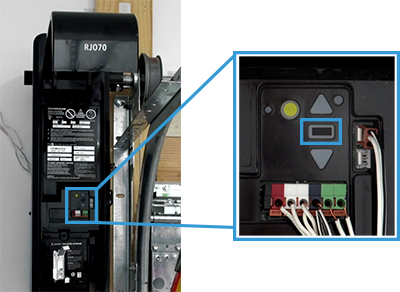
- Locate the Wi-Fi Setup Button: On your Chamberlain garage door opener, locate the Learn or Wi-Fi Setup button. This is usually found on the back or side of the unit.
- Press and Hold the Wi-Fi Setup Button: Press and hold the Wi-Fi Setup button for about 6 seconds, or until the LED light starts flashing. This indicates that the garage door opener is now in Wi-Fi setup mode.
Step 4: Connect the Opener to Wi-Fi
- Open the myQ App: Launch the myQ app on your smartphone or tablet.
- Select “Add a Device”: In the myQ app, tap the “Add a Device” button, then select Chamberlain Garage Door Opener from the list of available devices.
- Follow the Instructions: The app will prompt you to connect to the Wi-Fi network. Enter your Wi-Fi network name (SSID) and password.
- Complete the Setup: The app will attempt to connect your garage door opener to your Wi-Fi network. Wait for the connection to be established, which may take a few moments. Once successfully connected, the LED light on the opener will stop flashing and become solid.
Step 5: Test the Connection
Once your Chamberlain garage door opener is connected to Wi-Fi, test it by:
- Opening and Closing the Door: Using the myQ app, try opening and closing the garage door to confirm that the connection is working properly.
- Checking Notifications: Check if you receive a notification when the door opens or closes. This is a great way to ensure the system is working as expected.
Additional Features After Connecting Your Chamberlain Garage Door Opener to Wi-Fi
Now that your opener is connected, let’s look at some of the powerful features you can take advantage of:
1. Remote Control:
With your opener hooked up to Wi-Fi, you can control your garage door remotely. Whether you’re on vacation or at work, you can check the door’s status and open or close it from anywhere.
2. Scheduling:
Set up schedules to automatically open or close your garage door at specific times. For instance, you can program it to close every day at 9 PM, or open it at 7 AM to let in the morning light.
3. Voice Control:
Integrating your Chamberlain opener with voice assistants like Amazon Alexa or Google Assistant lets you control your garage door using just your voice. You can say, “Alexa, open the garage door,” and it will respond accordingly.
4. Security Alerts:
Receive push notifications and alerts when your garage door is opened or closed, ensuring that you’re always in the loop, even if you’re miles away.
5. Multiple Users:
You can share control with other family members or housemates by giving them access through the myQ app. This feature allows multiple people to monitor and control the garage door without sharing login information.
Troubleshooting Tips for Connecting Your Chamberlain Garage Door Opener to Wi-Fi
If you’re having trouble connecting your Chamberlain garage door opener to your Wi-Fi, here are a few tips to resolve common issues:
1. Wi-Fi Signal Issues:
If your opener is too far from your router, the signal may be weak, causing connection issues. Move the router closer or use a Wi-Fi extender.
2. Incorrect Network Info:
Ensure that the Wi-Fi network name and password entered into the myQ app are correct. Double-check that you’re connecting to a 2.4 GHz network, not a 5 GHz network.
3. Resetting the Opener:
If the connection fails repeatedly, you may need to reset the opener. Press and hold the Wi-Fi Setup button for 10 seconds until the LED light turns off. Then, repeat the setup process.
4. App Update:
Make sure your myQ app is updated to the latest version. Sometimes older versions may have bugs that prevent proper connectivity.
5. Router Settings:
Some routers have firewalls or settings that prevent new devices from connecting. Check your router settings to ensure there are no blocks preventing the Chamberlain opener from joining your network.
Conclusion
Learning how to hook up Chamberlain garage door opener to Wi-Fi is the first step toward a smarter, more convenient garage. By following the steps outlined above, you can quickly connect your opener to your home’s Wi-Fi and unlock the full potential of your garage door opener, including remote control, scheduling, voice commands, and more.
Once connected, your Chamberlain opener will become an integral part of your home’s smart ecosystem, allowing you to manage your garage door more efficiently and securely. If you experience any issues along the way, the troubleshooting tips provided will help you get back on track. Happy connecting!
Leave a Reply