If you’re wondering how to change WiFi on Chamberlain garage door opener, you’re not alone. Many homeowners run into this issue when switching internet providers, updating their router, or moving into a new home. Fortunately, updating the WiFi settings on your Chamberlain garage door opener is easier than you might think—if you know what steps to follow.
In this guide, we’ll walk you through the entire process of changing your Chamberlain garage opener’s WiFi, from preparation to troubleshooting. We’ll also discuss common mistakes, compatible apps, and pro tips to make sure your garage door opener stays connected at all times.
Why You Might Need to Change the WiFi on Your Chamberlain Garage Door Opener
There are several common scenarios where you might need to change the WiFi on your Chamberlain garage door opener:
- You’ve switched internet providers and have a new network name (SSID) and password.
- You’ve upgraded your router, changing either the frequency band (2.4GHz vs 5GHz) or network security settings.
- You’ve moved to a new home, and your opener needs to connect to the new WiFi network.
- You’re troubleshooting connectivity issues with your myQ app or smart home integration.
Read too: How Many Remotes Can A Chamberlain Garage Door Opener Have? Understaanding the Limits and Options
Whatever the reason, it’s essential to understand that your Chamberlain garage door opener depends on a stable 2.4GHz WiFi connection to function properly with the myQ app and smart home assistants like Google Home or Amazon Alexa.
Tools & Information You Need Before You Start
Before you begin the process of changing the WiFi settings on your Chamberlain garage door opener, make sure you have the following:
- Your WiFi network name (SSID) and password
- A smartphone or tablet with the myQ app installed
- Access to your garage and opener unit
- A ladder, if the opener is mounted high on the ceiling
Also, ensure your router is broadcasting on 2.4GHz, as most Chamberlain models do not support 5GHz connections.
H2: How To Change Wifi On Chamberlain Garage Door Opener – Step-by-Step Instructions
Changing the WiFi on your Chamberlain opener involves resetting the WiFi settings and reconnecting through the myQ app. Follow these easy steps:
Step 1: Erase the Current WiFi Settings
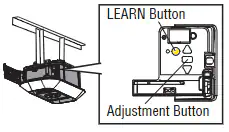
- Locate the “Learn” button on your Chamberlain garage door opener. This is usually on the back or side of the unit, near the antenna.
- Press and hold the Learn button until the LED light next to it turns off. This typically takes about 6–10 seconds. When the light turns off, it means the WiFi settings have been erased.
Tip: Don’t confuse this step with clearing all device programming. You’re only resetting the network settings here.
Step 2: Put the Opener in WiFi Setup Mode
- Press and release the Learn button again (do not hold it this time).
- The LED light will start blinking, indicating the opener is in WiFi setup mode.
Step 3: Reconnect Using the myQ App
- Open the myQ app on your smartphone.
- Go to Device Settings or select Add Device, depending on your version of the app.
- Choose Garage Door Opener with WiFi and follow the on-screen instructions.
- Select your home’s WiFi network from the list and enter the password.
- Once connected, the LED on your opener should stop blinking and turn solid, confirming the connection.
Common Issues and Troubleshooting Tips
1. WiFi Connection Fails
If your opener won’t connect to your network, check the following:
- Ensure you’re on a 2.4GHz network
- Reboot your router
- Reduce the distance between the router and the opener
- Disable VPNs or firewalls that could interfere with the connection
2. myQ App Not Detecting Opener
If your phone can’t detect the opener during setup:
- Turn on Bluetooth
- Ensure location permissions are enabled for the myQ app
- Close and reopen the app, or restart your device
Smart Home Compatibility and Why WiFi Matters
Changing your Chamberlain garage opener’s WiFi is more than just about connectivity—it’s about making your smart home work seamlessly. A strong, stable connection allows for:
- Remote control and monitoring through the myQ app
- Real-time alerts when your garage door opens or closes
- Integration with Amazon Key, Google Assistant, and IFTTT
Without WiFi, your opener becomes just a regular remote-based unit.
Best Practices After You Change Your WiFi
After successfully updating your garage door opener’s WiFi, take these additional steps:
- Rename the device in the app to match your new home setup
- Share access with family members through the myQ app
- Set up automations or routines if your opener is integrated with other smart devices
- Test the system to ensure smooth operation from your smartphone
How Often Should You Update Your Opener’s WiFi?
You don’t need to change the WiFi on your Chamberlain garage door opener often. However, consider updating the connection when:
- You notice frequent disconnections or lag
- You’ve changed routers or service providers
- You’ve updated your home network security settings
Chamberlain Garage Door Opener Models That Support WiFi Change
Most newer Chamberlain models support WiFi configuration through the myQ app, including:
- Chamberlain B970
- Chamberlain B1381
- Chamberlain B4643T
- Chamberlain RJO70
If your model doesn’t support WiFi, you may need a myQ Smart Garage Hub to enable these features.
Final Thoughts on How To Change Wifi On Chamberlain Garage Door Opener
Changing the WiFi on your Chamberlain garage door opener may seem intimidating at first, but it’s a straightforward task when broken into simple steps. Whether you’re upgrading your router, solving connection issues, or just moving into a new home, this guide helps ensure your smart garage system stays online and functional.
By keeping your WiFi settings up to date, you maintain full control over your garage door from anywhere—adding convenience, security, and peace of mind to your everyday life.
Leave a Reply