How To Change Light Bulb In Chamberlain Garage Door Opener? When your Chamberlain garage door opener light bulb burns out, it can be a hassle trying to figure out how to replace it. Fortunately, changing the light bulb in your Chamberlain opener is a straightforward task that you can do yourself with just a few basic tools. Whether you’re dealing with a faulty bulb or just want to upgrade to a brighter light, this guide will walk you through the steps to get your garage door opener’s light working again.
In this article, we’ll cover how to change the light bulb in Chamberlain garage door opener, including the tools needed, safety precautions, and troubleshooting tips if things don’t go as planned.
Why Is the Light Bulb Important in a Chamberlain Garage Door Opener?
Before diving into the how-to steps, it’s important to understand why the light bulb is essential in your Chamberlain garage door opener.
- Convenience: The light provides illumination in your garage, making it easier to see when you’re coming and going, especially if your garage doesn’t have other lighting sources.
- Safety: A working light bulb allows you to safely navigate in and out of your garage, reducing the risk of accidents.
- Indicator of Functionality: Sometimes, a flickering or malfunctioning light bulb can indicate an issue with the garage door opener’s electrical system. Replacing the bulb is often the first step in troubleshooting any potential problems.
Now that we understand the importance of the light bulb, let’s get into the steps for replacing it.
Tools You’ll Need to Change the Light Bulb in Your Chamberlain Garage Door Opener
Before you begin replacing the light bulb, make sure you have the necessary tools at hand. Luckily, this is a simple task, and you likely already have everything you need in your toolbox. Here’s what you’ll require:
- Ladder: You’ll need a sturdy ladder to reach the ceiling of your garage where the Chamberlain opener is mounted.
- Replacement Light Bulb: Make sure the bulb you choose is compatible with your Chamberlain garage door opener. Your owner’s manual will specify the type of bulb needed, whether it’s incandescent, CFL, or LED.
- Screwdriver (Optional): Depending on your model, you might need a screwdriver to remove the light bulb cover or any screws holding the fixture in place.
Once you’ve gathered the tools, it’s time to get started.
How To Change Light Bulb In Chamberlain Garage Door Opener: Step-by-Step Guide
Step 1: Unplug the Garage Door Opener for Safety
Before you begin working with any electrical components, it’s crucial to unplug your Chamberlain garage door opener from the power source. This will help prevent accidental electric shocks while you are changing the light bulb.
- Locate the power cord of the opener and unplug it from the outlet, or switch off the circuit breaker that controls the opener.
- Wait for a few minutes to allow the opener to cool down before proceeding.
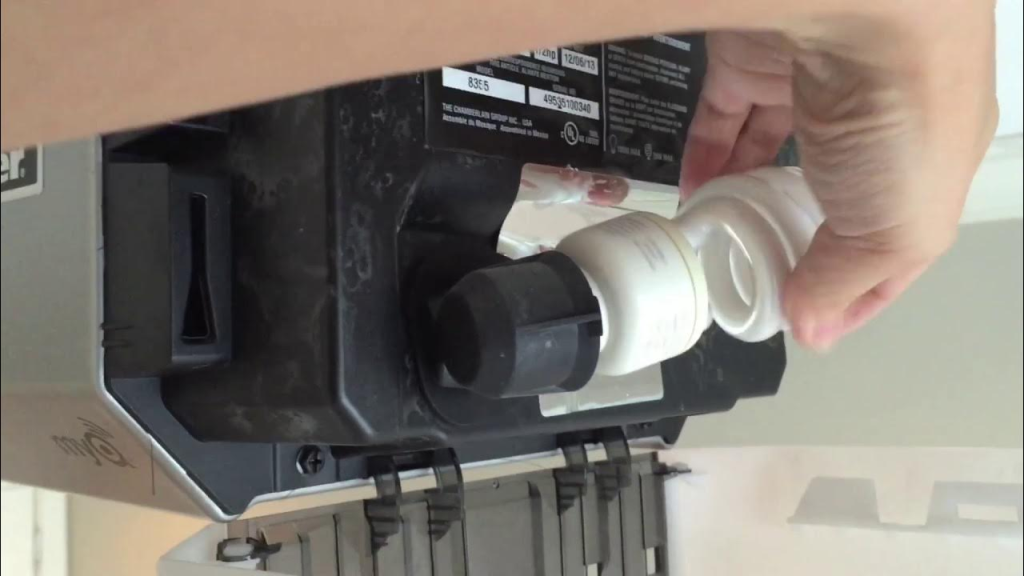
Step 2: Locate the Light Bulb and Access Panel
Most Chamberlain garage door openers have a light fixture located on the bottom of the motor unit. Depending on the model, you may need to remove a protective cover or panel to access the bulb.
- Find the light bulb compartment: This is typically located on the bottom of the motor unit, but it can vary depending on the specific model.
- Remove any covers or panels: In some cases, you may need to remove a plastic cover or a small protective panel that houses the light bulb. You can do this by gently prying it off or unscrewing any screws, depending on your opener model.
Step 3: Remove the Burned-Out Bulb
Once you’ve exposed the light bulb compartment, it’s time to remove the old bulb.
- Turn the bulb counterclockwise: Most bulbs used in Chamberlain garage door openers twist in a counterclockwise direction to unscrew them. Gently grip the bulb and twist it until it comes loose.
- Check for any broken glass: If the bulb is broken, be sure to handle the remains carefully. Use gloves to protect your hands and carefully dispose of the broken pieces.
Step 4: Install the New Light Bulb
Now it’s time to install the new light bulb. Follow these steps:
- Choose the correct replacement bulb: As mentioned earlier, check your user manual for the specific type of bulb recommended for your opener model. Make sure the bulb is compatible with the wattage and type of socket.
- Insert the new bulb: Place the new light bulb into the socket and turn it clockwise until it is secure. Be gentle while handling the new bulb to avoid damaging it.
- Double-check the bulb’s placement: Ensure the bulb is tightly screwed in but not overtightened. A loosely placed bulb might flicker or not work at all.
Step 5: Replace the Cover or Panel
If you removed a cover or panel to access the light bulb, now is the time to replace it.
- Reattach the cover: Gently place the cover back over the light bulb and secure it with screws if necessary.
- Ensure the cover is securely in place: This will help prevent any dust or debris from getting inside the motor unit and ensure the light fixture works properly.
Step 6: Plug the Garage Door Opener Back In
Now that the new light bulb is installed, plug your Chamberlain garage door opener back into the electrical outlet or turn the circuit breaker back on.
- Turn the power back on: Once the opener is powered up, check to see if the light turns on when you operate the opener.
Step 7: Test the Light and Opener Functionality
Finally, test the light to ensure it is working correctly. Open and close the garage door using your remote or wall switch. The light should illuminate when the door is in operation.
- If the light doesn’t turn on, double-check the bulb’s placement, and ensure that it is securely installed.
- If the light still doesn’t work, it could be an issue with the opener’s electrical system. In this case, consult your user manual or contact Chamberlain customer support for assistance.
Troubleshooting Tips for Light Bulb Issues
If the light still isn’t functioning after you’ve replaced the bulb, here are some troubleshooting steps to consider:
1. Check the Power Supply
Ensure that the garage door opener is receiving power. If the light isn’t working, there could be an issue with the power source or the electrical outlet.
2. Test the Switch
If the opener is receiving power, but the light isn’t turning on, there may be an issue with the light switch or control circuit. Check the switch to see if it’s operating correctly.
3. Inspect the Light Socket
If the bulb is inserted correctly but still not working, inspect the light socket for any visible damage or debris. You might need to clean or replace the socket if it’s corroded.
4. Contact Support
If you’ve tried everything and the light still isn’t working, it’s time to contact Chamberlain customer support for further assistance. There could be a deeper electrical issue that requires professional attention.
Conclusion
Changing the light bulb in your Chamberlain garage door opener is an easy and straightforward task that can restore the functionality of your opener’s light. With just a few simple steps, you can replace a burned-out bulb and continue to enjoy the convenience and safety of a well-lit garage.
Remember to choose the right type of replacement bulb, handle it carefully during installation, and ensure the opener is powered off before performing any maintenance. By following these steps, you’ll keep your garage door opener in great shape for years to come.
Leave a Reply