If you own a Chamberlain garage door opener remote or keypad, you know how convenient it is to open and close your garage door with just the push of a button. However, like all battery-powered devices, the remote control or keypad’s battery will eventually run low and need replacement. Knowing how to change battery in Chamberlain garage door opener devices is essential to avoid being locked out or dealing with a malfunctioning opener.
In this detailed guide, we will walk you through everything you need to know about replacing batteries in your Chamberlain garage door opener remote and keypad. From identifying the right battery type to step-by-step replacement instructions, troubleshooting, and tips to extend battery life, this article covers it all.
Read too: How Many Remotes Can A Chamberlain Garage Door Opener Have? Understaanding the Limits and Options
Understanding When and Why You Need To Change Battery In Chamberlain Garage Door Opener Devices
Battery failure is one of the most common reasons your Chamberlain garage door opener remote or keypad stops working. Signs that you need a new battery include:
- Reduced range or weak signal strength.
- The remote or keypad does not respond at all.
- The LED indicator on the remote or keypad is dim or does not light up.
- Inconsistent operation, such as the door opening only intermittently.
Most Chamberlain remotes and keypads use small coin or AAA batteries, which typically last between 1 to 3 years depending on use and environmental factors. Regular battery maintenance ensures your garage door opener remains reliable.
How To Change Battery In Chamberlain Garage Door Opener: Step-by-Step Instructions
Replacing the battery in your Chamberlain remote or keypad is straightforward and can be done with minimal tools. Here’s a detailed step-by-step process:
Step 1: Identify Your Chamberlain Device Type
Before buying replacement batteries, determine whether you have a remote control, wall-mounted keypad, or both. Chamberlain devices come in various models with slightly different battery types and replacement methods.
Step 2: Purchase the Correct Replacement Battery
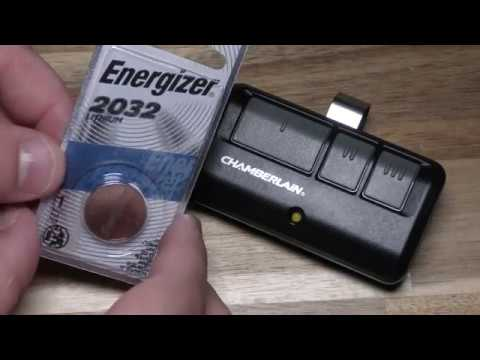
Most Chamberlain remotes use a coin cell battery such as CR2032 or CR2025. Wall keypads may use AAA batteries or similar types. Check the user manual or look inside the battery compartment for the exact battery model number.
Step 3: Open the Battery Compartment
- For remotes: Locate the small screw or sliding panel on the back or side of the remote. Use a small screwdriver or simply slide the cover open, depending on the model.
- For keypads: The battery compartment is often at the back. Remove screws or slide off the cover to access the batteries.
Step 4: Remove the Old Battery
Carefully take out the old battery or batteries. Pay attention to the battery orientation—note the positive (+) and negative (–) sides to insert the new batteries correctly.
Step 5: Insert the New Battery
Place the new battery in the compartment, matching the orientation as noted. Make sure the battery is seated firmly.
Step 6: Close the Battery Compartment
Replace the cover or screw back the compartment securely. Avoid forcing it, as it might damage the casing.
Step 7: Test the Device
Press any button on the remote or keypad to check if the device powers on and controls the garage door. If it works, you’ve successfully changed the battery.
Tips for Maintaining Your Chamberlain Garage Door Opener Battery Life
- Remove batteries during long periods of inactivity: If you won’t use the remote for months, take out the batteries to avoid corrosion.
- Keep the remote or keypad clean and dry: Moisture can damage electronic components and reduce battery life.
- Avoid dropping the device: Physical damage can impact battery contacts.
- Use high-quality batteries: Invest in reputable brands for longer-lasting performance.
- Replace batteries proactively: If your battery is more than 1.5 years old, consider changing it before it dies completely.
Troubleshooting Battery Issues in Chamberlain Garage Door Openers
If you’ve changed the battery but still face issues, here are some common troubleshooting steps:
- Check battery orientation: Incorrect placement can prevent power.
- Inspect battery contacts: Clean any dirt or corrosion gently with a dry cloth or cotton swab.
- Try a different battery: The new battery might be defective.
- Reprogram the remote: Sometimes remotes need re-syncing with the garage door opener after battery changes.
- Reset the garage door opener: Consult your Chamberlain manual for reset instructions if the remote isn’t responding.
- Check for physical damage: If the remote or keypad is damaged, replacing it might be necessary.
Benefits of Knowing How To Change Battery In Chamberlain Garage Door Opener Yourself
- Convenience: Avoid calling a technician or waiting for help.
- Cost-effective: Batteries are inexpensive, while service calls can be costly.
- Peace of mind: You ensure your garage door operates smoothly without unexpected failures.
- Quick fixes: Battery replacement can solve many common remote and keypad problems immediately.
Conclusion: Mastering How To Change Battery In Chamberlain Garage Door Opener For Optimal Performance
Knowing how to change battery in Chamberlain garage door opener devices is a simple yet vital maintenance task. Whether it’s a remote control or wall keypad, replacing batteries regularly keeps your garage door functioning reliably and enhances your home security. By following the step-by-step instructions, troubleshooting tips, and maintenance advice in this guide, you can extend the life of your devices and avoid inconvenient lockouts.
Always keep spare batteries on hand, and make it a habit to check your remote and keypad performance periodically. With these tips, you’ll be prepared to handle any battery issues and keep your Chamberlain garage door opener working perfectly.
Leave a Reply