Your Chamberlain garage door opener is designed to provide convenience, security, and efficiency. However, if your garage door doesn’t close completely or opens too far, the issue likely lies with the travel limits. Knowing how to adjust limits on Chamberlain garage door opener can help you fix these problems quickly and avoid costly repairs.
Travel limits (also known as open and close limits) control how far the door moves in either direction. When set correctly, the door stops at the precise position you want. When set incorrectly, you may face issues like the door reversing unexpectedly, not sealing to the ground, or leaving a gap at the top.
Read too: How Many Remotes Can A Chamberlain Garage Door Opener Have? Understaanding the Limits and Options
This article provides a comprehensive, easy-to-follow guide on adjusting the limits of your Chamberlain opener, ensuring your garage door operates safely and efficiently.
Why You Should Adjust the Limits on a Chamberlain Garage Door Opener
Before diving into how to adjust limits on Chamberlain garage door opener, let’s understand why this setting matters.
1. Proper Door Functionality
Without accurate limit settings, your door may:
- Not open all the way, making it hard for tall vehicles to enter.
- Slam into the floor, damaging the door or opener.
- Reopen automatically after closing.
- Fail to create a proper seal, allowing in weather or pests.
2. Safety Concerns
Incorrect limits can:
- Prevent the door from reversing properly when it hits an obstacle.
- Cause damage to the door components or opener.
- Risk injury if the door moves too far.
3. Longevity of Your System
When the opener doesn’t have to strain unnecessarily due to incorrect limits, it lasts longer and performs more reliably.
Tools You’ll Need
You don’t need much to adjust the limits:
- Ladder (to reach the opener unit)
- Flathead screwdriver (for older mechanical models)
- Your Chamberlain remote or wall control
- Owner’s manual (recommended)
- Protective gloves and glasses (optional but advised)
Understanding Limit Adjustment: Mechanical vs. Electronic
Chamberlain has several opener models. Depending on yours, limit adjustments may be:
- Mechanical – Using two screws (limit adjustment knobs).
- Electronic – Using up/down buttons and an adjustment button.
Newer models (especially those with myQ technology) usually feature electronic limits, while older units may require manual screw adjustments.
How To Adjust Limits On Chamberlain Garage Door Opener Safely and Accurately
Now let’s get into the detailed instructions for how to adjust limits on Chamberlain garage door opener.
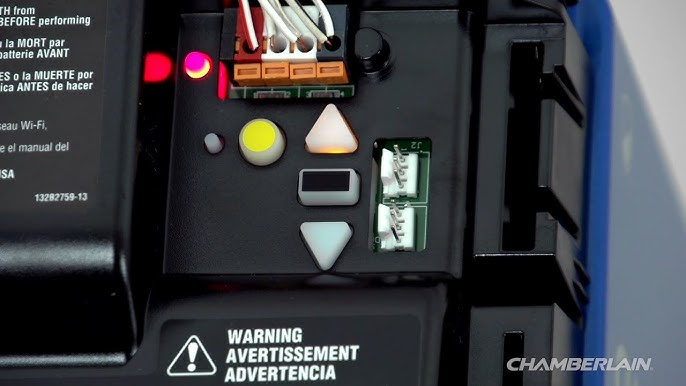
Step 1: Locate the Limit Adjustment Mechanism
- Electronic models: Look for the “Up” and “Down” arrows and the “Adjustment” or “Learn” button on the back or side of the motor housing.
- Mechanical models: You’ll find two dials labeled “Up Limit” and “Down Limit.”
Refer to your model number (usually printed on the opener body) to confirm the correct method.
Step 2: Enter Adjustment Mode (For Electronic Models)
- Press and hold the “Adjustment” button until the UP arrow blinks.
- Press and hold the UP arrow to raise the door to the desired full-open position.
- Once set, press and release the “Adjustment” button to confirm.
The DOWN arrow will begin blinking:
- Press and hold the DOWN arrow to move the door to the closed position (just touching the floor or slightly compressed).
- Press and release the “Adjustment” button again to save settings.
The LED light or status indicator will usually flash to confirm programming.
Step 3: Adjust Limits on Mechanical Models
- UP Limit Screw: Turn clockwise to reduce door height; counterclockwise to increase how far it opens.
- DOWN Limit Screw: Turn clockwise to make the door stop sooner; counterclockwise to let it close farther.
Always turn in small increments (1/4 turns) and test after each adjustment.
Step 4: Test the Door Operation
Using your wall control or remote:
- Open the door fully. It should stop before hitting the opener stop bolt or rail end.
- Close the door. It should touch the floor with a gentle seal—not slam or leave a gap.
Repeat adjustments as needed until both open and close positions are correct.
Additional Safety Test: Reversal Check
After setting the limits:
- Place a 2×4 wooden board flat on the floor where the door will close.
- Close the garage door using the remote or wall button.
- The door should reverse immediately upon hitting the board.
If not, adjust the down limit and check your force settings (covered in a separate article).
Troubleshooting Common Issues
Door Stops Short of Full Open
- Solution: Increase the UP limit slightly.
Door Slams Into Floor
- Solution: Reduce the DOWN limit to avoid excessive closing force.
Door Reverses Unexpectedly
- Solution: Check DOWN limit setting and confirm safety sensors are aligned.
Limits Won’t Save
- Solution: Make sure there’s no power interruption. For smart models, check myQ app settings and perform a full reset if necessary.
Advanced Tip: Use Smart Controls (if available)
If your Chamberlain garage door opener is myQ-enabled, you may be able to:
- Monitor the door’s open/close status in real time.
- Get alerts if limits are not reached.
- Use smart scheduling to avoid repeated adjustments.
While physical adjustment is still required, smart diagnostics can indicate if the limits are off.
Maintenance Tips for Long-Term Limit Accuracy
To keep your door limits accurate:
- Lubricate tracks and rollers monthly.
- Check for loose bolts or misalignment in the door.
- Ensure springs and cables are in good condition.
- Recheck limits seasonally, especially in extreme climates.
When to Call a Professional
If you’ve tried adjusting limits multiple times and still have issues:
- The gear mechanism inside the opener might be worn.
- Your springs may be unbalanced.
- The logic board may be malfunctioning.
In such cases, hiring a licensed garage door technician is safer and more cost-effective.
Frequently Asked Questions
How do I know if the limits need adjusting?
If the door doesn’t fully open or close, slams down, or reverses suddenly, your limits are likely off.
Can weather affect my garage door limits?
Yes. Cold or heat can change how the door moves. Check and adjust your limits seasonally if needed.
Is adjusting limits safe for beginners?
Yes—if you follow manufacturer instructions and test the safety reversal feature after adjustments.
How often should I check the limits?
You should check them:
- After power outages
- Following door component replacements
- Every 6–12 months as part of routine maintenance
Conclusion
Knowing how to adjust limits on Chamberlain garage door opener is a valuable skill every homeowner should have. Whether you’re dealing with a door that doesn’t close properly or one that opens too far, accurate limit settings are essential for safe and efficient garage door operation.
By following the step-by-step instructions in this guide—based on your specific opener type—you can easily fix common problems without hiring a professional. Regular maintenance and smart use of tools like the myQ app can further enhance your garage’s reliability and safety.
Take control of your Chamberlain system today and ensure your garage door works exactly how you need it to—with just the right limits.
Leave a Reply