Is your garage door not closing completely or stopping short of the ground? Maybe it slams down too hard or leaves a gap at the bottom? Don’t worry—this is a common issue that can usually be fixed by adjusting the down travel setting on your garage door opener. In this detailed guide, we’ll show you how to adjust down travel on Chamberlain garage door opener so your door functions smoothly and safely.
Whether you’re a DIY enthusiast or a homeowner just looking to avoid a service call, understanding how to make this adjustment can save you time, money, and hassle.
Read too: How Many Remotes Can A Chamberlain Garage Door Opener Have? Understaanding the Limits and Options
What Is “Down Travel” on a Garage Door Opener?
Before we dive into the process of how to adjust down travel on Chamberlain garage door opener, it’s helpful to understand what “down travel” means.
Down travel refers to how far your garage door moves downward before stopping. The travel limits are set on your opener and tell the motor when to stop moving the door. If the down travel is set incorrectly:
- The door may reverse before hitting the floor.
- It may leave a gap, letting in cold air, water, or pests.
- It might close too far, pressing against the ground and damaging the door or floor.
Setting the correct down travel is essential for both safety and performance.
Why Adjusting Down Travel Matters
Garage doors are heavy and can be dangerous if they don’t function properly. Adjusting the down travel ensures:
- A secure seal when the door is closed
- Improved safety—especially if you have children or pets
- Proper alignment with the ground, preventing strain on the opener
- Energy efficiency—no gaps means better insulation
When You Should Adjust the Down Travel
Here are some clear signs you need to adjust the down travel on your Chamberlain opener:
- The garage door stops before it fully closes
- The door reverses right before hitting the floor
- The door hits the ground hard or compresses weather stripping
- You’ve recently installed a new garage door
- You’ve noticed changes in performance after a power outage
Tools You’ll Need
You don’t need fancy equipment to adjust your Chamberlain opener. Just gather the following:
- A step ladder to reach the motor housing
- A flathead screwdriver
- Flashlight (if visibility is poor)
- Owner’s manual (optional but helpful for specific models)
Safety First!
Before starting, follow these safety tips:
- Don’t stand directly under the garage door when testing.
- Make sure your ladder is stable.
- Keep kids and pets out of the garage during adjustments.
- Never force the door open or closed manually during motor testing.
How To Adjust Down Travel On Chamberlain Garage Door Opener – Step-by-Step Guide
Now let’s get into the core of the article: how to adjust down travel on Chamberlain garage door opener the right way.
Step 1: Locate the Travel Adjustment Screws
Climb your ladder and examine the back or side panel of your garage door opener’s motor unit (usually mounted to the ceiling).
You’ll see two screws or dials labeled:
- Up Travel (or “Open”)
- Down Travel (or “Close”)
These are usually marked clearly, though the layout may vary depending on the model.
Tip: If your Chamberlain model uses digital controls or an LCD screen, refer to the manual for programming instructions.
Step 2: Test the Door’s Down Travel
Press the wall button or remote to close the door. Observe how it behaves:
- Does it stop short of touching the floor?
- Does it reverse before reaching the ground?
- Does it push too hard into the floor?
The answers will guide your adjustment.
Step 3: Make Small Adjustments
Now, use your screwdriver to adjust the Down Travel screw:
- Turn it clockwise to increase the travel distance (make the door close more).
- Turn it counterclockwise to decrease the travel (make the door close less).
Important: Make adjustments in 1/4 turn increments. Test the door after each adjustment to avoid overcorrecting.
Step 4: Test the Door Again
After each adjustment, use the remote or wall button to run a full close cycle. Watch for:
- Smooth, controlled movement
- No slamming or bouncing
- A gentle stop when the door reaches the floor
Repeat the adjustment process as needed until the door closes completely and safely.
Step 5: Check the Safety Reversal System
Once the down travel is set correctly, test your safety system:
- Place a small object (like a wood block) in the door’s path.
- Close the door using the opener.
- The door should touch the object and reverse automatically.
If it doesn’t reverse, your down force setting may also need adjusting.
How Down Travel Affects Other Systems
The down travel setting works in conjunction with other parts of your garage door system, including:
- Down Force: Determines how much pressure the door uses to close.
- Safety Sensors: Infrared beams that stop the door if something is detected.
- Limit Switches: Physical or digital switches that tell the motor when to stop.
Adjusting one setting can sometimes affect the others. Always re-test after making changes.
Digital Models: Programming Down Travel
Some newer Chamberlain openers (especially smart garage systems) allow you to set down travel electronically using a control panel or app.
For Digital Models:
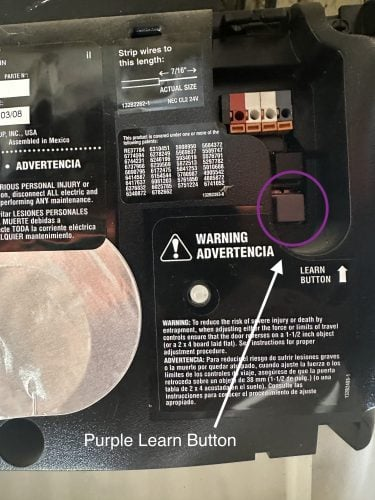
- Enter programming mode by pressing and holding the “Program” or “Learn” button.
- Use the arrow buttons to move the door to your desired closed position.
- Press “Set” or “Save” to confirm the setting.
Refer to your model’s manual for exact steps.
Maintenance Tips After Adjustment
Once you’ve successfully adjusted your down travel, help your garage door opener run longer and safer by following these tips:
- Lubricate hinges, rollers, and tracks twice a year.
- Test auto-reverse monthly.
- Keep the photo-eye sensors clean and aligned.
- Periodically check travel and force settings after major weather changes or power outages.
Troubleshooting Common Problems
Problem: Door still reverses before touching the ground
Solution: Increase the down travel slightly and ensure sensors are aligned.
Problem: Door slams too hard
Solution: Decrease the down travel and adjust the down force.
Problem: Lights blink but door doesn’t close
Solution: Check for sensor obstruction or wiring issues.
When to Call a Professional
If you’ve tried adjusting the settings and your garage door still malfunctions, it might be time to call a technician. Signs you need help include:
- Grinding noises from the motor
- Springs or cables look damaged
- The door is off track
- You’ve made multiple adjustments with no success
Don’t attempt repairs on high-tension components like springs unless you are trained.
Final Thoughts
Now that you know how to adjust down travel on Chamberlain garage door opener, you’re well-equipped to handle one of the most common garage door issues. With just a screwdriver and a few minutes, you can improve safety, security, and the smooth operation of your door.
By following this guide step by step, you’ll ensure your garage door closes exactly as it should—no more annoying gaps or frustrating reversals. Remember to test the auto-reverse feature after every adjustment, and keep your system maintained for years of hassle-free use.
Whether you’re doing this for the first time or brushing up on your maintenance skills, adjusting down travel is a key part of taking care of your home’s entryway.
Leave a Reply