How To Adjust Down Pressure On Chamberlain Garage Door Opener? If you’re experiencing issues with your Chamberlain garage door opener, particularly when it comes to the door not closing completely or reversing before reaching the ground, adjusting the down pressure may be the solution you need. Adjusting the down pressure is an essential task to ensure your garage door works smoothly and efficiently. In this guide, we will walk you through the steps of adjusting the down pressure on your Chamberlain garage door opener, explain why this adjustment is important, and give you tips on troubleshooting and maintaining your opener for long-term reliability.
Why Adjusting Down Pressure on a Chamberlain Garage Door Opener Is Important
The down pressure on your Chamberlain garage door opener plays a significant role in ensuring your garage door opens and closes with the proper force. If the down pressure is set too high or too low, it can cause a variety of problems, such as the door failing to close completely, the door reversing unexpectedly, or the opener straining under excessive pressure.
Adjusting the down pressure ensures that your garage door opener applies the right amount of force to close the door completely while also preventing damage to the door, the opener, or any objects that may be in the path of the door.
Understanding Down Pressure and How It Affects Your Garage Door Opener
Before learning how to adjust down pressure on your Chamberlain garage door opener, it’s important to understand what down pressure is and how it works.
- Down pressure refers to the amount of force the garage door opener uses to push the door downward during the closing cycle.
- When you press the button on your remote or wall control, the motor drives the garage door down. If the down pressure is too high, it may cause the door to slam shut with excessive force, possibly damaging the door, the opener, or any objects in its path.
- On the other hand, if the down pressure is too low, the door may not close completely or may reverse before it reaches the ground, leaving your garage exposed.
Properly adjusting the down pressure on your Chamberlain garage door opener ensures smooth, consistent operation without any risk of damage to your door or opener system.
How To Adjust Down Pressure On Chamberlain Garage Door Opener
Step 1: Locate the Down Pressure Adjustment Screws
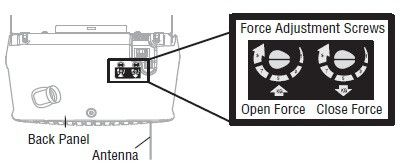
To adjust the down pressure, you’ll need to locate the adjustment screws on your Chamberlain garage door opener. These screws are typically located on the back or side of the motor unit. They may be labeled as “Up Force” and “Down Force.” The Down Force screw is the one that controls the amount of pressure applied during the closing cycle.
Note: Ensure the door is fully open before beginning the adjustment process. This will allow you to make accurate adjustments without affecting the opener’s operation.
Step 2: Turn Off Power to the Garage Door Opener
Before you begin adjusting the down pressure, make sure to turn off the power to the Chamberlain garage door opener for safety. You can do this by unplugging the opener from the electrical outlet or by turning off the circuit breaker that controls the garage door opener.
Step 3: Adjust the Down Pressure Screw
Using a flathead screwdriver, turn the down force adjustment screw on the motor unit. Turning the screw clockwise will increase the down pressure, making the door close more forcefully. Turning it counterclockwise will decrease the down pressure, making the door close more gently.
- If the door is reversing before it reaches the floor or not closing fully, you may need to increase the down pressure by turning the screw clockwise. This will ensure that the door closes completely without reversing.
- If the door slams down too hard, you may need to decrease the down pressure by turning the screw counterclockwise.
It’s important to make small adjustments and test the door after each change to avoid setting the pressure too high or low.
Step 4: Test the Door’s Operation
After adjusting the down pressure, plug the opener back in or turn the power back on. Test the door’s operation by closing and opening it several times. Pay attention to the following:
- Does the door close completely?
- Does the door reverse unexpectedly?
- Is there any unusual noise or strain from the opener?
If the door still doesn’t close completely or reverses before it hits the ground, repeat the process of adjusting the down pressure until the door functions smoothly.
Troubleshooting Tips for Down Pressure Adjustment
While adjusting the down pressure is typically a straightforward task, there may be other factors affecting the operation of your Chamberlain garage door opener. If you’re still experiencing problems after adjusting the down pressure, consider the following troubleshooting tips:
1. Check for Obstructions
Sometimes, the problem may not be related to the down pressure at all. Ensure that the garage door tracks are clear of debris or obstructions. If there is something blocking the path of the door, the opener may reverse the door to prevent damage.
2. Examine the Safety Sensors
The Chamberlain garage door opener is equipped with safety sensors that detect objects in the door’s path. If these sensors are misaligned, dirty, or malfunctioning, they can cause the door to reverse before reaching the floor. Clean the sensors and make sure they are properly aligned.
3. Inspect the Garage Door Springs
If the garage door springs are worn out or damaged, they may not provide enough tension for the door to close properly. In such cases, the opener may struggle to apply the correct down pressure. If you suspect the springs are damaged, it’s best to call a professional to inspect and repair them.
4. Check the Opener’s Force Settings
In addition to the down pressure, your Chamberlain garage door opener may have additional force settings that control how much force is applied to both the opening and closing cycles. Consult the user manual for your opener to learn how to adjust the force settings and ensure that both the up and down pressure are correctly balanced.
How To Maintain Your Chamberlain Garage Door Opener
Proper maintenance is key to ensuring that your Chamberlain garage door opener continues to perform optimally. Here are some important maintenance tips:
1. Lubricate the Moving Parts
Lubricating the moving parts of your garage door opener, such as the chain or belt, springs, and rollers, helps reduce friction and noise. Use a silicone-based lubricant to keep the opener running smoothly.
2. Inspect the Tracks and Door Components
Periodically check the garage door tracks, rollers, and springs for signs of wear or damage. Clean the tracks and tighten any loose hardware to keep everything functioning properly.
3. Test the Safety Features
Regularly test the safety features, including the photo eye sensors, to ensure they are working properly. This ensures that the opener will reverse the door if there is an obstruction in the way.
Conclusion: Ensuring a Smooth and Safe Garage Door Operation
Adjusting the down pressure on your Chamberlain garage door opener is a simple yet effective way to ensure your garage door opens and closes smoothly and safely. By following the steps outlined above, you can maintain the proper pressure settings for optimal performance. Additionally, regular maintenance and troubleshooting can help keep your garage door opener in excellent condition, ensuring reliable operation for years to come.
Leave a Reply