If your garage door is closing too quickly, reversing too soon, or simply not working as smoothly as it should, the issue might be with the down force settings. Learning how to adjust down force on Chamberlain garage door opener can prevent unnecessary wear, enhance safety, and extend the life of your opener system. Fortunately, the process is easier than you might think.
In this comprehensive guide, we’ll walk you through everything you need to know about adjusting the down force on your Chamberlain garage door opener, including when to adjust it, the tools you’ll need, safety tips, and a detailed step-by-step process.
Read too: How Many Remotes Can A Chamberlain Garage Door Opener Have? Understaanding the Limits and Options
What Is Down Force on a Chamberlain Garage Door Opener?
Before diving into how to adjust down force on Chamberlain garage door opener, let’s clarify what “down force” actually is.
Down force refers to the amount of pressure your garage door opener uses to close the door. If the down force is too low, the door may stop or reverse before reaching the ground. If it’s too high, it can become dangerous and potentially damage property or injure someone if the safety sensors fail.
Proper down force ensures:
- Safe and reliable door operation
- Prevention of door reversals on minimal resistance
- Reduction of wear on the motor and mechanical parts
Why You Might Need to Adjust the Down Force
There are several signs that indicate it’s time to adjust the down force on your Chamberlain garage door opener:
- The door reverses before it reaches the floor
- The door closes too forcefully
- The opener stops mid-close and the lights flash
- After a power outage or motor replacement
- After installing a new door or modifying door weight
In all these cases, a simple down force adjustment can restore normal functionality and ensure safety.
Safety First: What to Know Before Making Adjustments
Before attempting to adjust any settings, it’s important to follow these safety precautions:
- Disconnect power if you’re inspecting internal parts.
- Never attempt to bypass or disable safety sensors.
- Use a sturdy ladder and avoid working alone if possible.
- Keep hands, tools, and clothing clear of moving parts.
Now, let’s move on to the actual process of how to adjust down force on Chamberlain garage door opener.
Tools You’ll Need
Adjusting the down force typically requires minimal tools:
- A flathead screwdriver
- Step ladder (to reach the motor unit)
- Flashlight (if working in a dark garage)
- Optional: Your Chamberlain user manual for model-specific details
How To Adjust Down Force On Chamberlain Garage Door Opener – Step-by-Step Instructions
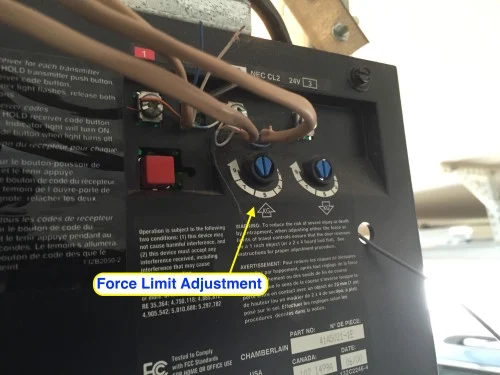
Step 1: Locate the Down Force Adjustment Screw
Climb your ladder and find the back or side panel of your Chamberlain garage door opener motor housing. You’ll see two adjustment screws:
- Up Force
- Down Force
These are often marked with labels and may be color-coded depending on your model.
Note: Do not confuse these with the travel limit screws, which control how far the door opens and closes.
Step 2: Identify the Current Problem
To determine how to adjust the down force properly, you must understand the specific problem:
- If the door reverses before closing fully, the down force is likely too low.
- If the door slams shut or doesn’t reverse when hitting an object, the down force may be too high.
Testing the door first helps identify what adjustment is necessary.
Step 3: Make Small Adjustments
Use your flathead screwdriver to turn the Down Force screw:
- Turn clockwise to increase the force.
- Turn counterclockwise to decrease the force.
Only turn the screw 1/4 turn at a time to avoid over-adjusting. Then test the door by closing it with your remote or wall button.
Step 4: Test the Safety Reversal System
Once you believe the force is correctly adjusted, test the safety reversal system:
- Place a solid object (like a piece of wood) under the door’s path.
- Close the door using the opener.
- The door should automatically reverse upon contact.
If it doesn’t reverse, reduce the down force immediately.
Step 5: Fine-Tune as Needed
Repeat the test-and-adjust process until:
- The door closes smoothly without slamming
- It doesn’t reverse before reaching the ground
- It reverses correctly when an object is detected
Keep in mind that environmental changes (like cold weather) or mechanical wear can require occasional re-adjustments over time.
Tips to Remember When Adjusting Down Force
Here are some best practices for success when learning how to adjust down force on Chamberlain garage door opener:
- Always start with small adjustments
- Test both up and down movements—force settings may affect both directions
- Check the door balance; an unbalanced door can make force adjustments ineffective
- Regularly clean and realign the safety sensors
- Check for obstructions or damaged tracks before adjusting force unnecessarily
When to Call a Professional
While adjusting the down force is usually safe and straightforward, it’s important to know your limits. Call a certified garage door technician if:
- The door is off track
- The springs or cables are broken
- The motor emits smoke or burning smells
- You’ve made multiple adjustments and the door still malfunctions
Garage doors are heavy and under tension, especially the torsion springs. If anything seems beyond a basic adjustment, it’s best to consult an expert.
Preventative Maintenance Tips
Once your Chamberlain garage door opener is working correctly, regular maintenance will help keep it that way:
- Lubricate moving parts every 6 months
- Inspect safety sensors monthly
- Test auto-reverse system regularly
- Check spring tension yearly
- Clean tracks and remove debris
Regular maintenance reduces the need for frequent adjustments and improves the overall performance of your opener.
FAQs About Down Force Adjustments
How often should I adjust down force?
You shouldn’t need to adjust it often. Only do so when you notice operational issues, after a repair, or after significant environmental changes.
Will adjusting down force affect the safety sensors?
No, but if the down force is set too high, the door may not reverse even if the sensors are triggered. Always test after adjustment.
What if my opener doesn’t have visible screws?
Some newer Chamberlain models use digital controls or smartphone apps. Refer to your user manual or Chamberlain’s support site.
Final Thoughts
Understanding how to adjust down force on Chamberlain garage door opener is a vital skill for any homeowner. It can fix frustrating issues like unexpected reversals or heavy closures and ensures your garage door system is safe for daily use.
With just a screwdriver, some patience, and a few tests, you can fine-tune your garage door opener and enjoy smooth, reliable operation every time you hit the button.
Keep your garage door opener in top shape with regular maintenance and safe adjustment practices—and you’ll avoid costly repairs and keep your home secure.
Leave a Reply