How To Adjust Closing Force On Chamberlain Garage Door Opener? Owning a garage door opener like the Chamberlain model brings convenience, security, and efficiency to your home. However, just like any other mechanical system, a garage door opener may require periodic adjustments to maintain optimal performance. One such crucial adjustment is the closing force. If your garage door isn’t closing properly, making adjustments to the closing force can prevent damage to the door or opener, and ensure that the door operates smoothly.
In this article, we’ll guide you through the process of adjusting the closing force on your Chamberlain garage door opener. We’ll discuss why this adjustment is necessary, how to do it safely, and when to make the adjustment. By the end of this guide, you’ll have the knowledge to maintain your garage door opener in peak condition.
Why Is Adjusting the Closing Force Important?
The closing force refers to the amount of force that the garage door applies when it closes. This is an essential setting that helps prevent damage both to the door and the opener. If the closing force is too high, the door may exert excessive pressure, potentially damaging the door, the opener, or any objects in the way. On the other hand, if the closing force is too low, the door may fail to close completely, leaving your garage vulnerable to the elements or intruders.
Adjusting the closing force ensures that your garage door operates efficiently and safely, with the right amount of pressure applied when the door closes. It also helps with the overall longevity of your garage door opener.
When Should You Adjust the Closing Force?
There are a few instances when adjusting the closing force is necessary:
- Garage Door Doesn’t Close Completely: If your garage door doesn’t fully close or stops halfway, this may be an indication that the closing force is too low.
- Garage Door Stops Before Reaching the Floor: If the door stops too soon, it could be due to excessive sensitivity in the closing force.
- Loud Noises or Jerky Movements: If your door closes with unusual noises or jerky movements, the force could be set too high.
- Changing Weather Conditions: Changes in temperature and humidity may cause the garage door’s tracks and springs to shift, which might require an adjustment to the closing force.
How To Adjust Closing Force On Chamberlain Garage Door Opener
Now that you know why adjusting the closing force is important, let’s walk through the steps to adjust the closing force on your Chamberlain garage door opener. This process is straightforward and can be done with minimal tools and time.
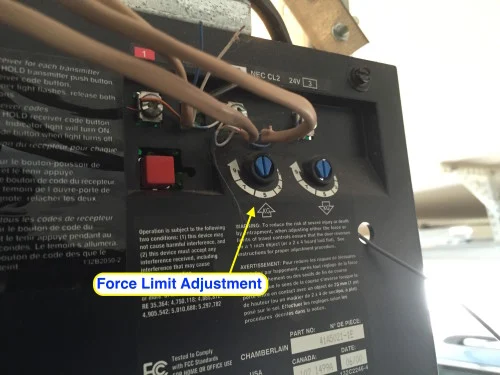
Step 1: Locate the Adjustment Screws
The first step is to locate the adjustment screws on your Chamberlain garage door opener. These screws are typically found on the opener’s motor unit. There will be two main adjustment knobs or screws: one for the opening force and one for the closing force. They are usually labeled “Close Force” and “Open Force.”
- For most Chamberlain models, these adjustments are located on the motor unit of the opener, near the light bulb compartment.
- If you’re unsure where the adjustment screws are, refer to the user manual for your specific model.
Step 2: Identify the Problem
Before making any adjustments, it’s important to identify the problem. If your door isn’t closing properly, check for any obstacles in the door’s path, as well as the alignment of the tracks. Once you’re sure there are no physical obstructions, you can move forward with adjusting the closing force.
- If the door closes too quickly or with jerky movements, the force may need to be reduced.
- If the door doesn’t close completely or stops halfway, the force may need to be increased.
Step 3: Turn the Adjustment Screw
Once you’ve identified which screw to adjust, use a flathead screwdriver to turn the closing force adjustment screw.
- To decrease the closing force: Turn the screw counterclockwise. This will reduce the pressure applied when the door closes, making the door more sensitive to obstacles and less likely to damage the door or opener.
- To increase the closing force: Turn the screw clockwise. This will increase the pressure and force applied when the door closes, ensuring that the door reaches the floor fully.
Step 4: Test the Door
After making your adjustment, it’s important to test the garage door to ensure it closes properly. Here’s how to test it:
- Operate the door: Close the door using the remote or wall switch and observe the operation. Watch how smoothly it closes and whether it reaches the floor completely.
- Test for resistance: Place a small object (like a rolled-up towel or a piece of cardboard) under the door while closing it. If the door stops when it encounters the object, that’s a good sign that the force is properly set.
- Listen for unusual noises: If the door closes smoothly without unusual noises, you’re good to go. If you hear grinding or jerky movements, you may need to adjust the force again.
Step 5: Repeat the Process if Necessary
Sometimes, the first adjustment may not be perfect. If the door doesn’t close properly after the first test, you can repeat the adjustment process. Adjust the force slightly and test again until the door operates smoothly.
Safety Tips When Adjusting Closing Force
While adjusting the closing force on your Chamberlain garage door opener is relatively simple, there are some safety precautions you should keep in mind:
- Always disconnect the power: Before making any adjustments, make sure to disconnect the power to the garage door opener to prevent accidental activation while you’re working on it.
- Check the tracks and springs: If you’re having trouble adjusting the closing force, it might be a sign that the tracks are misaligned or that the springs need maintenance. If in doubt, call a professional.
- Test the door after adjustment: Always perform a test after adjusting the closing force to ensure the door operates properly. If the door doesn’t close properly, it could be a safety risk.
- Consult the manual: If you’re unsure about the location of the adjustment screws or the proper procedure, consult your Chamberlain user manual for detailed instructions specific to your model.
Troubleshooting Common Issues with Closing Force Adjustment
Even after adjusting the closing force, there may be a few lingering issues that can affect the performance of your Chamberlain garage door opener. Here are some common problems and how to troubleshoot them:
1. The Door Reverses After Closing
If your garage door closes but then immediately reverses back up, this could indicate that the closing force is set too high. It could also be due to a malfunctioning safety sensor.
Solution: Lower the closing force slightly and clean the sensors to ensure they’re properly aligned and free of debris.
2. The Door Stops Before Reaching the Floor
If the door stops before it reaches the ground, this is usually due to insufficient closing force. The door may not be able to complete the closing cycle due to a lack of pressure.
Solution: Increase the closing force by turning the adjustment screw clockwise.
3. Noisy or Jerky Movements
If the door makes loud noises or moves jerkily, it may indicate that the closing force is too high, causing the opener to overexert itself.
Solution: Decrease the closing force by turning the screw counterclockwise.
Conclusion
Adjusting the closing force on your Chamberlain garage door opener is an important task to ensure your garage door operates smoothly, safely, and efficiently. By following the simple steps outlined in this article, you can maintain your opener’s optimal performance and avoid unnecessary damage to your door and opener. Remember to always test your door after making adjustments, and consult your user manual for model-specific instructions.
If you continue to experience issues with your garage door opener, it may be time to consult a professional for further inspection or repairs. Proper maintenance will not only extend the life of your Chamberlain garage door opener, but it will also provide you with the peace of mind that your garage is secure and functioning correctly.
Leave a Reply