Is your Chamberlain garage door opener making odd noises, or is the door opening and closing unevenly? It might be time to check the belt tension. Knowing how to adjust the belt on a Chamberlain garage door opener is essential to keep your system operating safely and efficiently.
This guide walks you through:
- The signs your belt needs adjusting
- Step-by-step belt tension adjustment
- Safety tips and tools required
- Common mistakes to avoid
- Long-term maintenance for belt-drive garage openers
Let’s dive in and help you maintain the reliability and longevity of your Chamberlain system.
Read too: How Many Remotes Can A Chamberlain Garage Door Opener Have? Understaanding the Limits and Options
Why Belt Tension Matters in a Chamberlain Garage Door Opener
Chamberlain garage door openers are among the most trusted in North America, especially the belt-drive models known for their quiet and smooth performance. Unlike chain-drive openers, a belt system uses a reinforced rubber or polyurethane belt to lift the garage door.
Over time, belts can stretch slightly due to:
- Frequent use
- Seasonal temperature shifts
- Age and wear
If the belt becomes too loose, it can:
- Cause the door to slip or move unevenly
- Make unusual slapping noises
- Lead to belt damage or complete system failure
That’s why learning how to adjust the belt on Chamberlain garage door opener is so important.
How To Adjust Belt On Chamberlain Garage Door Opener – Full Instructions
Tools You’ll Need:
- 7/16-inch wrench or socket
- Ladder (6 to 8 feet)
- Work gloves
- Safety glasses
- Flashlight (optional)
Step 1: Disconnect Power and Ensure Safety
Before you begin, unplug the garage door opener from the outlet. If it’s hardwired, turn off the circuit breaker. Then, engage the emergency release cord (usually a red cord hanging from the trolley) to disconnect the door from the opener.
Tip: Always make sure the door is fully closed before you release the trolley to avoid uncontrolled movement.
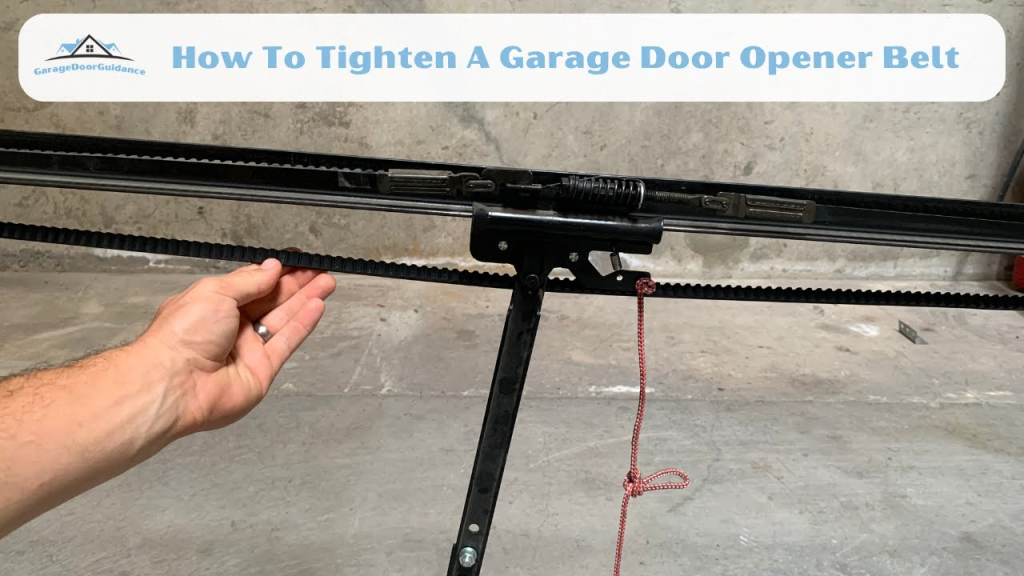
Step 2: Locate the Tensioning Nut
Climb your ladder and locate the tensioning assembly on the belt rail, usually near the garage door opener motor head.
You’ll see:
- A threaded tension bolt
- A spring-loaded nut or idler pulley bracket
This is where the belt tension can be adjusted.
Step 3: Check Belt Slack
The belt should sag no more than 1/4 inch to 1/2 inch when gently pushed at the midpoint between the rail and the trolley.
If it sags more than this:
- The belt is too loose
- Proceed with tightening
If it’s too tight (no visible slack), loosening is necessary to prevent damage.
Step 4: Adjust the Belt Tension
To Tighten the Belt:
- Use your 7/16-inch wrench or socket
- Turn the tension nut clockwise (usually righty-tighty)
- Do so in small increments (quarter turns)
- After each adjustment, check the slack
To Loosen the Belt:
- Turn the nut counterclockwise
- Again, work slowly and check often
Warning: Over-tightening the belt can put excess stress on the motor and rail system, potentially voiding your warranty.
Step 5: Reconnect and Test
- Reconnect the opener to power
- Re-engage the trolley by pulling the red release cord toward the motor
- Press the opener remote to run a full open/close cycle
Observe:
- Smoothness of movement
- Unusual sounds
- Vibration or hesitation
Repeat the adjustment process if necessary.
Signs That Your Chamberlain Belt Needs Adjustment
Even if your door is still working, here are signs the belt might be too loose or tight:
- Squeaking or slapping sound during operation
- Door moves jerkily or unevenly
- You notice belt slipping off the rail
- Belt appears visibly sagging more than ½ inch
- Motor head shakes or vibrates while lifting
Benefits of Proper Belt Adjustment
Learning how to adjust the belt on Chamberlain garage door opener offers real benefits:
- Improved safety for people and property
- Reduced wear on opener components
- Quieter operation, especially in belt-driven systems
- Longer lifespan of your garage door opener
- Lower maintenance costs in the long run
Proper adjustment ensures that your garage door opens and closes smoothly, safely, and quietly—just as Chamberlain designed it.
Common Mistakes to Avoid
- Skipping the power disconnection step – always unplug before working on any mechanical part.
- Over-tightening the belt – this causes premature wear and noise.
- Ignoring early warning signs like strange noises.
- Using the wrong tools – can strip the nut or damage parts.
- Not consulting the manual – models may vary slightly.
Maintaining Your Belt-Drive Chamberlain Opener
Regular maintenance is key to avoiding belt issues:
- Visual inspection every 3 months for cracks or sag
- Lubricate the rail (but never the belt!)
- Test the force and travel limits every 6 months
- Clean the rail and motor housing with a dry cloth
- Check mounting brackets for tightness and rust
If you notice frequent belt adjustments are required, it may be time to replace the belt, which typically lasts 8–12 years depending on usage.
When to Replace the Belt Instead of Adjusting
Adjustments are not a long-term fix if:
- The belt is frayed, cracked, or brittle
- You’ve reached the end of the tension bolt thread
- The door continues to slip or jam despite adjustments
Chamberlain replacement belts are available for most models (e.g., LiftMaster, Craftsman equivalents). Make sure to buy a compatible belt kit using your model number, which is usually found on the motor housing.
FAQs on How to Adjust Belt on Chamberlain Garage Door Opener
Q: How often should I adjust the belt?
A: Typically once every few years unless your opener is used very frequently.
Q: Can I adjust the belt without a wrench?
A: No, a 7/16-inch wrench or socket is required for safe and accurate adjustment.
Q: Is it safe to do this myself?
A: Yes, if you follow safety precautions and manufacturer guidelines.
Q: Will adjusting the belt void my warranty?
A: No, as long as you don’t damage parts. In fact, proper maintenance is encouraged.
Final Thoughts: Take Control of Your Garage Opener
Understanding how to adjust the belt on Chamberlain garage door opener empowers homeowners to take control of their garage system’s performance. With just a wrench, a ladder, and 15–30 minutes of your time, you can:
- Restore quiet and smooth operation
- Avoid costly repairs
- Ensure your garage door works safely and efficiently
Don’t ignore belt slack — a small adjustment now can prevent major problems later.
Leave a Reply