How To Adjust A Chamberlain Whisper Drive Garage Door Opener? If your Chamberlain Whisper Drive garage door opener isn’t working as smoothly as it used to, it might be time for a simple adjustment. Whether the door doesn’t close all the way, reverses unexpectedly, or won’t open completely, making the right adjustments can solve most issues without needing professional help.
In this comprehensive guide, we’ll walk you through how to adjust a Chamberlain Whisper Drive garage door opener, what tools you’ll need, common problems to look out for, and how to maintain the system to avoid future issues.
Read too: How Many Remotes Can A Chamberlain Garage Door Opener Have? Understaanding the Limits and Options
Understanding Your Chamberlain Whisper Drive Garage Door Opener
Before jumping into adjustments, it’s important to understand the basic functionality of your Chamberlain Whisper Drive garage door opener. This type of opener is known for its quiet belt-drive system, which is ideal for homes with attached garages. It uses sensors, limit switches, and force controls to determine how far the door should open or close and how much pressure it should use.
Key Features:
- Belt-Drive Motor: Quieter than chain-driven openers
- Safety Sensors: Prevents the door from closing on people or objects
- Travel and Force Adjustment Screws: Allow fine-tuning of door behavior
- Manual Release Handle: In case of power failure
Common Problems Requiring Adjustment
If you’re wondering how to adjust a Chamberlain Whisper Drive garage door opener, you’re likely facing one of these common issues:
- Door doesn’t fully open or close
- Door reverses before or after hitting the ground
- Door opens again after closing
- Door moves too quickly or slowly
- Remote control doesn’t work consistently
- Opener makes unusual noises or vibrations
All these problems are usually linked to incorrect travel limits, misaligned sensors, or improper force settings.
Tools You’ll Need for Adjustment
Adjusting your Chamberlain Whisper Drive opener is a relatively simple task that requires minimal tools:
- Flathead screwdriver
- Step ladder
- Clean rag (for dusting the sensors)
- Flashlight (if working in low-light conditions)
- Instruction manual (optional but helpful)
H2: How To Adjust A Chamberlain Whisper Drive Garage Door Opener – Step-by-Step Instructions
Step 1: Ensure the Opener Is Powered and in Standby
Make sure your garage door opener is plugged in and the opener light turns on. Use the wall control or remote to confirm that the system is receiving power.
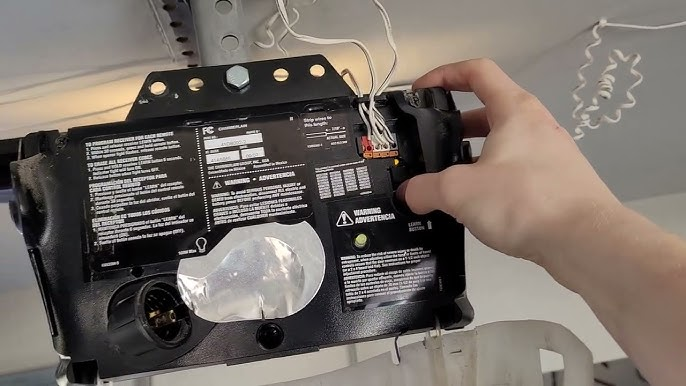
Step 2: Locate the Adjustment Screws
On the back or side of the opener’s motor unit, you’ll find three key adjustment screws:
- Up Travel Limit
- Down Travel Limit
- Force Adjustment (Up and Down)
These screws are usually color-coded and marked, making them easy to identify.
Step 3: Adjusting the Travel Limits
If your door doesn’t open or close fully, you’ll need to tweak the travel limits.
- To increase upward travel (door opens higher), turn the Up Travel screw clockwise.
- To decrease upward travel, turn it counterclockwise.
- To increase downward travel (door closes more), turn the Down Travel screw clockwise.
- To decrease downward travel, turn it counterclockwise.
Make small adjustments (no more than 1/4 turn at a time), then test the door.
Step 4: Adjusting the Force Settings
Force settings control how much power is used to move the door. If the opener struggles, reverses unnecessarily, or stops midway, the force settings may need adjustment.
- To increase upward force, turn the “Up Force” screw clockwise.
- To decrease it, turn it counterclockwise.
- Same goes for downward force—adjust the “Down Force” screw accordingly.
Again, make small changes and test after each adjustment.
Step 5: Check and Align the Safety Sensors
The photo-eye sensors at the bottom of the garage door track must be perfectly aligned. If the door reverses when trying to close, it could be due to dirty or misaligned sensors.
- Clean the lenses with a dry cloth.
- Ensure both sensors have a solid green or amber light.
- Adjust the position slightly until lights are solid and not blinking.
Step 6: Test the Door Multiple Times
After adjustments, use the remote or wall button to open and close the door several times. Observe for any unusual noises, hesitation, or reversal. If needed, fine-tune the settings again.
Preventive Maintenance Tips
Knowing how to adjust a Chamberlain Whisper Drive garage door opener is important, but so is regular maintenance. Here’s how to keep your system in top shape:
- Lubricate the belt and hinges every 6 months.
- Check the balance of the door—disconnect the opener and manually open the door halfway. If it doesn’t stay in place, call a technician.
- Inspect the cables, rollers, and springs annually.
- Test the auto-reverse system monthly by placing a small object in the door’s path.
When to Call a Professional
While most adjustments can be done on your own, there are times when professional help is necessary:
- If the door spring or cable is broken
- The opener unit emits burning smells or sparks
- Repeated errors after multiple adjustments
- Strange noises persist despite lubrication
Safety is crucial—don’t attempt repairs beyond your comfort level.
Why It’s Important to Learn How To Adjust A Chamberlain Whisper Drive Garage Door Opener
A misadjusted garage door opener can lead to wear and tear, unsafe operation, and higher energy costs due to poor sealing. By learning how to adjust a Chamberlain Whisper Drive garage door opener, you ensure:
- Smooth operation every time
- Extended lifespan of your opener and garage door
- Enhanced safety for your family and property
- Lower maintenance costs over time
With just a few tools and about 30 minutes of your time, you can make your garage opener feel like new again.
Frequently Asked Questions
Can I adjust the garage door opener if it’s still under warranty?
Yes, basic adjustments are usually allowed under the warranty, but avoid opening the motor housing or modifying electrical components without approval.
What if my door still won’t close completely?
Double-check the safety sensors and down travel settings. Also, ensure there are no obstructions in the track.
How often should I adjust my Chamberlain Whisper Drive opener?
Generally, once a year or anytime you notice performance issues.
Final Thoughts
Knowing how to adjust a Chamberlain Whisper Drive garage door opener not only saves you time and money, but also improves the overall safety and performance of your garage system. Most issues can be solved with simple tweaks to travel limits, force settings, and sensor alignment. Combine that with regular maintenance and you’ll enjoy hassle-free operation for years to come.
Don’t wait for your garage door to stop working altogether. With this guide, you’re equipped to handle the most common problems like a pro.
Leave a Reply