When it comes to operating your Chamberlain garage door opener, the ceiling control panel plays a crucial role. This control panel is located on the ceiling of your garage and is responsible for providing access to key functions such as programming, troubleshooting, and managing your garage door system. If you’re unsure of how to access and use the ceiling control panel for your Chamberlain garage door opener, you’re in the right place.
In this comprehensive guide, we will walk you through how to access the ceiling control panel Chamberlain garage door opener, the steps involved, and some important tips to help you troubleshoot and maintain your garage door opener system.
Read too: How Many Remotes Can A Chamberlain Garage Door Opener Have? Understaanding the Limits and Options
How To Access Ceiling Control Panel Chamberlain Garage Door Opener
The ceiling control panel for your Chamberlain garage door opener is typically located on the motor unit of the garage door opener system. This panel allows you to manage various functions, including:
- Programming new remotes and keypads
- Adjusting settings for sensitivity and force
- Troubleshooting issues
- Performing maintenance tasks
If you’re not familiar with how to access this control panel or if you need to make adjustments, following the steps below will help you.
1. Locate the Ceiling Control Panel
Before you begin, it’s important to locate the ceiling control panel. The panel is usually attached directly to the ceiling, above the garage door, and is part of the motor unit that controls the door’s movement.
The Chamberlain garage door opener system will have a small box or housing unit that contains the ceiling control panel. Depending on the model, this may look like a small rectangular box or a more prominent unit with a series of buttons and LED lights.
The ceiling control panel can be accessed by either removing the cover or using the buttons on the unit directly. However, in most cases, it will have a removable cover that can be lifted or unscrewed to reveal the internal panel.
2. Turn Off the Power Supply
Before you attempt to access or interact with the control panel, always ensure that the power to the Chamberlain garage door opener is turned off. This is an important safety precaution to prevent any potential electric shock or accidental operation of the door.
To turn off the power:
- Unplug the opener unit from the electrical outlet.
- Alternatively, you can turn off the circuit breaker that supplies power to the garage door opener.
Once the power is off, you can safely access the control panel.
3. Removing the Control Panel Cover
In most Chamberlain garage door openers, the control panel cover is designed to be easily removed for access. This cover might be attached with screws or it may simply snap into place, depending on the model of the opener. Here’s how to remove the cover:
a) Locate the Screws (If Any)
If your control panel cover is held in place by screws, use a screwdriver to remove them. Typically, the screws are located around the edges or in the center of the cover.
b) Snap-off Covers
For models that don’t require screws, simply pull the cover off the control panel gently. Be cautious to avoid damaging any internal wiring or components as you remove the cover.
c) Ensure No Loose Parts
Once the cover is removed, double-check that no parts are loose or detached. Everything should be intact and securely in place.
4. Understanding the Control Panel Functions
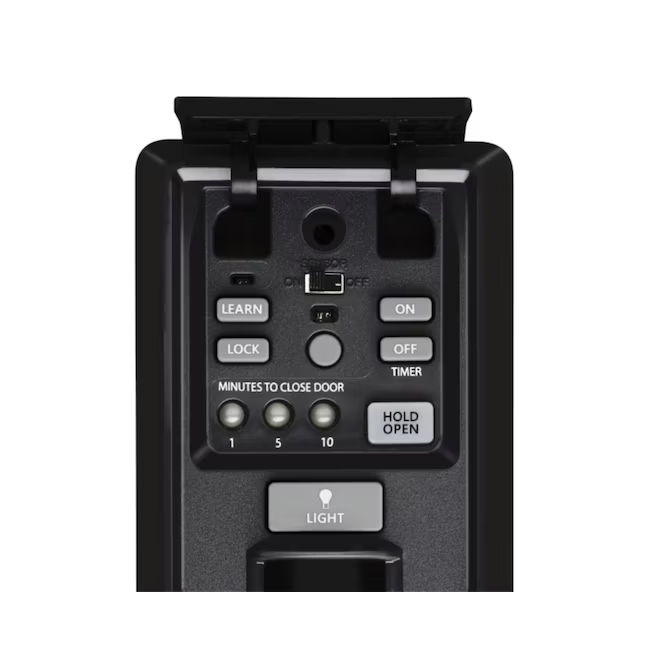
After you have accessed the ceiling control panel, it’s important to understand the various functions it controls. Depending on your Chamberlain garage door opener model, the control panel may feature different settings and buttons, including:
- Program Button: Used to program remotes, keypads, or other devices to your garage door opener.
- Up and Down Arrows: These buttons are used to adjust the settings of the opener, such as force, speed, and sensitivity.
- Diagnostic LED: A series of lights or a display that can help you identify errors or issues with the opener.
- Travel Limit Adjustments: Used to adjust how far the door opens and closes. This ensures proper travel limits and prevents damage to the opener or door.
5. Troubleshooting the Control Panel
Sometimes, you may need to troubleshoot the Chamberlain garage door opener through the ceiling control panel. Here are a few common issues and how to address them:
a) Garage Door Not Opening or Closing Fully
If your garage door is not opening or closing all the way, the control panel may allow you to adjust the travel limits. You can use the arrows or dials to fine-tune the opening and closing positions.
b) Garage Door Not Responding to Remote
If your remote or keypad is not responding, it could be due to a communication issue. The programming button on the control panel allows you to re-sync the opener with the remote control. Follow the programming instructions specific to your model.
c) Diagnostic LED Error Codes
Many Chamberlain garage door openers are equipped with a diagnostic LED light on the control panel. If this light is flashing or indicating an error, it is often accompanied by a code. You can refer to your Chamberlain garage door opener manual for error code definitions and troubleshooting steps.
6. Reprogramming and Resetting the Control Panel
In some cases, you may need to reset the Chamberlain garage door opener or reprogram the control panel to restore normal operation. Here’s how you can reset or reprogram the control panel:
a) Factory Reset
To perform a factory reset, locate the learn button on the ceiling control panel. Hold the button down for several seconds until the indicator light turns off. This will reset the opener to its factory settings, erasing any stored codes.
b) Reprogram the Remote
After performing a factory reset, you’ll need to reprogram the remotes and keypads. To do this, press the learn button and follow the programming instructions provided in your manual.
7. Reattaching the Control Panel Cover
After you have finished making adjustments or troubleshooting the control panel, reattach the cover. Ensure that all screws are securely fastened if your model requires screws, or snap the cover back in place if it’s a snap-on design.
Final Tips for Accessing and Maintaining Your Chamberlain Garage Door Opener Ceiling Control Panel
- Routine Maintenance: Regularly check the ceiling control panel for any loose connections or visible wear. Keeping the control panel in good condition can prevent future issues.
- Safety First: Always ensure that the power is off before attempting to access or make adjustments to the control panel.
- Read the Manual: For detailed instructions specific to your Chamberlain garage door opener, always refer to the owner’s manual. This will provide specific guidance for your model, including error codes, maintenance procedures, and programming details.
- Don’t Over-Tighten: When reattaching the cover or making adjustments, avoid over-tightening screws or forcing any parts back into place. This can cause damage to the unit.
Conclusion: How To Access Ceiling Control Panel Chamberlain Garage Door Opener
Knowing how to access the ceiling control panel Chamberlain garage door opener is essential for maintaining, programming, and troubleshooting your garage door system. By following the steps outlined above, you can safely access the control panel, make necessary adjustments, and ensure your garage door opener is functioning optimally.
Remember that if you are unsure about any step, it’s always a good idea to consult the user manual or reach out to a professional technician for assistance.
Leave a Reply