When it comes to home improvement projects, installing a garage door opener might seem daunting. However, with the right steps and a little patience, you can easily set up a Chamberlain garage door opener and enjoy the convenience of automatic garage access. Whether you’re replacing an old unit or installing a brand-new opener, this guide will walk you through everything you need to know.
If you’ve been asking yourself “How do you set up a Chamberlain garage door opener?”, this detailed article will provide a step-by-step guide, including essential tips for installation, programming, and troubleshooting.
What is a Chamberlain Garage Door Opener?
Chamberlain is one of the most trusted brands when it comes to garage door openers. Their products are known for being reliable, easy to install, and packed with features like MyQ® smart technology. Whether you’re installing a chain-drive, belt-drive, or wall-mount opener, Chamberlain offers a variety of systems to suit different garage sizes and needs.
Read too: How Many Remotes Can A Chamberlain Garage Door Opener Have? Understaanding the Limits and Options
Before diving into installation, let’s review some features that make Chamberlain garage door openers popular:
- Quiet Operation: Belt-driven openers are designed for quieter operation, making them perfect for garages located near living spaces.
- Security: Chamberlain openers come with rolling code technology that changes the opener’s code each time you use it, enhancing security.
- Wi-Fi Capability: With MyQ technology, you can control your garage door remotely using a smartphone app, giving you peace of mind whether you’re home or away.
- Durability: These openers are built to last, ensuring years of reliable service.
Tools You’ll Need to Set Up a Chamberlain Garage Door Opener
Before you start, gather the following tools to ensure a smooth installation process:
- Ladder (to reach high areas)
- Wrench set (for tightening bolts)
- Screwdrivers (flathead and Phillips)
- Power drill (for drilling holes)
- Measuring tape (to ensure correct placement)
- Level (to ensure the opener is mounted straight)
- Cordless drill with driver bits
- Socket set
- Stepladder (for easier access to the opener motor)
- Safety glasses and gloves (for protection during installation)
How Do You Set Up A Chamberlain Garage Door Opener? A Step-by-Step Guide
Let’s get started with the step-by-step installation process for your Chamberlain garage door opener. The process is similar across different models, although you should always refer to the manual that comes with your specific unit.
Step 1: Prepare Your Garage for Installation
Before you begin the actual installation, you’ll need to prepare your garage and door for the opener setup.
- Clear the area: Remove any obstacles from around the garage door, including tools, vehicles, or boxes, so you have a clear workspace.
- Check the door’s balance: Make sure your garage door is balanced and doesn’t have any broken springs or cables. If necessary, lubricate the moving parts.
- Measure the ceiling: Ensure there’s enough clearance for the opener, especially if you’re installing a belt-drive or chain-drive unit.
Step 2: Mount the Garage Door Opener
The first step in the installation is mounting the opener motor on the ceiling of the garage.
- Position the opener: Place the opener in the center of the garage, ensuring it aligns with the door’s opening mechanism. This is typically 6-8 inches from the ceiling, but it may vary based on your specific garage door setup.
- Install the mounting brackets: Use a level to ensure the opener is straight, then mark the positions for the mounting holes. Drill holes in the ceiling and attach the mounting brackets securely to the beams.
- Attach the opener: Lift the motor unit onto the brackets and secure it with the provided screws. Make sure it is stable and level before moving forward.
Step 3: Install the Rail and Chain/Belt Drive
Once the opener motor is mounted, you’ll need to attach the rail and chain or belt (depending on the model).
- Attach the rail: Connect the rail to the opener motor using the provided bolts. Ensure it is straight and secure.
- Install the chain or belt: If you have a chain-drive opener, attach the chain to the rail. For a belt-drive system, attach the belt. Ensure the belt or chain is tight, but not overly stretched.
- Connect the trolley: The trolley is the part that moves along the rail and connects to the garage door. Attach it securely to the chain or belt.
Step 4: Attach the Arm to the Door
- Install the door arm: The door arm connects the trolley to the top of your garage door. Attach one end of the arm to the trolley and the other end to the door’s center bracket.
- Ensure proper alignment: Use a level to make sure the door arm is aligned properly. Tighten the bolts securely to hold the arm in place.
Step 5: Install the Wall Control and Safety Sensors
Now that the main components are installed, it’s time to set up the wall control and safety sensors.
- Mount the wall control: Choose a location for the wall control near the entryway to your garage. It should be mounted about 5 feet from the ground. Use screws to secure the control panel to the wall.
- Install the safety sensors: The safety sensors prevent the door from closing if something is in the way. Mount the sensors about 6 inches above the ground on either side of the door opening. They should face each other directly across the threshold.
- Connect the wiring: Follow the instructions in the manual to wire the sensors and wall control to the opener motor.
Step 6: Connect Power and Test the System
Before testing, make sure everything is properly connected:
- Plug in the opener: Once everything is secured, plug the opener into a power outlet.
- Test the door: Use the wall control to test the door’s movement. It should open and close smoothly. If it doesn’t, adjust the settings or check the motor and door arm connections.
How Do You Set Up A Chamberlain Garage Door Opener: Programming the Remote
Now that the physical installation is complete, it’s time to program your remote and ensure everything is set up for convenient operation.
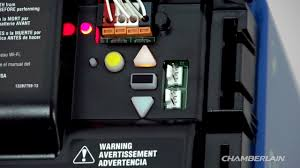
- Locate the Learn button: Find the Learn button on the motor unit of your opener (usually near the antenna). This button is used to pair remotes and keypads.
- Press the Learn button: Press and release the Learn button. The LED light next to the button should turn on.
- Program the remote: Within 30 seconds, press and hold the button on your remote that you want to use. The light on the opener should blink or the motor unit should make a sound to indicate the remote is paired.
- Test the remote: Press the button on the remote to ensure that the door opens and closes properly.
Troubleshooting: What to Do If Your Chamberlain Garage Door Opener Isn’t Working
While Chamberlain openers are reliable, sometimes issues may arise. Here are a few common problems and solutions:
1. The Door Doesn’t Open or Close
- Check the power: Make sure the opener is plugged in and the outlet is working.
- Inspect the door’s balance: A misaligned or unbalanced door can cause operational issues.
- Check the sensors: Ensure that the safety sensors are properly aligned and free from obstructions.
2. The Remote Doesn’t Work
- Replace the battery: If your remote isn’t responding, replace the battery.
- Reprogram the remote: If the remote is not paired with the opener, follow the programming steps again.
Conclusion: How Do You Set Up A Chamberlain Garage Door Opener?
Setting up a Chamberlain garage door opener is a straightforward process when you follow the proper steps. From mounting the motor unit and attaching the rail to programming the remote and testing the door, each stage is essential for a smooth installation.
By following this guide, you can confidently set up your Chamberlain garage door opener and enjoy the convenience, security, and durability it offers.
Leave a Reply