Whether you’re upgrading your garage access, replacing a lost remote, or ensuring the security of your home, reprogramming your garage door opener is a vital step. If you’re wondering how do you reprogram a Chamberlain garage door opener, you’re in the right place. This guide will walk you through the entire process, from understanding your Chamberlain model to executing the reprogramming with ease.
In today’s age of smart home technology and enhanced security concerns, knowing how to take control of your garage access is crucial. This article not only answers your question but empowers you to maintain and secure your home more confidently.
Read too: How Many Remotes Can A Chamberlain Garage Door Opener Have? Understaanding the Limits and Options
Why Reprogram Your Chamberlain Garage Door Opener?
Before diving into the step-by-step instructions, it’s important to understand why reprogramming might be necessary:
- Lost or stolen remote: Prevent unauthorized access by erasing and resetting codes.
- New home ownership: Reprogram for security if you’ve moved into a new house.
- Adding a new remote or keypad: Pair additional access devices to your system.
- Replacing old remotes: Sync new remotes after the old ones stop working.
- Security upgrades: Periodically reset codes to enhance safety.
Chamberlain garage door openers are user-friendly, and reprogramming them is easier than you might think. Let’s break down the process.
How Do You Reprogram A Chamberlain Garage Door Opener – The Complete Process
The answer to how do you reprogram a Chamberlain garage door opener depends slightly on your model, but most follow a very similar process. Here’s a general step-by-step guide that covers most models made in the last 20 years.
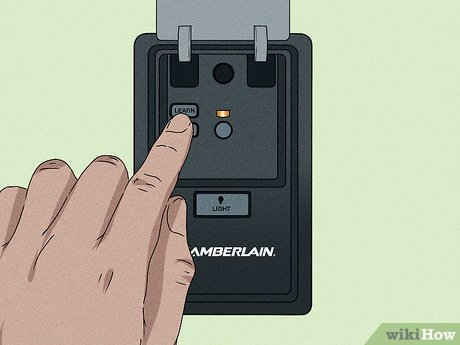
🔹 Step 1: Locate the “Learn” Button
Chamberlain garage door openers feature a Learn button located on the back or side of the opener unit. To access it:
- Grab a sturdy ladder and safely reach the main opener housing.
- Remove any light cover if needed to see the control panel.
- Look for a yellow, red, orange, purple, or green Learn button depending on the model.
This button is your gateway to reprogramming.
🔹 Step 2: Clear All Previous Codes (Optional but Recommended)
To erase all old remote control or keypad codes from the unit:
- Press and hold the Learn button for about 6–10 seconds until the LED next to it turns off.
- This clears all stored remotes and keypads—great if you’re resetting access or starting fresh.
⚠️ Warning: This will remove all existing codes, so make sure you’re ready to reprogram all devices.
🔹 Step 3: Program the Remote Control
To sync a new or replacement remote:
- Press and release the Learn button once.
- Within 30 seconds, press and hold the button on your remote that you want to program.
- Hold the button until the garage door opener light blinks or you hear a click (about 2–3 seconds).
Your remote is now programmed and ready to use.
🔹 Step 4: Program the Keypad (If Applicable)
To reprogram your Chamberlain wireless keypad:
- Press and release the Learn button on the opener.
- Within 30 seconds, enter a four-digit PIN on the keypad.
- Press and hold the Enter button until the garage door opener light flashes.
Your keypad is now synced to the opener with your custom PIN.
Tips for Successful Programming
To ensure a smooth reprogramming process:
- Stay close to the garage door opener during programming.
- Make sure remotes have fresh batteries.
- Only press the Learn button once unless you’re clearing codes.
- Don’t wait too long after pressing Learn—there’s a 30-second window.
If something doesn’t work, repeat the process from the Learn button. It’s normal to require a second attempt, especially for new users.
Troubleshooting Common Issues
Even if you follow all the steps, you might still run into issues. Here are common problems and solutions:
❌ The remote doesn’t work after programming
✅ Solution: Try reprogramming. Check the battery. Make sure the remote is Chamberlain-compatible.
❌ The keypad won’t sync
✅ Solution: Confirm the keypad is compatible with your opener model. Re-enter your 4-digit PIN slowly and carefully.
❌ The Learn button isn’t responding
✅ Solution: Unplug the opener, wait 30 seconds, then plug it back in and retry. Make sure you’re pressing the correct button.
❌ The door opens partially or not at all
✅ Solution: Check if the door sensors are aligned and nothing is obstructing the door’s path.
Understanding Your Chamberlain Model
Different Chamberlain openers may vary slightly depending on whether they use Security+, Security+ 2.0, or MyQ technology.
🔸 Security+ (1993–2011)
- Uses red/orange or purple Learn buttons
- Supports basic remote/keypad functions
🔸 Security+ 2.0 (2011–present)
- Uses yellow Learn buttons
- Advanced rolling code encryption
- More secure programming
🔸 MyQ Enabled Openers
- Wi-Fi enabled
- Controlled via the MyQ app
- Some programming may be done through the app interface
Knowing your model helps with choosing the right accessories and following the correct procedure.
Reprogramming Through the MyQ App (For Smart Models)
If your Chamberlain garage door opener is MyQ-compatible, you can manage reprogramming and remote access through your smartphone:
- Download the MyQ app.
- Create an account or log in.
- Connect your garage door opener by following on-screen instructions.
- Add new virtual keys, manage guest access, and set schedules.
The app is ideal for users who prefer smartphone control over traditional remotes or keypads.
When Should You Reprogram?
Here are a few real-life situations when reprogramming is a smart idea:
- 🔐 After moving into a new home: Reset the opener to remove old codes from previous owners.
- 🎮 Replacing old or lost remotes: Prevent unauthorized access by clearing and resetting.
- 🧑🔧 Home maintenance or upgrades: When servicing or upgrading your system.
- 📦 Adding delivery access: Grant temporary access to delivery personnel or guests.
Reprogramming gives you peace of mind and control over who can access your garage—and by extension, your home.
Safety Tips While Reprogramming
- Disconnect power if opening the motor housing.
- Keep children and pets clear of the garage door during testing.
- Do not press the door button repeatedly—it may cause motor strain or desync the remote.
- Avoid standing under the door while it’s moving.
Always consult your Chamberlain owner’s manual if unsure about a step.
Frequently Asked Questions
🧠 Can I program multiple remotes to one opener?
Yes! You can program several remotes and a keypad to one Chamberlain garage door opener.
🧠 How many remotes can my Chamberlain opener remember?
Typically, it can store up to 8 remote controls and 1 keypad, depending on the model.
🧠 Do I need to reprogram my opener after a power outage?
No. Codes are stored in memory and won’t be lost during power interruptions.
🧠 Can I erase just one remote from memory?
Unfortunately, no. You must clear all codes and reprogram the devices you still want to use.
Final Thoughts
So, how do you reprogram a Chamberlain garage door opener? The answer is—easily, with just a few steps. Whether you’re updating your remotes, enhancing security, or integrating new devices, the process is straightforward and takes just a few minutes.
Chamberlain has made their garage openers reliable, secure, and easy to maintain—even for non-tech-savvy homeowners. By understanding how reprogramming works, you gain more control over one of the most important access points to your home.
Stay secure, stay informed, and take advantage of smart garage technology for peace of mind every time you come and go.
Leave a Reply