Are you having trouble with your Chamberlain garage door opener keypad? Whether you’ve forgotten your code, bought a new keypad, or just need to reset it for another reason, you may be wondering, How do I reset my Chamberlain garage door opener keypad? Resetting your keypad can restore functionality and make your garage door opener more secure. Fortunately, resetting a Chamberlain keypad is a simple process that you can easily perform yourself.
In this guide, we will walk you through the steps to reset your Chamberlain garage door opener keypad, troubleshoot common issues, and provide maintenance tips to keep it working efficiently.
Why Reset My Chamberlain Garage Door Opener Keypad?
The Chamberlain garage door opener keypad is an essential device that allows you to open and close your garage door without needing a remote. It’s a convenient way to access your garage, especially when you don’t have your car remote with you. However, there are several reasons you may need to reset it:
- Forgotten PIN: If you’ve forgotten the code, resetting the keypad will allow you to create a new one.
- Security Concerns: If you feel that your PIN has been compromised, resetting the keypad will give you the opportunity to update the code for enhanced security.
- New Keypad Installation: If you’re installing a new Chamberlain keypad, you will need to reset it to sync with your existing opener.
No matter the reason, resetting the Chamberlain garage door opener keypad is a manageable task that ensures smooth operation.
How Do I Reset My Chamberlain Garage Door Opener Keypad?
Step 1: Locate the “Learn” Button on Your Opener
The first step in resetting your Chamberlain garage door opener keypad is to find the Learn button on the garage door opener. The Learn button is typically located on the back or side of the opener’s motor unit. This button is essential for programming the keypad to communicate with the opener.
- Look for the “Learn” Button: The Learn button is typically square or round, and its color can vary depending on the model (red, green, or orange).
- Open the Garage Door: Before proceeding with the reset, ensure your garage door is fully open to avoid any mishaps during the programming process.
Step 2: Press and Hold the “Learn” Button
Once you’ve located the Learn button on the opener, you need to clear the existing PIN code from the system. This action will prepare the opener to accept a new code from the keypad.
- Press the Learn button for about 6-10 seconds, or until the indicator light next to it turns off. This will clear all stored codes from the opener, including any previous codes linked to the keypad.
- After the light goes out, the opener will no longer recognize the old code, and it will be ready to receive a new code.
Step 3: Reset the Keypad
Now that you’ve cleared the opener’s memory, you can reset the Chamberlain keypad. This will allow you to create a new PIN code.
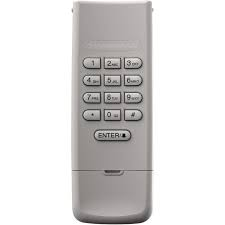
- Press and Hold the “*” and “#” Buttons: Press and hold both the “*” and “#” buttons simultaneously on the keypad.
- Enter the New Code: After pressing the “*” and “#” buttons, enter a new 4-digit PIN that you can easily remember. The keypad will blink to confirm the input.
- Press the Enter Button: After entering your new PIN code, press the Enter button to save the new code.
- Check the Keypad: The keypad should now be reset and synced with the opener. Test the keypad by entering the new code and ensuring the garage door opens and closes as expected.
Step 4: Reprogram the Keypad to Your Opener
Now that you have reset your Chamberlain garage door opener keypad, you need to link it to the motor unit. This is done by entering the PIN you just created and syncing it with the opener.
- Press the “Learn” Button Again: Once the system has cleared the previous PIN, press the Learn button again. The indicator light will turn on, signaling that the opener is ready to accept a new PIN code.
- Enter the New PIN on the Keypad: Within 30 seconds of pressing the Learn button, enter the new 4-digit code you created on the keypad.
- Press the Enter Button: After entering the code, press Enter to confirm. The garage door opener will blink its lights, signaling that the new code has been successfully synced.
Step 5: Test the Keypad
Finally, test the keypad by entering the new code and checking if the garage door opens and closes as expected. If it does, the Chamberlain garage door opener keypad has been successfully reset.
Common Issues and Troubleshooting
Even though resetting the Chamberlain garage door opener keypad is usually straightforward, there may be a few issues that arise. Here are some common problems and troubleshooting tips:
1. The Keypad Doesn’t Respond After Resetting
If your keypad isn’t responding after a reset, try the following steps:
- Check the Batteries: Ensure the batteries in the keypad are fresh and inserted correctly. Weak or dead batteries can prevent the keypad from functioning properly.
- Ensure the Keypad Is Linked to the Opener: Double-check that the keypad is properly synced with the opener. If the opener’s light does not blink after pressing the Learn button, it may not have accepted the new PIN.
- Press the Right Buttons: Ensure you are pressing the “*” and “#” buttons correctly while entering the code.
2. The Keypad is Not Accepting the New Code
If the keypad isn’t accepting the new PIN:
- Enter the PIN Quickly: After pressing the Learn button, you must enter the new code within 30 seconds. If you wait too long, the system may exit programming mode.
- Clear the Memory Again: If the keypad is still not accepting the code, you may need to reset the system and start the process over, clearing the memory and reprogramming the PIN.
3. The Garage Door Opener Doesn’t Respond
If the garage door opener doesn’t respond after resetting the keypad, check the following:
- Ensure the Door Is Fully Open: If the door isn’t fully open during the programming process, it may cause issues.
- Check for Interference: Make sure there are no obstacles or electrical interference that might be preventing the system from properly syncing.
Maintenance Tips for Your Chamberlain Garage Door Opener Keypad
To keep your Chamberlain garage door opener keypad in top working condition, follow these maintenance tips:
1. Regularly Replace the Batteries
Make sure to replace the batteries in your keypad every 6-12 months or when you notice a decrease in performance. Fresh batteries ensure smooth operation.
2. Clean the Keypad
Wipe down the keypad with a clean, dry cloth to remove dust, dirt, or grime that can affect the keypad’s performance. Avoid using harsh chemicals or abrasive materials.
3. Test the Keypad Periodically
Every few months, test the keypad to ensure that it is functioning properly. Enter the code and confirm that the garage door opens and closes as expected.
4. Keep the Keypad Secure
To prevent unauthorized access, make sure that the keypad is not easily accessible to others. Store the PIN code in a safe place, and do not share it unless necessary.
Conclusion
Resetting your Chamberlain garage door opener keypad is a simple and effective way to regain access to your garage door. Whether you’ve forgotten your PIN or want to enhance security, following the steps outlined above will help you quickly reset the keypad and get it working again.
By keeping your keypad in good condition and periodically testing it, you can ensure smooth, hassle-free access to your garage. If you encounter any issues, refer to the troubleshooting tips to resolve them quickly.
Leave a Reply