Installing a garage door opener used to be a job reserved for professionals. But with the evolution of smart home technology and intuitive DIY solutions, more homeowners are taking installation into their own hands. One standout product in this space is the Chamberlain WD1000WF 1-1 4 HPS Wi-Fi Garage Door Opener. Known for its high-powered motor, ultra-quiet belt drive, and built-in Wi-Fi, this model not only adds smart features to your garage but also boosts security and convenience.
In this comprehensive guide, we’ll walk you through the Chamberlain WD1000WF 1-1 4 HPS Wi-Fi Garage Door Opener Installation process, offering valuable tips, common troubleshooting advice, and everything else you need to get the job done right.
Read too: How Many Remotes Can A Chamberlain Garage Door Opener Have? Understaanding the Limits and Options
Why Choose the Chamberlain WD1000WF 1-1 4 HPS Wi-Fi Garage Door Opener?
Before diving into installation, it’s worth understanding why this model is so popular among smart home enthusiasts and DIYers.
- High Power: With a 1-1/4 HPS (Horsepower Strength) motor, it’s built to lift heavy, reinforced, or double-layered garage doors.
- Ultra-Quiet Belt Drive: Unlike chain-driven systems, this one uses a reinforced steel belt for quieter operation.
- Wi-Fi Enabled: Built-in Wi-Fi and compatibility with the myQ® app mean you can open, close, and monitor your garage remotely.
- Battery Backup: Ensures continued operation during power outages.
- Enhanced Security Features: Security+ 2.0®, motion detection, and automatic locking enhance home safety.
Tools and Materials Needed for Installation
Before starting your Chamberlain WD1000WF 1-1 4 HPS Wi-Fi Garage Door Opener Installation, gather the following tools and materials:
Tools:
- Drill with bits
- Adjustable wrench
- Phillips and flathead screwdrivers
- Socket set
- Ladder
- Level
- Tape measure
- Stepladder
Included Materials:
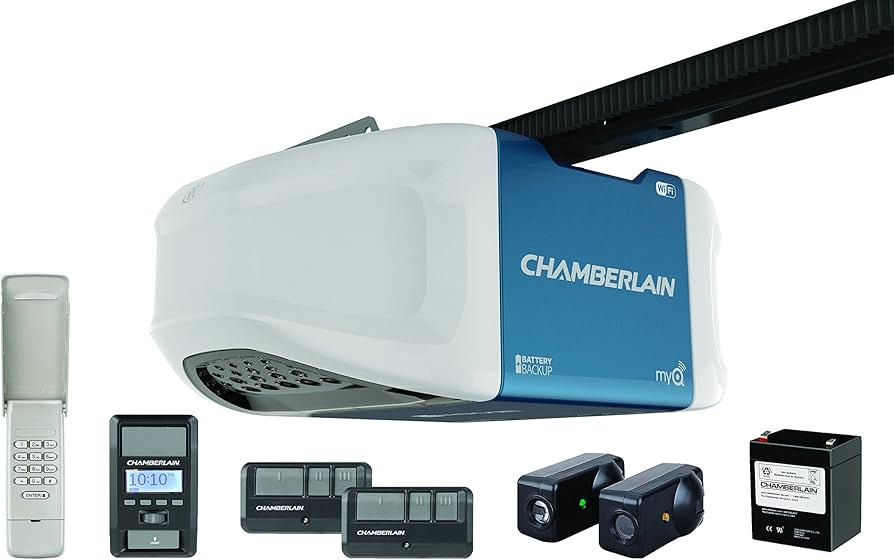
- Garage door opener unit
- Rail assembly kit
- Safety sensors
- Wall control panel
- Wireless remote
- Mounting brackets
- Hardware kit
Step-by-Step Chamberlain WD1000WF 1-1 4 HPS Wi-Fi Garage Door Opener Installation
H2: Chamberlain WD1000WF 1-1 4 HPS Wi-Fi Garage Door Opener Installation – Complete DIY Instructions
Installing the Chamberlain WD1000WF doesn’t require expert knowledge, but following the correct procedure is critical for safety and functionality.
Step 1: Preparation and Safety Checks
Before you begin, ensure the garage door is in good condition and moves freely. Disconnect the power to any existing garage door opener and clear the workspace.
Pro Tip: Take a photo of your current setup (if replacing an older unit) for reference during installation.
Step 2: Assemble the Rail and Attach the Belt
- Connect the rail sections using the provided connectors.
- Slide the trolley onto the rail.
- Feed the belt or chain through the rail and around the motor pulley and tensioner pulley.
- Tighten the tension bolt to secure the belt in place.
This step is crucial for the smooth operation of your garage door opener. Ensure the belt is taut but not overly tight.
Step 3: Mount the Motor Unit
- Lift the motor unit and position it on a stepladder or temporary support.
- Secure the rail to the header bracket above the garage door using the provided fasteners.
- Mount the motor unit to the ceiling using angle iron or brackets. Use a level to ensure the unit is perfectly horizontal.
Note: The motor should sit about 7 feet off the ground for optimal performance.
Step 4: Install the Safety Sensors
- Position the sensors 6 inches above the garage floor on either side of the door.
- Run the wiring along the garage wall and secure it with staples.
- Connect the wires to the motor unit’s sensor terminals, ensuring you match the colors.
The safety sensors prevent the door from closing if something is in the way. Proper alignment is essential—use the built-in LED indicators to ensure they’re synced.
Step 5: Install the Wall Control Panel
- Mount the wall control near the entrance to your garage (at adult height).
- Run the included wire from the control panel to the motor unit.
- Strip the wire ends and insert them into the designated terminals.
The control panel also acts as the main diagnostic tool for the opener and includes motion detection lighting.
Step 6: Connect Power and Test
- Plug the motor unit into a grounded outlet.
- Reconnect power to the garage.
- Use the wall control and remote to test the opener.
- Adjust the up/down travel limits using the motor unit’s adjustment knobs or digital panel.
Watch the door open and close several times to ensure it moves smoothly and stops at the correct height.
Step 7: Configure Wi-Fi and myQ App
- Download the myQ app from the Apple App Store or Google Play.
- Create an account or log in.
- Follow the in-app instructions to connect the opener to your home Wi-Fi network.
- Test remote access and set up alerts, schedules, and user access.
Once connected, you’ll be able to open, close, and monitor your garage door from virtually anywhere.
Tips for a Successful Installation
- Read the manual fully before starting the installation.
- Double-check all connections, especially wiring and sensor alignment.
- Use proper support while lifting the motor unit to prevent strain or injury.
- Label your wires if you’re replacing an older system.
- Keep firmware updated for continued compatibility with smart home systems.
Troubleshooting Common Issues After Installation
Door Doesn’t Close Completely
- Check the down limit adjustment.
- Ensure safety sensors are aligned and unobstructed.
Wi-Fi Connection Fails
- Reboot your router and ensure the signal reaches the garage.
- Use a Wi-Fi range extender if needed.
Remote Doesn’t Work
- Reprogram the remote using the learn button on the opener.
- Check battery life.
Lights Flash but Door Doesn’t Move
- Indicates sensor misalignment. Adjust until the LED lights on both sensors are solid.
Maintenance After Installation
To keep your Chamberlain WD1000WF 1-1 4 HPS Wi-Fi Garage Door Opener running efficiently, perform regular checks:
- Lubricate door hinges and rollers every 6 months.
- Test the auto-reverse safety feature monthly.
- Clean the photo-eye sensors.
- Keep the rail free of dust and debris.
The belt drive requires less maintenance than chain-driven systems, but occasional inspections help ensure longevity.
Final Thoughts: A Smart Addition to Any Home
Completing your Chamberlain WD1000WF 1-1 4 HPS Wi-Fi Garage Door Opener Installation is more than a technical upgrade—it’s a lifestyle improvement. With smart functionality, enhanced security, and powerful performance, this opener offers everything a modern homeowner needs. And the fact that it’s DIY-friendly makes it all the more appealing.
Whether you’re upgrading from a noisy, outdated system or installing a garage door opener for the first time, the Chamberlain WD1000WF delivers on all fronts: reliability, technology, and ease of use.
Leave a Reply