If your Chamberlain Garage Door Opener Model 4100 is showing signs of malfunction—particularly with its sensor system—the part you’re likely dealing with is the sensor component identified as 41B4115. This part is critical for ensuring safe and consistent operation of your garage door system, as it prevents the door from closing when an object is detected in its path.
In this detailed guide, we’ll explore everything you need to know about the Chamberlain Garage Door Opener Model 4100 Sensor Parts 41B4115, including how the sensors work, common problems, how to troubleshoot, and where and how to replace this crucial safety component.
Read too: How Many Remotes Can A Chamberlain Garage Door Opener Have? Understaanding the Limits and Options
Understanding the Chamberlain Model 4100 and Its Sensor System
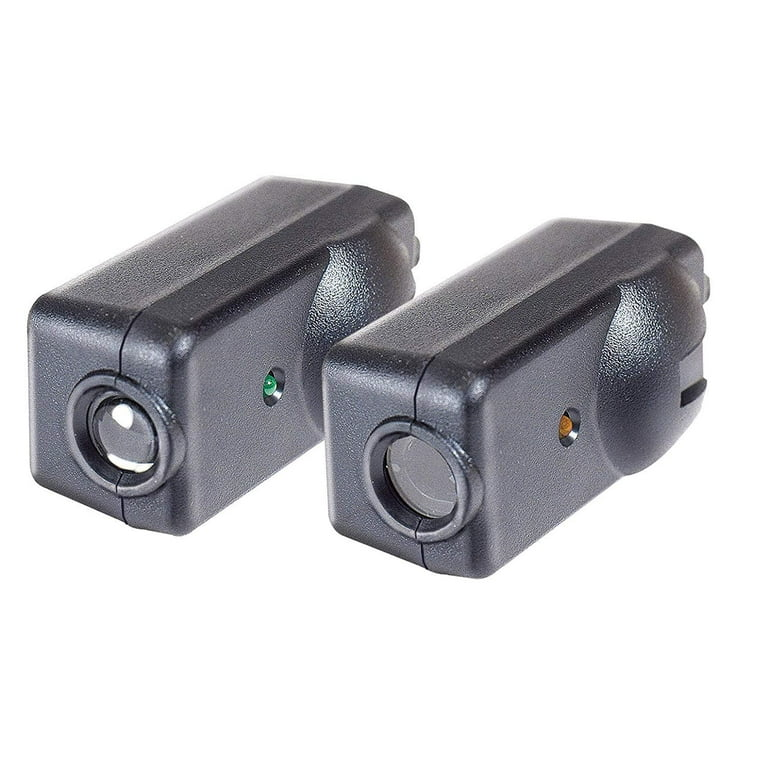
The Chamberlain Garage Door Opener Model 4100 is a chain-drive unit known for its durability and reliable performance. One of its most critical safety features is the use of infrared safety sensors, often referred to as photo eyes. The specific part number 41B4115 refers to the complete set of sensor parts that includes the emitter and receiver, mounting brackets, and wiring.
These sensors:
- Are mounted near the bottom of the garage door track on either side.
- Send an invisible infrared beam from one side to the other.
- If the beam is blocked or interrupted, the door automatically reverses or won’t close, protecting children, pets, and vehicles.
This system is essential for preventing accidents, which is why keeping the Chamberlain Garage Door Opener Model 4100 Sensor Parts 41B4115 in working order is a priority.
Why Sensor Parts Like 41B4115 Matter
The sensors (also called safety reversing sensors) are required by law for all garage door openers manufactured after 1993 in the United States. The 41B4115 sensor kit ensures your system complies with safety regulations while also functioning reliably day-to-day.
Common uses and reasons for replacement include:
- Sensor misalignment
- Broken wires
- Dirty lenses
- Sensor LED indicators not lighting up
- Random door reversal
If you’re experiencing issues like the garage door not closing completely or blinking lights on the opener unit, the sensors should be the first component to inspect.
Troubleshooting Chamberlain Garage Door Opener Model 4100 Sensor Parts 41B4115
Whether you’re dealing with malfunctioning sensors or looking to upgrade or replace a worn-out unit, knowing how to troubleshoot and resolve issues with sensor parts 41B4115 is essential.
1. Check Sensor Alignment
Misaligned sensors are the number one cause of malfunction. Here’s how to check:
- Locate the LED lights on both the emitter and receiver sensors.
- One light should be solid green, and the other solid amber.
- If either light is off or blinking, the beam may be misaligned.
Fix: Gently adjust each sensor until both LEDs are solid. Use a level or string line to confirm alignment across the doorway.
2. Clean the Sensor Lenses
Dirt, spiderwebs, or condensation on the sensor lenses can block the infrared beam.
Fix:
- Use a soft microfiber cloth and a mild cleaner.
- Do not use abrasive materials that can scratch the lens.
3. Inspect Wiring and Connections
Damaged or loose wires can lead to power loss or intermittent signal.
Steps:
- Turn off the power to the opener at the circuit breaker.
- Inspect wires leading from the sensor to the opener unit for:
- Frays
- Cuts
- Loose terminals
- Reconnect or replace wires as needed.
The Chamberlain 41B4115 sensor parts typically include about 2 feet of pre-attached wire, but splicing may be required for longer distances.
4. Check LED Light Indicators
The status of the LEDs tells you a lot about the sensor’s health:
- Both lights solid = functioning correctly
- Flashing or dim = interference, misalignment, or dirty lens
- One or both off = no power or damaged sensors
If you’re getting no LED on either sensor, the sensors themselves may need replacing.
5. Test the Opener Without Sensors
To confirm a sensor issue:
- Temporarily disconnect the sensor wires from the opener unit.
- Try to close the door using the wall button.
Warning: Most Chamberlain models won’t operate the door without working sensors. This is for safety and not a sign of mechanical failure.
If the door works with the sensors removed, the issue is confirmed within the sensor set.
Replacing Chamberlain Sensor Parts 41B4115: Step-by-Step Guide
If troubleshooting doesn’t resolve the issue, it’s time to replace your sensor parts. Here’s how.
Tools You’ll Need:
- Flathead screwdriver
- Wire stripper/cutter
- Ladder
- Electrical tape or wire connectors
Step-by-Step Installation:
- Power Off the Opener
- Unplug the opener or turn off the circuit breaker.
- Remove the Old Sensors
- Unscrew mounting brackets and disconnect wiring.
- Install New Sensors
- Mount the new 41B4115 sensors using included brackets.
- Align them so they face each other directly.
- Wire the Sensors
- Use wire nuts or electrical connectors to join wires.
- Match the wire colors (usually white and black/white).
- Test the LED Lights
- Reconnect power.
- Check both sensors for solid LEDs.
- Test the Door Operation
- Close the door using the remote or wall switch.
- Ensure it doesn’t reverse or stop mid-operation.
Where to Buy Chamberlain 41B4115 Sensor Parts
You can find the Chamberlain Garage Door Opener Model 4100 Sensor Parts 41B4115 at:
- Official Chamberlain website
- Amazon
- Lowe’s or Home Depot
- Garage door specialist websites
- eBay (for discontinued parts)
Always ensure you’re buying from a reputable source and that the part is compatible with model 4100.
How to Tell If the 41B4115 Sensors Are Compatible With Your Garage Opener
Although 41B4115 is specifically designed for the Chamberlain 4100 model, it’s also compatible with:
- Sears Craftsman openers
- LiftMaster models using similar sensor technology
Check your opener’s product manual or look for a compatibility list on the part’s product page.
Maintenance Tips for Chamberlain Garage Door Sensor Parts
To extend the life and reliability of your sensor parts:
- Clean lenses every 2–3 months
- Recheck alignment seasonally
- Protect wires from pets or lawn equipment
- Avoid placing items near sensors that could block the beam
Regular attention prevents bigger issues down the road.
When to Call a Professional
While many DIYers can replace sensor parts 41B4115, consider calling a technician if:
- You’re uncomfortable with wiring
- The opener still fails after sensor replacement
- Other opener components like the logic board may be faulty
A professional will also check that your door’s force settings and travel limits are correctly adjusted—an essential step after sensor replacement.
Final Thoughts
The Chamberlain Garage Door Opener Model 4100 Sensor Parts 41B4115 are essential for keeping your garage system both safe and functional. While issues with sensors are common, they’re typically easy to diagnose and fix.
From simple misalignment to full part replacement, understanding how these sensors work empowers you to maintain a secure and reliable garage access system. Investing a little time in troubleshooting or replacing the 41B4115 sensor set can save you money, prevent accidents, and keep your door running smoothly for years to come.
Leave a Reply