If you own a Chamberlain 1/2 HP garage door opener, you likely rely on it every day for seamless and secure garage access. At the heart of its performance is a critical yet often overlooked component: the circuit board. This essential part acts as the “brain” of the system, responsible for processing commands, controlling movement, and managing connectivity.
In this detailed guide, we’ll explore everything you need to know about the Chamberlain 1 2 Hp Garage Door Opener Circuit Board — including its function, signs of failure, how to troubleshoot, when to replace it, and tips to extend its lifespan.
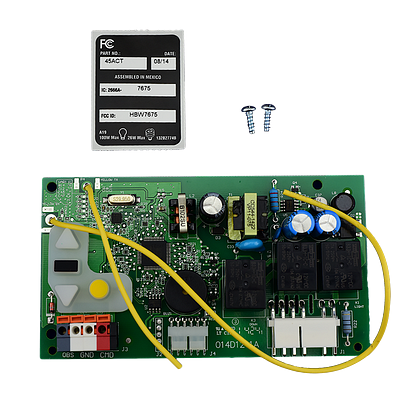
Understanding the Chamberlain 1 2 Hp Garage Door Opener Circuit Board
The circuit board in a garage door opener is essentially a printed circuit that connects all of the electrical components. In Chamberlain 1/2 HP models, this board is responsible for controlling motor function, light operation, remote communication, and safety sensors.
Read too: How Many Remotes Can A Chamberlain Garage Door Opener Have? Understaanding the Limits and Options
It receives signals from the wall-mounted control panel or remote and tells the motor what to do—open, close, or stop. It also interacts with safety mechanisms to ensure that the garage door doesn’t close when something is obstructing its path.
Without a functioning circuit board, your Chamberlain opener becomes non-responsive or erratic.
Signs Your Chamberlain 1 2 Hp Garage Door Opener Circuit Board May Be Failing
Like any electronic component, the circuit board can fail over time. Environmental factors, age, power surges, or mechanical stress can lead to malfunctions.
Here are common symptoms that indicate an issue with your Chamberlain 1/2 HP circuit board:
- No response when pressing remote or wall control
- Opener lights work, but the motor doesn’t activate
- Unusual clicking sounds from the motor unit
- Partial door movement, stuttering, or reversing
- Intermittent operation (works some days, not others)
- Burn marks or burnt smell near the unit
If your opener is displaying any of these signs, your circuit board might need to be reset, repaired, or replaced.
How to Inspect the Chamberlain 1 2 Hp Garage Door Opener Circuit Board
Before you replace the board, you should rule out simpler issues like dead batteries, misaligned sensors, or faulty wiring.
Here’s how to safely inspect the circuit board:
Step 1: Turn Off the Power
Unplug the garage door opener to avoid electrical shock during inspection.
Step 2: Remove the Outer Housing
Use a screwdriver to open the motor unit cover and access the circuit board.
Step 3: Visually Inspect the Board
Look for signs of:
- Burnt components
- Loose wiring
- Blown capacitors
- Corrosion or moisture damage
Step 4: Check Connectors and Wires
Ensure all connectors are tightly in place. A loose wire can mimic a failed board.
If everything looks fine but the unit still doesn’t respond, it’s likely that the circuit board has failed internally.
Replacing a Faulty Chamberlain 1 2 Hp Garage Door Opener Circuit Board
If troubleshooting doesn’t resolve the issue, replacement may be the only option. Luckily, replacing the circuit board in a Chamberlain 1/2 HP opener is relatively straightforward.
What You’ll Need:
- Replacement Chamberlain-compatible circuit board (match model number)
- Phillips screwdriver
- Step ladder
- Safety gloves (optional)
Step-by-Step Replacement Guide:
- Unplug the opener. Always cut power before beginning any electrical work.
- Access the motor unit. Use a ladder and screwdriver to remove the outer casing of the opener.
- Locate the existing circuit board. It’s typically situated in the rear or under the front panel.
- Take pictures. Before removing anything, take photos of all wire connections for easy reference.
- Disconnect wires and connectors. Gently remove all wires connected to the board.
- Unscrew the old circuit board. Carefully remove it from the mounting bracket.
- Install the new circuit board. Attach the new board using the same mounting points and reconnect all wires according to your photos.
- Replace the outer housing. Reassemble the unit and plug the opener back in.
- Test the opener. Use the remote or wall button to ensure full functionality.
- Reprogram remotes if needed. Some new boards require re-pairing of remotes or keypads.
Choosing the Right Replacement Circuit Board
Not all Chamberlain circuit boards are created equal. Make sure to match the part number (e.g., 41A5021-1, 41AC050-1) found on your current board to the new one. Chamberlain offers support to help you identify compatible replacement parts.
If unsure, check:
- The model number of the opener
- The serial number and date of manufacture
- The color of the learn button (which indicates technology generation)
You can find replacements at Chamberlain’s official parts store, Amazon, or through authorized dealers.
Preventing Circuit Board Damage in the Future
While circuit board failures can’t always be avoided, taking a few proactive steps can extend the lifespan of your unit:
1. Use a Surge Protector
Garage door openers are sensitive to voltage spikes. Use a surge-protected outlet to reduce the risk of damage.
2. Avoid Moisture Exposure
Ensure the motor housing is sealed and protected from water leaks or high humidity.
3. Perform Regular Maintenance
Dust buildup, cobwebs, and pests can interfere with electronics. Clean your garage opener components at least once a year.
4. Test the System Monthly
Make sure the sensors, remotes, and wall controls are functioning. Early detection helps prevent larger failures.
Chamberlain MyQ and Circuit Boards
Some newer Chamberlain 1/2 HP garage door openers come with MyQ smart technology. These models have circuit boards that handle Wi-Fi connectivity, app control, and scheduling.
If your MyQ features stop working, the issue may be firmware-related rather than a failed board. Try resetting your router or updating the app before replacing the circuit board.
If the circuit board is damaged, ensure you purchase a MyQ-compatible board.
Common FAQs
Q: Can I repair a Chamberlain circuit board myself?
A: While minor repairs like replacing a fuse or capacitor are possible, full board repairs are best left to professionals or replaced entirely.
Q: How much does a replacement board cost?
A: Depending on the model, expect to pay between $40 and $100 for a genuine replacement board.
Q: How long should a circuit board last?
A: With proper care, most Chamberlain circuit boards last 10–15 years.
Q: Is it safe to use a non-OEM circuit board?
A: Using off-brand boards is risky. Stick with genuine Chamberlain parts to ensure safety and compatibility.
Conclusion: Keep Your Chamberlain 1 2 Hp Garage Door Opener Circuit Board in Top Shape
Your Chamberlain 1/2 HP garage door opener circuit board is central to the functionality of your entire garage system. Recognizing the signs of failure early, knowing how to replace the board, and following regular maintenance steps can save you time, frustration, and money.
If your system isn’t responding correctly or behaves inconsistently, don’t overlook the possibility of a worn-out or damaged circuit board. With the right approach, you can diagnose, replace, and restore your opener with ease—without needing a professional.
Leave a Reply