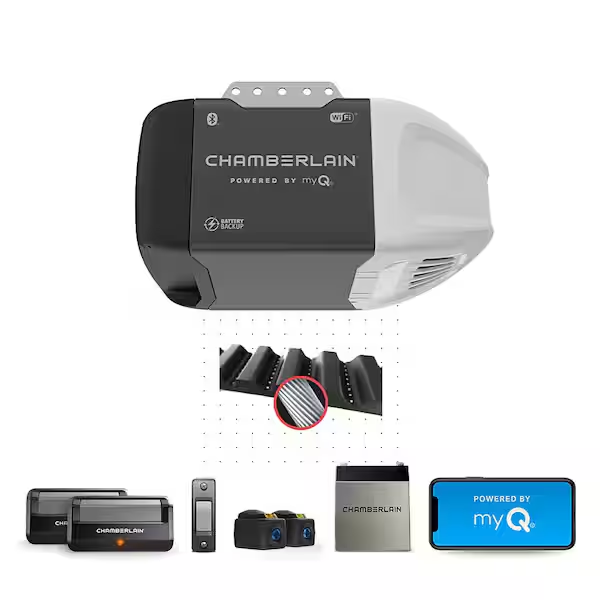
A Chamberlain 1/2 HP Belt Drive Garage Door Opener is a great choice for homeowners looking for a quiet, smooth, and reliable garage door opener. Thanks to its belt drive system, this opener operates with minimal noise, making it perfect for attached garages. If you’re planning to install it yourself, this guide will walk you through every step of the Chamberlain 1 2 Hp Belt Drive Garage Door Opener Installation process.
By following this guide, you’ll be able to safely and efficiently install your garage door opener while avoiding common mistakes.
Read too: How Many Remotes Can A Chamberlain Garage Door Opener Have? Understanding the Limits and Options
Why Choose a Chamberlain 1/2 HP Belt Drive Garage Door Opener?
Before we dive into the installation process, let’s look at some of the key benefits of this garage door opener:
✅ Quiet Operation – The belt drive system reduces noise, making it ideal for homes with bedrooms above or near the garage.
✅ Reliable Performance – With 1/2 HP motor power, it’s perfect for single or double garage doors.
✅ Smart Features – Some models come with Wi-Fi connectivity, allowing you to control the door remotely via the myQ app.
✅ Durability – The high-quality reinforced belt ensures long-lasting performance with minimal maintenance.
Now, let’s go step by step on how to install your Chamberlain 1/2 HP Belt Drive Garage Door Opener.
Tools & Materials Needed for Installation
Before starting the Chamberlain 1 2 Hp Belt Drive Garage Door Opener Installation, make sure you have the following tools and materials:
Tools Required
🔧 Adjustable wrench
🔩 Socket wrench set
🔨 Hammer
🛠 Screwdrivers (flathead & Phillips)
📏 Tape measure
🛑 Step ladder
🔦 Work light or flashlight
Materials Required
- Chamberlain 1/2 HP Belt Drive Garage Door Opener Kit
- Mounting brackets (included in the kit)
- Lag screws and bolts
- Safety sensors
- Wall control panel
- Power drill & drill bits
Once you have everything ready, you can begin the installation process.
Step-by-Step Guide to Chamberlain 1 2 Hp Belt Drive Garage Door Opener Installation
Step 1: Prepare the Garage Door
Before installing the opener, make sure your garage door is in good condition. Check for:
✔️ Proper balance – The door should open and close smoothly without resistance.
✔️ Tightened hardware – Inspect hinges, rollers, and tracks for any loose screws.
✔️ Lubricated moving parts – Apply lubricant to the rollers and hinges for smoother operation.
Step 2: Assemble the Opener
- Unbox the Chamberlain opener kit and lay out all the parts.
- Attach the rail sections together to form the full-length rail.
- Slide the belt drive into the rail, making sure it is properly aligned.
- Secure the belt drive system to the motor unit.
- Tighten the tension bolt to ensure the belt has the right amount of tension.
💡 Tip: Check the installation manual for proper belt tension settings.
Step 3: Install the Opener to the Ceiling
- Position the opener motor on a step ladder near the center of the garage.
- Mark the ceiling where the opener will be mounted and install the mounting brackets.
- Secure the motor unit to the brackets using lag screws and bolts.
- Ensure the opener is level before tightening all the bolts.
🔧 Tip: Use a level tool to prevent misalignment, which can affect door operation.
Step 4: Attach the Opener to the Garage Door
- Connect the opener’s rail to the garage door’s bracket (usually located at the top of the door).
- Use the provided hardware to secure the connection.
- Test the manual movement to ensure the opener moves freely with the door.
🚪 Tip: If the door does not move smoothly, check the alignment of the rail and brackets.
Step 5: Install Safety Sensors & Wall Control Panel
- Mount the safety sensors on both sides of the garage door, about 6 inches from the ground.
- Run the sensor wires along the wall and connect them to the opener unit.
- Install the wall control panel near the garage door entrance for easy access.
- Connect the control panel wires to the opener motor.
⚠️ Important: Make sure the safety sensors are aligned properly. If they are misaligned, the garage door may not close properly.
Step 6: Connect to Power & Test the Opener
- Plug in the opener to a power outlet.
- Turn on the power and test the remote control or wall panel.
- Run an opening and closing cycle to ensure everything is working correctly.
- Adjust the force and travel settings if necessary.
🔧 Tip: If the garage door reverses before fully closing, adjust the travel limit settings on the motor unit.
Step 7: Program Remote & Wi-Fi Features (If Available)
- Press the “Learn” button on the opener unit.
- Press the remote control button to sync it with the opener.
- If your opener has Wi-Fi capabilities, download the myQ app and follow the app instructions to connect your opener to your smartphone.
📲 Tip: With myQ, you can control your garage door remotely and receive activity notifications.
Troubleshooting Common Issues After Installation
Even after installing the Chamberlain 1/2 HP Belt Drive Garage Door Opener, you may encounter some minor issues. Here’s how to fix them:
🔹 Garage door won’t close completely → Adjust the travel limits on the motor unit.
🔹 Opener makes noise but the door doesn’t move → Check the belt tension and ensure the opener is properly connected.
🔹 Remote control is unresponsive → Replace the batteries and reprogram the remote.
🔹 Safety sensors are blinking → Make sure they are aligned correctly and free from obstructions.
Final Thoughts on Chamberlain 1 2 Hp Belt Drive Garage Door Opener Installation
Installing a Chamberlain 1/2 HP Belt Drive Garage Door Opener is a straightforward DIY project that can be done with basic tools and careful planning. With its quiet belt drive system and smart features, this opener is a great addition to any home.
By following this step-by-step installation guide, you’ll ensure a smooth and successful installation process. If you encounter major issues, don’t hesitate to consult Chamberlain support or a professional installer.
Leave a Reply