A garage door opener keypad offers great convenience for homeowners, allowing access to the garage without needing a remote or key. Over time, however, like any other device, the battery in your Chamberlain garage door opener keypad will eventually wear out. If you’re using an older keypad model, replacing the battery may seem more complicated than you’d expect, especially if you’re unfamiliar with the process.
In this guide, we’ll cover everything you need to know about selecting the right battery for Chamberlain garage door opener keypad for older keypads, how to replace the battery, and some tips to keep your keypad working smoothly for years. Whether you’re dealing with an outdated model or just need to troubleshoot, this article will walk you through the process in simple, easy-to-understand steps.
Read too: How Many Remotes Can A Chamberlain Garage Door Opener Have? Understanding the Limits and Options
Understanding the Role of Your Chamberlain Garage Door Opener Keypad
Before we get into how to replace the battery for your Chamberlain garage door opener keypad, it’s important to understand the purpose and role of the keypad. The keypad provides a secure and convenient way to operate your garage door without the need for a remote or a traditional key. Most Chamberlain keypads work by entering a pin code that you set up during the initial installation.
For older models, these keypads may have a built-in battery that powers the device. Over time, this battery will naturally lose its charge, affecting the functionality of the keypad. When you notice that the keypad’s backlight is dimming or it’s not responding when you press the keys, it’s time to replace the battery.
Why Replacing the Battery for Chamberlain Garage Door Opener Keypad for Older Keypad is Necessary
Replacing the battery in your Chamberlain garage door opener keypad is necessary to maintain the keypad’s functionality. Without a functioning battery, the keypad will not communicate with your garage door opener, leaving you without a convenient entry option for your garage. Additionally, an old battery may cause the keypad to malfunction, resulting in delays or inconsistencies in operation.
For older keypads, replacing the battery becomes even more important. The technology in these devices may be slightly outdated compared to newer models, and the battery could be less efficient as it ages. This can cause the keypad to fail sooner than expected if the battery isn’t replaced in time.
Battery For Chamberlain Garage Door Opener Keypad For Older Keypad: Choosing the Right One
When selecting a battery for Chamberlain garage door opener keypad for older keypads, it’s important to choose the correct type to ensure your keypad operates correctly. The most common battery type used in Chamberlain keypads is a 9-volt battery. This battery is widely available, and many Chamberlain keypad models, including older ones, are designed to use it.
However, some older keypads may require different types of batteries, such as AA or CR2032 lithium batteries. It’s essential to check your keypad’s manual to determine the exact battery requirements for your model. The user manual should list the recommended battery type, and replacing it with the wrong one could lead to malfunctions or further damage to your keypad.
Here are a few tips when choosing the right battery:
- Consult the Manual: As mentioned, always refer to your Chamberlain keypad’s manual. This will give you the correct battery type and installation instructions.
- Buy a High-Quality Battery: Opt for a high-quality battery from a reliable brand to ensure longer battery life and optimal performance.
- Consider Rechargeable Batteries: If you frequently replace batteries, you may want to consider using rechargeable batteries to save money in the long run.
How to Replace the Battery in Your Chamberlain Garage Door Opener Keypad for Older Models
Replacing the battery in your Chamberlain garage door opener keypad for older models is a relatively simple process. Here’s a step-by-step guide to help you through it:
Step 1: Gather the Necessary Tools
For this process, you will need:
- A replacement battery (usually a 9-volt, but verify for your specific keypad model)
- A small screwdriver (if required to open the keypad casing)
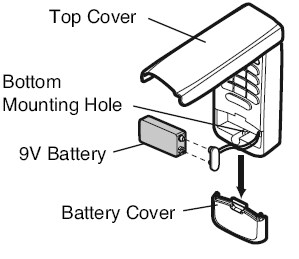
Step 2: Open the Keypad Casing
Most Chamberlain keypads have a small compartment on the back where the battery is housed. For older models, you may need to remove screws to open the casing. If your keypad has a compartment door, simply open it to reveal the battery.
Step 3: Remove the Old Battery
Once the keypad is open, carefully remove the old battery. If the battery is tightly secured, you may need to gently pry it out. Take note of how the battery is installed, paying attention to the battery’s polarity (which way the positive and negative terminals are facing).
Step 4: Install the New Battery
Insert the new battery, ensuring it is installed with the correct polarity. For a 9-volt battery, the positive (+) side should face the terminal inside the compartment. Once the battery is in place, close the battery compartment.
Step 5: Test the Keypad
After replacing the battery, test the keypad to ensure it is working correctly. Enter your code and check if the keypad’s backlight comes on and the garage door opens. If the keypad works, you’re all set!
Common Issues with Older Keypads and Batteries
While replacing the battery should restore the functionality of your keypad, there are a few other common issues that you may encounter with older keypads:
- Corroded Battery Terminals: Over time, battery acid may leak and corrode the terminals inside the keypad. If you notice any corrosion, clean the terminals with a cotton swab dipped in vinegar or baking soda solution. Be sure to dry the area completely before inserting a new battery.
- Damaged Keypad: If the keypad still doesn’t work after replacing the battery, it’s possible that the keypad itself is damaged. In this case, you may need to replace the keypad entirely.
- Incorrect Programming: If your keypad isn’t functioning even after a battery replacement, you may need to reprogram it. Follow the instructions in the user manual to reset and reprogram the keypad.
Maintaining Your Chamberlain Garage Door Opener Keypad for Longevity
To ensure that your Chamberlain garage door opener keypad remains in good working condition, here are some maintenance tips:
- Regularly Check the Battery: Replace the battery as soon as the keypad starts showing signs of low battery. This will help avoid delays and ensure your keypad is always ready to use.
- Keep the Keypad Clean: Dust and dirt can accumulate on the keypad, which may interfere with the operation of the buttons. Clean the keypad regularly with a dry cloth to remove dust.
- Protect From the Elements: If your keypad is exposed to the elements, consider installing a protective cover to shield it from rain, snow, or extreme temperatures.
Conclusion
Replacing the battery for Chamberlain garage door opener keypad for older keypads is an essential maintenance task that ensures the continued functionality of your garage door opener system. By following the steps outlined in this article, you can easily replace the battery and keep your keypad working smoothly for years to come. Whether you’re dealing with an older model or simply need a quick fix, knowing how to replace the battery properly will help maintain the convenience and security your keypad offers.
Remember, always use the correct battery type, and if problems persist after replacement, check for other issues such as corrosion or damage. With these tips, you can keep your Chamberlain keypad in top shape.
Leave a Reply