As smart homes become more popular, many homeowners are looking for ways to integrate their garage door systems into their broader home automation networks. If you’ve been wondering how to add Insteon garage door to Chamberlain garage door opener, you’re in the right place.
This guide will walk you through everything you need to know—from understanding the compatibility between Insteon and Chamberlain devices to the exact steps required for setup and troubleshooting. You’ll also learn about the benefits of this integration, what hardware is needed, and how to ensure secure and efficient operation.
Read too: How Many Remotes Can A Chamberlain Garage Door Opener Have? Understaanding the Limits and Options
Why Add Insteon Garage Door to Chamberlain Garage Door Opener?
The purpose of integrating Insteon with Chamberlain is to centralize your home automation. While Chamberlain is a trusted brand for garage door openers, Insteon offers powerful home automation solutions with its dual-mesh network technology, combining both wireless RF and powerline communication.
By adding an Insteon garage door controller to your existing Chamberlain system, you’ll gain:
- Remote garage door control from your smartphone or tablet
- Automation using Insteon scenes or schedules
- Voice control (if integrated with Alexa, Google Assistant via Insteon Hub)
- Enhanced security and monitoring features
This integration is especially useful for those already using Insteon products, making your garage door part of your smart lighting, security, and sensor system.
What You’ll Need to Get Started
To begin the process of adding an Insteon garage door to Chamberlain garage door opener, you’ll need the following components:
Hardware:
- Chamberlain garage door opener (preferably with wall control terminals)
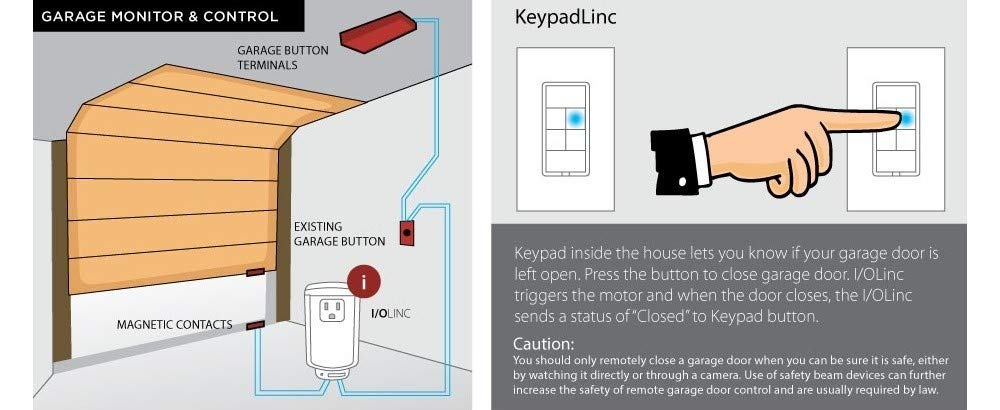
- Insteon I/O Linc Module (2450) – a low-voltage relay/sensor combo device
- Magnetic garage door contact sensor (usually included with I/O Linc kit)
- Insteon Hub (for app-based control and scene integration)
Tools:
- Flathead screwdriver
- Wire stripper/cutter
- Mounting tape or screws
- Smartphone or tablet with the Insteon app installed
Is Chamberlain Compatible with Insteon?
Technically, Chamberlain and Insteon are not natively integrated in the way that Chamberlain is with its own MyQ system. However, Chamberlain garage door openers that feature wall control terminals or are relay-compatible can work with Insteon via the I/O Linc module.
⚠️ Important: Chamberlain models using Security+ 2.0 and MyQ wireless protocols do not allow direct dry contact control, which the I/O Linc requires. In those cases, you may need a workaround such as a universal remote emulator or 3rd-party interface relay.
How to Add Insteon Garage Door to Chamberlain Garage Door Opener: Step-by-Step Guide
Step 1: Connect the I/O Linc Module
- Locate the control terminals on your Chamberlain opener—usually marked as “Push Button” or “Wall Control.”
- Cut two pieces of 18–22 AWG wire (6–8 inches).
- Connect one end of the wires to the N/O (Normally Open) and COM (Common) terminals on the Insteon I/O Linc relay side.
- Connect the other end to the Chamberlain opener’s control terminals.
This setup allows the I/O Linc to simulate a button press to open or close the door.
Step 2: Install the Magnetic Contact Sensor
- Position the sensor magnet on the garage door and the sensor switch on the door frame.
- Wire the sensor to the sensor input terminals on the I/O Linc.
- Secure the sensor and magnet with screws or adhesive so they stay aligned when the door is closed.
This sensor will report the door’s open/closed status to the Insteon system.
Step 3: Add I/O Linc to Insteon Hub and App
- Press and hold the set button on the I/O Linc module until its LED blinks.
- Open the Insteon app and select Add Device.
- Follow the app prompts to identify the I/O Linc and assign it a name like “Garage Door.”
- You can now control the garage door remotely through the Insteon app.
Step 4: Create Scenes or Automation Rules
Once your Insteon garage door module is added, you can:
- Automate door operation (e.g., close after 10 PM)
- Receive alerts if the door is left open
- Add voice control with Alexa or Google Assistant via the Insteon Hub
- Combine with Insteon motion sensors or keypads
This step helps transform your garage into a fully automated access point.
Add Insteon Garage Door to Chamberlain Garage Door Opener: Compatibility Challenges and Workarounds
Some Chamberlain garage openers—particularly newer models with MyQ—don’t support dry contact relay operation, which is needed for the Insteon I/O Linc.
Here are some workarounds:
- Use a spare garage door remote: Connect the I/O Linc’s relay output to the remote’s button contacts. This method simulates a button press via the remote, bypassing the main opener control board.
- Use a Z-Wave or Wi-Fi bridge: If you also have a Z-Wave system, consider bridging Insteon with other smart home platforms for broader compatibility.
Benefits of Integrating Insteon With Chamberlain Garage Door
- Unified Smart Home Control
Use one app to control lights, thermostats, sensors, and now your garage door. - Remote Access
Forgot to close the door? Do it from anywhere via your smartphone. - Security Alerts
Get notified when the garage door opens during unusual hours. - Energy Efficiency
Combine door automation with lights to avoid unnecessary power usage. - Custom Scenes
Set a “Coming Home” scene that turns on lights and opens the garage.
Troubleshooting Tips
Issue 1: Door Not Responding to Insteon Command
- Ensure the I/O Linc is securely connected to the correct terminals.
- Double-check wiring polarity and continuity.
Issue 2: Insteon App Shows Incorrect Door Status
- Verify sensor alignment and connection.
- Check for proper gap (less than ½ inch) between magnet and sensor.
Issue 3: Door Randomly Opens or Closes
- Avoid using toggle mode. Instead, set the relay to momentary mode via the Insteon app to simulate button press behavior accurately.
Security Considerations
While this integration is powerful, it’s essential to keep security in mind:
- Use strong passwords on your Insteon Hub account.
- Enable two-factor authentication where available.
- Set up notifications for door activity.
- Periodically test the sensor to ensure accurate status updates.
Alternatives to Insteon for Garage Door Automation
If you’re not fully committed to Insteon, other smart garage solutions that work well with Chamberlain include:
- MyQ Smart Garage Hub (native Chamberlain solution)
- Z-Wave garage controllers (e.g., GoControl)
- Wi-Fi-enabled relay controllers (like Shelly or Sonoff)
- Apple HomeKit (requires HomeBridge setup for Insteon compatibility)
Still, for users who already have Insteon lighting, thermostats, or sensors, the I/O Linc is the most direct way to add Insteon garage door to Chamberlain garage door opener.
Conclusion: Smart Upgrade With Powerful Benefits
Learning how to add Insteon garage door to Chamberlain garage door opener empowers you to take full control of your home’s access systems. While compatibility depends on the specific Chamberlain model you own, the Insteon I/O Linc offers a flexible, reliable solution for many setups.
This integration helps streamline your smart home, improves energy efficiency, and gives you peace of mind knowing your garage is always within your control. Whether you’re an Insteon pro or just getting started, adding your garage door to your home automation setup is a smart investment.
Leave a Reply