Whether you’re dealing with a non-responsive remote, a backup battery warning, or a keypad that won’t light up, one of the most common and easily fixable issues is a drained battery. Knowing how to change batteries in Chamberlain garage door opener can save you time, stress, and money.
In this comprehensive guide, you’ll learn everything from identifying which battery needs replacing to the correct procedures for changing batteries in remotes, keypads, and backup systems. This is a must-read for every homeowner with a Chamberlain opener.
Read too: How Many Remotes Can A Chamberlain Garage Door Opener Have? Understaanding the Limits and Options
How To Change Batteries In Chamberlain Garage Door Opener
Changing the batteries in your Chamberlain garage door opener isn’t complicated, but it varies depending on the component. Chamberlain openers typically use batteries in three main parts:
- Remote control transmitter
- Wireless keypad
- Backup battery inside the opener unit
Below is a detailed breakdown of how to change batteries in Chamberlain garage door opener across all these components.
Step 1: Identifying Which Battery Needs Replacing
Before you grab a screwdriver, make sure you identify which part of the system is having battery issues.
Symptoms of a Dead Remote Battery:
- Garage door doesn’t respond to remote input
- You must press the button multiple times
- LED light on remote is dim or off
Symptoms of a Keypad Battery Issue:
- Keypad doesn’t light up when you press any button
- Door won’t open even with correct PIN
- LED feedback is missing
Symptoms of a Backup Battery Failure:
- Beeping sound from the motor housing
- Red or orange battery light on the opener
- Door won’t operate during a power outage
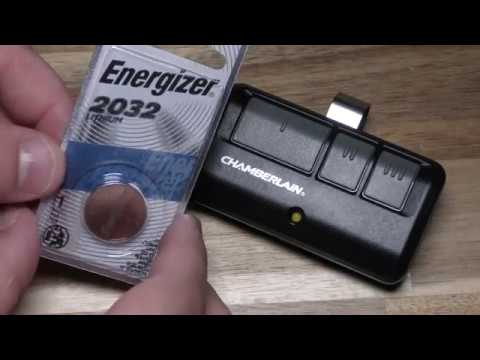
Step 2: How To Change the Battery in Chamberlain Remote Control
What You’ll Need:
- A 3V coin-cell battery (usually CR2032 or CR2025)
- A small flathead screwdriver
Steps:
- Locate the Seam
Flip the remote and find the seam between the front and back casing. - Pry Open the Remote
Insert the flathead screwdriver into the seam and gently twist to pop it open. - Remove the Old Battery
Slide the battery out of its holder. Be careful not to touch the metal contacts with bare fingers. - Insert the New Battery
Place the new coin-cell battery with the positive side (+) facing up. - Snap the Remote Back Together
Align both halves and press until they snap securely. - Test the Remote
Press the button to ensure it lights up and operates the door.
🛠️ Pro Tip: Always keep a spare battery in a drawer to avoid being locked out in an emergency.
Step 3: How To Change the Battery in Chamberlain Wireless Keypad
What You’ll Need:
- A 9V battery
- A Phillips-head screwdriver
Steps:
- Open the Keypad Cover
Slide open the cover to reveal the keypad. - Remove the Keypad from the Mount
Unscrew the bottom screw (if applicable) and gently lift the keypad off the wall. - Access the Battery Compartment
On the back, open the battery compartment by unsnapping the cover. - Replace the 9V Battery
Remove the old battery and install a new one, aligning the terminals correctly. - Re-Mount the Keypad
Place the keypad back and secure it with screws if necessary. - Test the Keypad
Input your PIN and press Enter to see if the door responds.
⚡ Warning: Using a low-quality battery may cause keypad failure, especially in cold weather.
Step 4: How To Change the Chamberlain Backup Battery
Backup batteries are typically found inside the garage door opener unit and keep it functional during a power outage.
What You’ll Need:
- A 12V rechargeable battery (Chamberlain part #4228 or compatible)
- A screwdriver
Steps:
- Unplug the Opener
Always unplug the unit from power to avoid electrical shock. - Locate the Battery Compartment
Most Chamberlain openers have the battery on the side or under a cover panel. - Open the Cover
Use a screwdriver to remove the cover screws and access the battery. - Disconnect the Old Battery
Gently pull the red and black terminals off the old battery. - Install the New Battery
Connect the red (positive) and black (negative) wires to the new battery terminals. - Replace the Cover and Plug In
Secure the cover and restore power. The battery indicator should go green after a few hours.
🔋 Battery Life Tip: Chamberlain backup batteries usually last 1–3 years. A beeping noise often signals it’s time for a replacement.
Why Changing the Battery Matters
Many homeowners underestimate the importance of timely battery replacement. A dead battery not only causes inconvenience but could also:
- Lock you out during a power outage
- Disable smart features like MyQ notifications
- Reduce the security of your home
Chamberlain systems are designed to warn you in advance of battery issues, but regular inspections every 6–12 months are still recommended.
Troubleshooting After Battery Replacement
If your garage door opener still isn’t working after replacing the battery:
- Reprogram the remote or keypad (consult your model’s manual)
- Check the battery orientation
- Test another known-working battery
- Inspect for corroded contacts
Most issues after battery replacement are related to incorrect installation or faulty new batteries.
Battery Type Reference Guide for Chamberlain Devices
| Device Type | Battery Type | Estimated Life |
|---|---|---|
| Remote Control | CR2032 or CR2025 | 1–2 years |
| Wireless Keypad | 9V | 1–2 years |
| Backup Battery | 12V (Model #4228) | 1–3 years |
Always refer to your owner’s manual for the exact specifications.
Environmental Tips: Dispose of Old Batteries Properly
Don’t throw old batteries in the trash. Chamberlain batteries, especially 12V lead-acid types, should be:
- Taken to a local recycling center
- Dropped off at hardware stores offering recycling bins
- Handled with care to avoid leakage or short circuits
Protect the environment by recycling your used garage door opener batteries responsibly.
Final Thoughts
Knowing how to change batteries in Chamberlain garage door opener is a basic skill every homeowner should learn. It only takes a few minutes but ensures your system stays functional, safe, and reliable.
Whether it’s your remote, keypad, or emergency backup battery, regular checks and timely replacements will give you peace of mind and uninterrupted access to your garage. With the steps in this guide, you’ll be ready to handle any battery-related issue like a pro.
Leave a Reply