Modern garage door openers, like those from Chamberlain, include infrared safety sensors (often referred to as “photo-eyes”) that prevent the door from closing if any object crosses the beam. These are critical for preventing accidents involving kids, pets, cars, or other obstructions. However, there are rare situations—like troubleshooting technical issues—where homeowners need to know How To Disable Sensors On Chamberlain Garage Door Opener temporarily. Doing this correctly ensures you maintain compliance with safety standards and avoid unnecessary risks.
In this guide, we’ll explore:
- What Chamberlain safety sensors do and why they’re vital
- Common reasons someone may need to disable sensors
- Step-by-step instructions on How To Disable Sensors On Chamberlain Garage Door Opener temporarily and properly
- Troubleshooting tips
- Best practices to re-enable sensors and maintain safety
Why You Should Know How To Disable Sensors On Chamberlain Garage Door Opener
Understanding how to deactivate sensors—briefly and safely—can be valuable for several reasons:
- Troubleshooting: If your door won’t close due to misaligned or damaged sensors, disabling them temporarily lets you test the door functionality.
- Temporary Maintenance or Cleaning: To clean the garage floor or perform maintenance, temporarily disabling sensor safety prevents the system from reversing unexpectedly.
- Sensor Adjustment or Replacement: While aligning or replacing sensors, you may need to bypass the system.
- Avoiding False Reversals: Dirt, cobwebs, or lens buildup can trigger false ‘block’ signals, requiring temporary bypass during cleaning.
However, keep in mind that permanently disabling sensors is unsafe and likely illegal. This guide focuses only on temporary disabling during maintenance or troubleshooting. Always restore full functionality afterward.
What Do Chamberlain Safety Sensors Do?
Chamberlain garage door openers come with two infrared sensors installed near the bottom of the door track (6–8 inches above the floor). These sensors project an invisible infrared beam. If anything interrupts that beam while the door is closing, the opener stops and reverses the door.
This system prevents serious injuries and property damage. Sensors are typically wired directly into the garage opener motor unit using a low-voltage wiring harness, which supports the infrared beam operation. Interfering with these sensors even briefly requires caution.
Hearing “Wall Control LED Blinking”? That Signals a Sensor Problem
A blinking LED or constant beeping from the wall panel often means the sensors aren’t aligned or blocked. Faulty sensors will cause the opener to refuse to close, produce errors, or flash red/yellow lights depending on the model. Before disabling anything, consider cleaning or realigning sensor lenses:
- Wipe both lenses clean.
- Look for misalignment (one sensor LED flashing while the other is steady).
- Adjust both sensors until both show a solid light.
- Reroute wires away from kinks or damage.
If these fixes fail, then carefully proceed with How To Disable Sensors On Chamberlain Garage Door Opener temporarily for troubleshooting.
How To Disable Sensors On Chamberlain Garage Door Opener – Step-by-Step Instructions
Follow these steps carefully to temporarily bypass the safety sensors. Have a friend or backup plan in case of unexpected movement.
Step 1: Disconnect Power to the Opener
Before handling any wiring or internal parts of the opener, unplug the motor unit from the electrical outlet. This ensures no live power is present while you work.
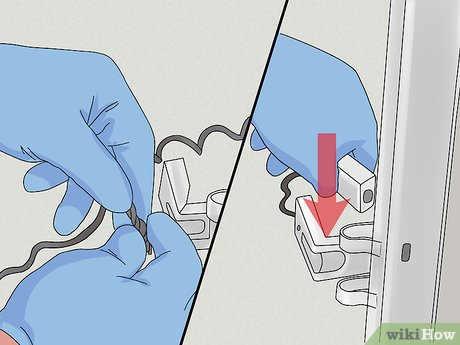
Step 2: Locate and Access the Sensor Wires
Open the access panel on the front or rear of the motor unit to get to the low‑voltage terminal block where the sensor wires are connected. These terminals are usually labeled “Sensor”, “Infrared”, or “IR” and may be color-coded white/black or red/black.
Step 3: Carefully Disconnect Sensor Wires
Using a screwdriver, loosen the screws holding the sensor cables to the terminals. Pull both wires free to fully disable the circuit. Leaving wires disconnected prevents the opener from detecting any beam from the sensors.
Step 4: Restore Power and Test the Door
- Plug the motor unit back in.
- Use the wall switch or remote to operate the door.
- The door should close without sensor interference—indicating the sensors are bypassed.
Note: While the door will function, this is unsafe. Do not operate with people, pets, or vehicles underneath.
Step 5: Reconnect Everything as Soon as Possible
Once troubleshooting or work is complete:
- Unplug power again.
- Re-attach sensor wires to their correct terminals.
- Check that screw clamps are tight.
- Plug the opener back in.
- Use the wall panel switch—it should close and reverse if something crosses the sensor beam.
Troubleshooting Common Problems During Sensor Override
| Issue | Possible Cause | Recommended Fix |
|---|---|---|
| Door still won’t close | Lock mode, travel limit settings | Exit lock mode; re-adjust travel limits |
| LED on wall control blinks | Sensor wires still disconnected | Recheck wiring; ensure tight connections |
| Door closes but reverses | Sensors misaligned/dirty | Clean and realign lenses before reconnecting |
| Door won’t operate at all | GFCI triggered or wall switch disabled | Reset breaker, ensure wall switch is powered |
Best Practices to Re-enable Sensors and Ensure Safety
- Always restore sensor wiring after troubleshooting.
- Align and test sensors daily for 3 days after reconnection.
- Clean lenses monthly using a soft cloth.
- Ensure sensor lights are steady, not blinking/flashing.
- Use Child-Safe Lock Mode when not at home: press the lock button on the wall console to disable remotes—but keep sensors active.
- Avoid disabling sensors near driveway entrances, pathways, or areas with foot traffic.
What Not To Do When Disabling Sensors
- Do not use cardboard or mirror overrides. This just won’t close doors safely.
- Never bypass the sensors permanently.
- Never leave the opener running unattended while sensors are disabled.
- Avoid disabling sensors if kids or pets might access the garage.
- Don’t disconnect sensors and leave the door closed with people working underneath—this is extremely dangerous.
When Disabling Sensors May Be Legally Risky
Disabling door sensors can violate safety codes (e.g., UL 325 in the U.S.) and possibly void your opener warranty. Only do this in private spaces during maintenance—never in commercial or public settings. Improper use can lead to fines or liability if injury occurs.
Frequently Asked Questions (FAQs)
Q: Can I disable sensors permanently to trick the opener?
A: No. Permanent disabling is unsafe and likely illegal. Always restore sensors immediately after troubleshooting.
Q: Why do my sensors trip if nothing is blocking them?
A: Dirty or misaligned lenses, damaged cables, or radio interference can falsely obstruct the beam.
Q: The opener runs partially but stops—what then?
A: Look for reversed travel limits or lock mode enabled. Exit lock mode using the “Lock” button on the console.
Q: My wiring seems fragile—what now?
A: Replace wires or contact a qualified technician for safe replacement and testing.
Conclusion
Knowing How To Disable Sensors On Chamberlain Garage Door Opener—but only for short-term troubleshooting—can be extremely helpful when you’re clearing obstructions, realigning lenses, or testing door movement. The key is to act cautiously: always disconnect power before touching wires, never operate unattended, and restore full safety functionality immediately.
Permanent disabling or unsafe practices not only put people at risk but may also void warranties or violate safety regulations. By following the above steps, you can handle maintenance or diagnostic tasks safely and return your system to its protected state quickly.
Need more help aligning sensors, interpreting garage opener lights, or restoring travel settings post-service? Just ask—I’m here to help!
Leave a Reply