If you’re looking for a convenient, secure way to control your garage without carrying keys or remotes, learning How To Connect Keypad To Chamberlain Garage Door Opener is a smart upgrade. A wall-mounted or surface keypad adds keyless entry—perfect for family members, guests, or maintenance personnel. Whether installing a new keypad or re-syncing an existing one, this detailed guide covers everything you need plus helpful tips, proactive security advice, and FAQs to ensure a successful and safe setup.
Understanding Your Chamberlain Garage Door Opener and Keypad
Chamberlain openers (and their cousin brand LiftMaster) support a companion wireless keypad that communicates using secure rolling codes. This means each time you enter a PIN, the code changes—protecting your garage against code-grabbing or unauthorized entry. Before we dive into How To Connect Keypad To Chamberlain Garage Door Opener, let’s identify key features:
- Rolling Code Security: Unique PIN changes every use
- Weatherproof Design: Outdoor keypads resist rain and sun
- Backlit Keypad: For easy evening or nighttime entry
- Multiple PIN Support: Great for families or short-term access
Understanding these upfront ensures your new setup will be both functional and secure.
How To Connect Keypad To Chamberlain Garage Door Opener – Step by Step
This section breaks down the process of connecting your keypad to your opener. Follow these steps carefully:
1. Choose a Suitable Location
- Mount the keypad about 5–6 feet off the ground
- Keep it in a sheltered spot, away from direct rain or excessive sunlight
- Ensure it’s within wireless range (typically 30–50 ft) of your opener
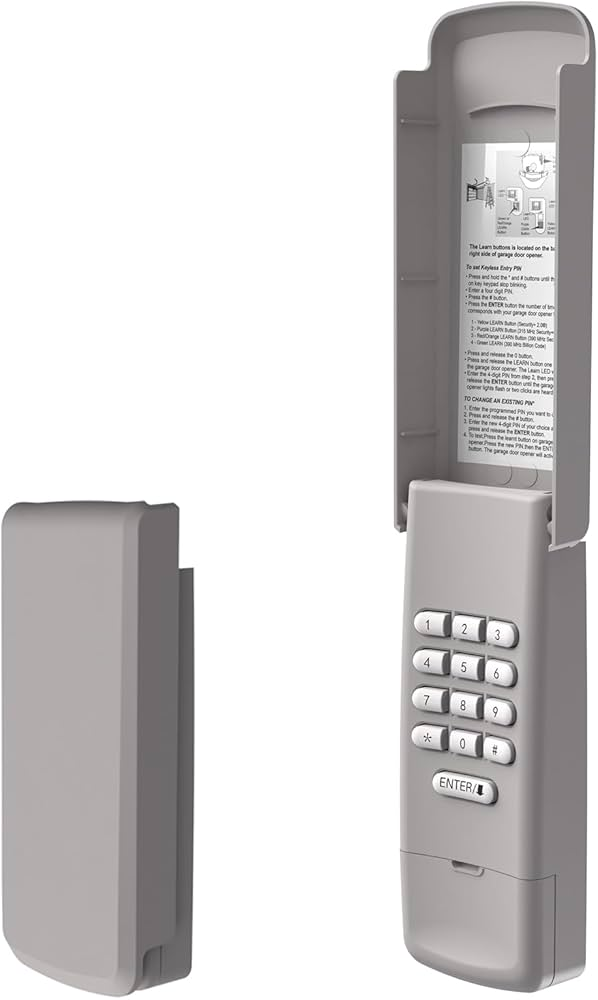
2. Access the Learn Button
- On your Chamberlain opener motor (ceiling-mounted), locate the “Learn” button.
- The button may be red, yellow, purple, or green, depending on your model.
- Pressing that button puts the opener into programming mode.
3. Enter Programming Mode
- Press and release the Learn button.
- You’ll have about 30 seconds to sync with the keypad.
4. Program the Keypad
- On the keypad, press and hold the program or “*” key until the keypad light begins flashing.
- Release and immediately enter a 4–8 digit PIN of your choice, followed by “#”.
- The LED should flash or beep to confirm successful programming.
5. Test the Keypad
- Wait a few seconds, then enter your PIN and press “#” to open the garage door.
- If the door moves, programming is complete; if not, repeat the steps.
Additional Programming Tips
- Multiple PINs: Some keypad models allow multiple PINs—press “*” before each new code during programming.
- Clear Old Codes: To erase existing codes, press and hold the Learn button for ~6 seconds until the LED turns off.
- Factory Reset: Accessed by holding “*” + the “#” key until the keypad blinks, then reprogram your PIN.
Troubleshooting Common Issues
Keypad Beeps but Doesn’t Open the Door
- Move closer to the opener to check signal strength
- Confirm you used the correct PIN followed by “#”
- Make sure you pressed the Learn button on the opener right before programming
Programming Fails Again
- Retract/reposition any external antennas that might cause interference
- Reset both the opener and keypad before retrying
- Use fresh batteries in the keypad
Wrong Version or Incompatible Model
- Ensure your Chamberlain opener supports wireless keypads
- Model numbers typically begin with “C” or “PD20 (eg., “C370” or “PD2200”)
- Older non‑Wi-Fi or older-gen openers might not support programming
Optimizing Keypad Security and Usage
Use Strong, Memorable PINs
- Avoid obvious codes like
1234,0000, birthdays - Choose a unique 4–8 digit code and change it regularly
Enable Smart Security Features
- Some Wi‑Fi models allow keypad PIN notifications via the MyQ mobile app
- Enable alerts to get notified when someone uses the keypad
Disable Remote PIN Entry Temporarily
- For extra security (vacation mode), press and hold the Learn button for 6 seconds to disable code use—preserving remote operation
Professional Touch-Ups and Enhancements
For an even more robust system, consider these upgrades:
- MyQ Smart Keypad: Wi-Fi enabled and connected to MyQ for enhanced monitoring
- Keyless Entry Bluetooth: Some openers support Bluetooth keyless entry modules
- Integration with Security Systems: Connect via smart home hubs like SmartThings or Home Assistant
Why This Upgrade Pays Off
- Hands-Free Convenience
No need to carry keys or garage remotes—just enter your PIN or use voice control if integrated - Managed Access by Code
Ideal for guests, pet sitters, or service personnel—no need to share extra remotes - Boosted Home Security
Rolling codes and strong PINs protect against code thieves - Preserved Main Remotes
You can program multiple PINs without duplicating remotes—convenient and cost-effective
Frequently Asked Questions
Q: Can more than one keypad be installed?
A: Yes—Chamberlain openers typically support multiple keypad devices. Program them one at a time per the Learn button method.
Q: What do I do if the keypad light never stops flashing?
A: It may mean the Learn button timer expired—retry by pressing Learn again, then syncing immediately.
Q: Will the keypad work during a power outage?
A: Yes, because it’s battery-operated. However, opener functionality may be limited without backup power.
Q: Do I need professional support?
A: Not usually—most DIYers can complete programming within 15 minutes. But if you’re uncomfortable with troubleshooting or mounting, call a professional installer.
Conclusion
Mastering How To Connect Keypad To Chamberlain Garage Door Opener is a worthwhile step to boost your home’s convenience and security. With clear instructions—from locating the Learn button to choosing strategic PINs—you can quickly set up reliable, keyless access.
From single-family homes to shared living spaces, the keypad offers effortless entry for residents, guests, and service providers without compromising safety. With periodic PIN updates and smart notifications via MyQ, your secure garage access becomes both modern and manageable.
If you want help selecting the best keypad model, integrating it with Alexa or Google Home, or linking it to your home automation system, feel free to ask—I’m happy to help!
Leave a Reply