If your garage feels dim when the door opens or your Chamberlain garage door opener light isn’t turning on anymore, it’s probably time for a new bulb. Learning how to change bulb in Chamberlain garage door opener is a simple yet essential maintenance task that ensures your garage remains well-lit and safe to navigate.
In this guide, we’ll walk you through why changing the light bulb in your Chamberlain opener is important, what kind of bulbs to use, safety precautions, and a complete step-by-step process to do it properly. Whether you’re replacing a burnt-out bulb or upgrading to LED lighting, this article provides all the information you need.
Read too: How Many Remotes Can A Chamberlain Garage Door Opener Have? Understaanding the Limits and Options
Why Changing the Garage Opener Bulb Matters
Lighting in your garage isn’t just about convenience—it’s about safety. The light that comes on when your Chamberlain garage door opens helps prevent accidents, allows you to find your way at night, and makes it easier to load or unload your vehicle.
More importantly, if the light bulb fails or isn’t the correct type, it can also affect other garage opener functions. For example, certain bulbs can create electromagnetic interference that disrupts remote signals.
Choosing the Right Bulb for Chamberlain Garage Door Openers
Before diving into how to change bulb in Chamberlain garage door opener, you need to select the right replacement bulb. Not all light bulbs are compatible with garage door openers.
Here’s what to consider:
✅ Wattage
Chamberlain typically recommends bulbs with a maximum of 60 watts. Installing a bulb with a higher wattage may damage the light socket or other internal components.
✅ Bulb Type
Chamberlain openers are compatible with:
- Standard incandescent bulbs
- Rough service bulbs (ideal for garage vibrations)
- LED bulbs (look for Chamberlain-compatible models)
💡 Avoid compact fluorescent bulbs (CFLs) as they can interfere with the remote control signal and opener operation.
✅ Vibration Resistance
Garage openers vibrate during use. Look for bulbs labeled “garage door opener safe” or “vibration resistant” to ensure long life.
Tools You Might Need
- A sturdy step ladder
- A clean, dry cloth or gloves for handling bulbs
- A Chamberlain-compatible replacement bulb
- Optional: Screwdriver (if housing cover is secured)
How To Change Bulb In Chamberlain Garage Door Opener
Now, let’s break down the steps involved in how to change bulb in Chamberlain garage door opener safely and efficiently.
Step 1: Unplug the Garage Door Opener
Safety always comes first. Start by unplugging your garage door opener from the power outlet. This prevents any risk of electric shock or accidental activation during the process.
If your opener is hardwired, turn off the breaker switch controlling the garage power supply.
Step 2: Set Up Your Ladder
Use a stable step ladder tall enough for you to reach the light bulb compartment comfortably. Make sure the ladder is on a level surface and follow all safety precautions.
Step 3: Locate the Bulb Housing
Most Chamberlain garage door openers have the light bulb housed under a plastic lens cover, usually on the sides or bottom of the motor unit. The design may vary slightly depending on your model (e.g., Chamberlain B970, B550, or LiftMaster-branded units).
Inspect the housing to determine how the lens cover is attached. It may:
- Snap off with gentle pressure
- Slide or rotate off
- Be secured with screws
Step 4: Remove the Lens Cover
If the lens cover is secured with clips, gently press and pull it off. If there are screws, use a screwdriver to remove them and set them aside in a safe place.
Be careful not to crack the plastic housing. Apply light pressure and don’t force anything.
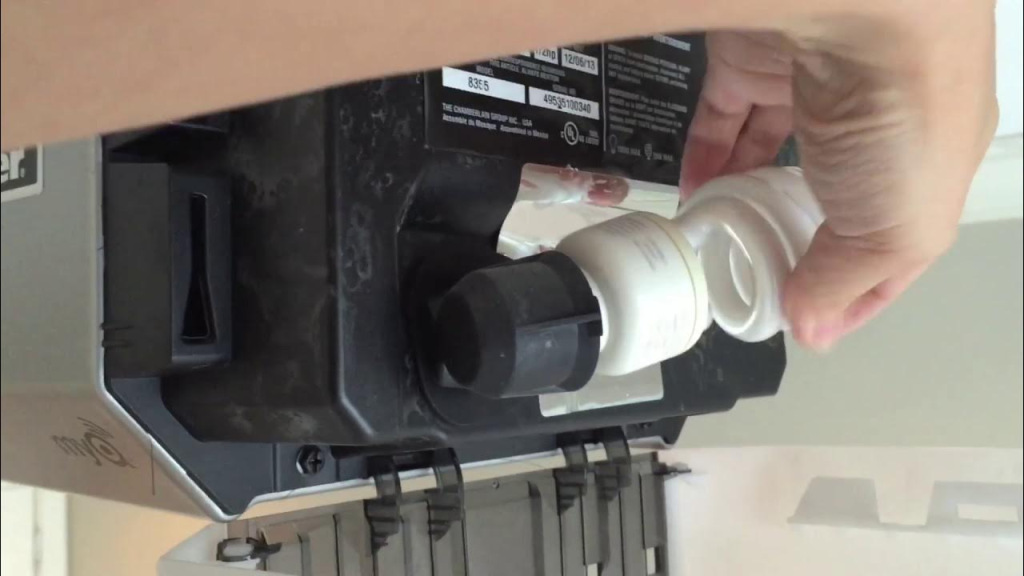
Step 5: Remove the Old Bulb
Carefully twist the old bulb counterclockwise to unscrew it from the socket. Use a cloth or gloves if the bulb is dusty or greasy. If the bulb broke or is stuck, wear gloves and remove it with pliers (gently), or call a professional if unsure.
Dispose of the bulb properly according to your local recycling or disposal guidelines.
Step 6: Install the New Bulb
Take your new Chamberlain-approved bulb and screw it into the socket clockwise until snug—but don’t overtighten.
Remember:
- Maximum 60 watts
- LED or rough service bulbs are preferred
- Avoid CFLs to reduce remote interference
Step 7: Replace the Lens Cover
Once the new bulb is in place, reattach the lens cover. Snap or screw it back securely, ensuring that it’s properly aligned and won’t fall off during operation.
Step 8: Restore Power and Test the Light
Plug the opener back in or turn on the breaker. Test the light by pressing the wall-mounted control or operating the door with your remote.
If the bulb lights up:
✅ Success! Your garage is now well-lit.
If it doesn’t light up:
- Double-check the bulb is securely fastened
- Confirm power is on
- Try another new bulb (it’s rare, but defective bulbs happen)
Common Issues When Changing Opener Bulbs
Even if you know how to change bulb in Chamberlain garage door opener, you may encounter a few hiccups:
❌ Bulb Doesn’t Fit
Double-check the bulb base size. Most Chamberlain units use standard E26 bases, but always refer to your model’s manual.
❌ Light Still Doesn’t Work
If a new bulb doesn’t solve the issue:
- The socket may be damaged
- A wiring issue could be present
- The circuit board in the opener may be faulty
These may require professional repair.
❌ Remote Stops Working After New Bulb
This is often caused by interference from incompatible LED or CFL bulbs. Replace it with a Chamberlain-tested LED bulb or a rough service incandescent bulb.
Tips for Long-Term Maintenance
To reduce how often you need to change bulbs and ensure consistent lighting:
- Use vibration-resistant bulbs for durability
- Clean the light lens cover every few months to maximize brightness
- Test your opener lighting during seasonal garage checks
- Label your preferred bulb type and wattage inside the lens cover for future reference
Benefits of Upgrading to LED
If you haven’t yet, consider upgrading to a Chamberlain-compatible LED bulb. Benefits include:
- Longer lifespan (often 25,000+ hours)
- Brighter light output
- Energy savings
- Minimal heat generation
- Vibration resistance
Be sure to purchase LED bulbs specifically labeled as safe for garage door openers to avoid signal disruption.
When to Call a Professional
While changing the bulb in a Chamberlain garage door opener is a DIY-friendly task, you may want to call a technician if:
- The light socket appears damaged or corroded
- Wires are exposed or appear frayed
- The opener fails to power on after multiple bulb changes
- You’re dealing with broken glass from a shattered bulb
A professional will also inspect the opener for internal electrical faults or control board issues.
Conclusion
Knowing how to change bulb in Chamberlain garage door opener is a simple yet valuable skill that enhances your garage’s safety and usability. By selecting the right type of bulb, following the correct steps, and observing safety precautions, you can easily complete this task in under 15 minutes.
Whether you’re dealing with a burned-out bulb or upgrading to an LED solution, keeping your garage opener light functioning is crucial for everyday convenience and security. With this step-by-step guide, you’re now equipped to handle it like a pro.
Leave a Reply