If your garage door refuses to close all the way or starts to close and then reverses, you might be dealing with misaligned safety sensors. These sensors, also known as photo eyes, are a crucial part of your Chamberlain garage door system. They prevent accidents by detecting obstacles in the door’s path. Knowing how to align sensors on Chamberlain garage door opener can save you from unnecessary service calls and ensure your door functions properly and safely.
In this comprehensive guide, we’ll explain how these sensors work, common signs of misalignment, step-by-step instructions on how to realign them, and maintenance tips to prevent future issues.
Read too: How Many Remotes Can A Chamberlain Garage Door Opener Have? Understaanding the Limits and Options
Why Sensor Alignment Is Important
Before diving into the step-by-step process of how to align sensors on Chamberlain garage door opener, it’s helpful to understand why sensor alignment is critical.
Garage door sensors are mounted on both sides of the door near the floor and work together by sending an invisible infrared beam across the bottom of the door. When something breaks this beam, the door automatically reverses or refuses to close. This safety feature is essential for protecting pets, children, vehicles, and personal belongings.
If the sensors are even slightly out of alignment, they may falsely detect an obstruction and stop the door from closing—even when nothing is there.
Symptoms of Misaligned Garage Door Sensors
If you’re wondering whether your sensors are misaligned, look for these common indicators:
- The garage door starts to close but reverses immediately
- The garage door won’t close at all
- The LED lights on the sensors are blinking or off entirely
- The motor makes a clicking noise when attempting to close
- You need to press and hold the wall button for the door to fully close
All these symptoms suggest it’s time to learn how to align sensors on Chamberlain garage door opener.
Tools You’ll Need
Before starting the alignment process, gather the following tools and supplies:
- A soft cloth for cleaning the sensors
- A level tool or string and tape for precision alignment
- A screwdriver (usually Phillips-head)
- A measuring tape (optional but helpful)
- Zip ties or clamps (to temporarily hold sensors in place)
How To Align Sensors On Chamberlain Garage Door Opener
Now that you understand the importance of alignment and have your tools ready, let’s walk through the steps on how to align sensors on Chamberlain garage door opener. The entire process typically takes 15–30 minutes.
Step 1: Disconnect Power and Ensure Safety
Always start by cutting power to the garage door opener. Either unplug the opener or switch off the circuit breaker. This ensures your safety while adjusting or touching any electrical components.
Also, make sure the area around the door is free of clutter or debris, especially near the sensor mounts.
Step 2: Locate and Inspect the Sensors
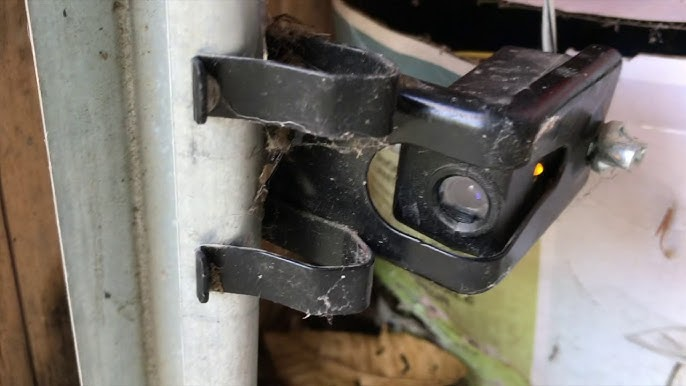
Garage door sensors are mounted about 4–6 inches off the ground on either side of the door frame. Each sensor has a small LED light:
- One sensor emits the infrared beam (sending unit)
- The other receives the beam (receiving unit)
Check the LEDs:
- A steady green or amber light means the sensors are powered and aligned
- A blinking or off light means the beam is misaligned or blocked
Also inspect for:
- Dirt or cobwebs on the lens
- Bent brackets or mounting hardware
- Loose wires or damaged insulation
Step 3: Clean the Sensor Lenses
Using a soft, dry cloth, gently clean the lenses on both sensors. Dust, moisture, or spider webs can interrupt the infrared beam just like a physical object. Don’t use any harsh chemicals or wet cloths.
Step 4: Loosen the Sensor Brackets
Use your screwdriver to loosen (but not remove) the screws holding the sensor brackets in place. This will allow you to move the sensors slightly for alignment.
Ensure the brackets are still secure enough to hold the sensors while adjusting.
Step 5: Align the Sensors
There are two popular methods to align garage door sensors:
Method 1: Manual Alignment by Eye
- Stand in front of the sensors and gently move them so they face each other directly.
- Observe the LED indicators on both sensors.
- Slowly adjust until both LEDs stay lit steadily (not blinking).
- Tighten the screws on each bracket to lock the sensors in place.
Method 2: String and Level Alignment (More Accurate)
- Tape one end of a string to the middle of one sensor.
- Stretch the string across the door to the opposite sensor.
- Tape the other end to that sensor.
- Use a level tool along the string to ensure it is perfectly horizontal.
- Adjust each sensor up or down until it aligns with the string level.
- Confirm LED lights are solid and tighten brackets.
This method provides more precision, especially if the brackets or wall mounts are slightly off.
Step 6: Reconnect Power and Test
Plug the Chamberlain opener back in or restore power at the breaker. Test the door by pressing the wall button or remote:
- If the door closes smoothly and the sensors’ LED lights stay steady, the alignment was successful.
- If the door still reverses, check again for blinking LEDs or go back through the alignment steps.
Additional Troubleshooting Tips
If your garage door sensors still aren’t working after alignment, consider the following checks:
✅ Wiring Check
Inspect the sensor wiring:
- Ensure wires are connected to the correct terminals (white to white, black to gray).
- Look for frayed or disconnected wires, especially where they attach to the opener or sensors.
✅ Obstruction Check
Even a thin object (like a blade of grass or plastic bag) can break the beam. Make sure nothing is interrupting the path between the sensors.
✅ Sunlight Interference
Strong sunlight can sometimes interfere with sensor function. Try shading the sensor with a small shield or relocating slightly (if possible).
How Often Should You Align Garage Door Sensors?
Sensor alignment is not a task you need to do regularly—typically only when:
- The garage door starts to malfunction
- You accidentally bump or hit the sensor
- You perform maintenance on the door or its track
However, it’s a good idea to inspect sensor alignment every 3–6 months during regular garage maintenance routines.
Preventative Maintenance Tips
To avoid future sensor issues and maintain smooth operation, follow these maintenance habits:
🛠 Lubricate Tracks and Rollers
Friction in the moving parts can strain the system. Use garage door lubricant, not WD-40, every few months.
🧼 Clean Sensors Regularly
Wipe the lenses gently to remove dust, spider webs, and moisture buildup.
🧪 Perform Safety Tests
Close the garage door using your remote and wave an object (like a broomstick) across the sensor beam. The door should stop and reverse immediately.
When to Call a Professional
If you’ve followed all the steps on how to align sensors on Chamberlain garage door opener and your system still isn’t working properly, you might need expert help. Contact a licensed garage door technician if:
- The sensors have no power despite proper wiring
- The mounting brackets are damaged or rusted
- You suspect internal wiring or circuit board issues with the opener
Conclusion
Learning how to align sensors on Chamberlain garage door opener is one of the most useful DIY garage skills you can develop. Proper sensor alignment not only ensures smooth operation of your garage door but also protects your family and belongings from accidents. Most alignment issues can be fixed in less than 30 minutes with minimal tools and basic knowledge.
Make sensor alignment part of your routine garage door maintenance and enjoy worry-free performance from your Chamberlain system for years to come.
Leave a Reply