Garage doors are one of those home features you don’t think about—until they stop working correctly. If you’re using a unit that’s been in place for a decade or more, chances are it needs a little maintenance. One common question homeowners ask is: How to adjust an older Chamberlain garage door opener?
Older models may not have the modern features of today’s smart openers, but with proper adjustment and care, they can remain functional and safe for many more years. In this comprehensive guide, we’ll walk you through everything you need to know about adjusting an older Chamberlain garage door opener—from identifying common issues to making precise changes to travel limits, force settings, and safety sensors.
Read too: How Many Remotes Can A Chamberlain Garage Door Opener Have? Understaanding the Limits and Options
Why Adjusting an Older Chamberlain Opener Matters
Even if your garage door still works, it might not be working optimally. Over time, the alignment and force of the door can shift due to:
- Weather changes
- Worn components
- Normal wear and tear
- Power surges or circuit resets
Regular adjustment ensures:
- Safe operation
- Proper sealing of the door
- Reduced strain on the motor
- Less noise and smoother travel
- Extended life of the opener system
Tools You’ll Need
Before we begin, gather the following tools:
- Flat-head screwdriver
- Phillips screwdriver
- Step ladder
- Flashlight or work light
- Clean rag or cloth
- Safety glasses and gloves
Older Chamberlain models typically have mechanical dials or turn screws, so you won’t need advanced tools or diagnostic equipment.
Understanding the Basic Components
Before adjusting, it helps to know the key parts of your opener:
- Travel Limits: Determine how far the door travels up and down.
- Force Adjustment: Controls how much force is used to open/close the door.
- Safety Sensors (Photo Eyes): Prevent the door from closing on objects.
- Trolley/Carriage: Connects the opener to the door.
- Limit Switches: Small levers or contacts that trigger stop points.
How To Adjust An Older Chamberlain Garage Door Opener
Now let’s get into the heart of the article. Below is a step-by-step process for how to adjust an older Chamberlain garage door opener safely and effectively.
Step 1: Disconnect the Opener from the Door
For safety and easier adjustment:
- Pull the red emergency release cord on the trolley.
- This disconnects the opener from the door.
- Manually open and close the garage door to ensure it’s properly balanced.
If the door is hard to lift or falls quickly, the issue might lie with the garage door springs, not the opener. In that case, call a professional.
Step 2: Adjust Travel Limits
Travel limits control how far your garage door opens and closes.
- Plug in the opener and reconnect the trolley.
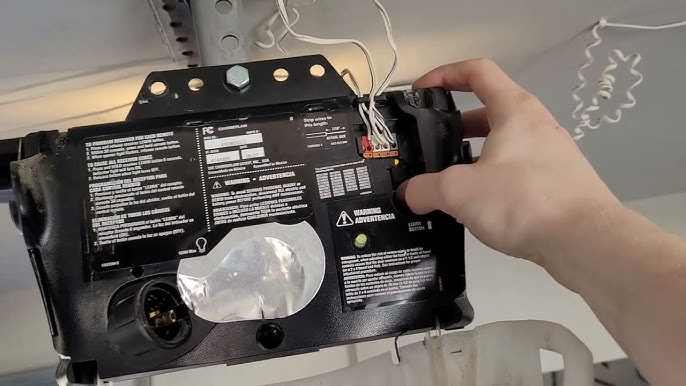
- Locate the limit adjustment screws or dials. These are often labeled “Up” and “Down” and are found on the side or back of the motor housing.
- Use a flathead screwdriver to turn the adjustment screws:
- Turn Up Limit clockwise to reduce the opening height.
- Turn counterclockwise to increase the opening height.
- Turn Down Limit clockwise to reduce how far the door closes.
- Turn counterclockwise to increase how far it closes.
- After each adjustment, use the wall control to operate the door and observe the results.
Tip: Make small adjustments—usually one turn equals 2–3 inches of movement.
Step 3: Adjust the Force Settings
Force settings control how hard the motor works to move the door. Too little force and the door won’t close; too much can be unsafe.
- Locate the force adjustment dials. These are often near the travel limit screws and labeled “Open Force” and “Close Force.”
- Adjust gradually:
- If the door stops before fully closing, increase the Close Force slightly.
- If the door bounces open after closing, reduce the Close Force.
- For upward movement issues, adjust Open Force accordingly.
- Test after every change. The door should operate smoothly and without excessive jerking or noise.
Warning: Excessive force settings can cause the door to crush objects. Always test safety reversal features.
Step 4: Test the Safety Reverse System
Chamberlain openers, even older ones, include a safety reversal feature.
Here’s how to test it:
- Place a 2×4 piece of wood flat on the ground in the door’s path.
- Close the garage door using the remote or wall button.
- The door should reverse immediately upon hitting the wood.
If it doesn’t:
- Reduce the Close Force setting.
- Inspect and clean the photo-eye sensors.
Step 5: Align and Clean the Safety Sensors
Safety sensors prevent the door from closing when there’s an obstruction. These sensors can fall out of alignment over time.
- Locate the sensors near the bottom of each garage door track.
- Make sure they are aligned (the LED on both should be solid, not blinking).
- Clean the lenses with a soft cloth.
- Tighten any loose mounting brackets.
Misaligned or dirty sensors often cause the door to reverse unexpectedly or not close at all.
Step 6: Lubricate Moving Parts
Though not a direct adjustment, lubricating key components improves performance:
- Use garage door lubricant (not WD-40) on rollers, hinges, and tracks.
- Avoid greasing the chain or belt unless specified in your model’s manual.
Step 7: Reconnect the Door
After all adjustments are complete:
- Reconnect the door to the opener by pulling the emergency release cord toward the opener.
- Use the wall control to operate the door automatically.
- Confirm smooth, complete travel and test force and safety settings one last time.
Troubleshooting Tips
Problem: Door stops halfway
Solution: Adjust travel limits and check for track obstructions.
Problem: Door reverses when closing
Solution: Clean or realign safety sensors and reduce close force.
Problem: Loud noises or jerky motion
Solution: Lubricate rollers and check track alignment.
Problem: Opener doesn’t respond at all
Solution: Check power supply, remote batteries, and wall control wiring.
When to Call a Professional
If your adjustments don’t solve the problem—or if you’re dealing with worn-out springs, frayed cables, or unresponsive motors—it may be time to call a garage door technician. For older openers (15+ years), it might even be more cost-effective to replace the unit with a modern, smart Chamberlain model.
Maintenance Tips to Avoid Frequent Adjustments
- Test your safety reversal system monthly
- Lubricate moving parts quarterly
- Check sensor alignment after storms or vibrations
- Keep opener manual and labels for quick reference
Proper maintenance means you won’t be asking how to adjust an older Chamberlain garage door opener again anytime soon!
Conclusion
Adjusting an older Chamberlain garage door opener may seem intimidating, but with the right guidance and tools, it’s a task most homeowners can tackle confidently. From tweaking the travel limits and force settings to ensuring safety sensor functionality, these steps can breathe new life into your old opener.
So, if you’ve been wondering how to adjust an older Chamberlain garage door opener, follow this guide to restore smooth, reliable operation—and extend the life of your system without spending on a new unit.
Need help identifying your model or finding compatible parts? Feel free to ask—I’m here to help!
Leave a Reply