Garage doors are one of the most frequently used moving parts in any home. They provide safety, convenience, and access—but when they stop functioning properly, it can quickly become a major inconvenience. If you’re asking, “How do I adjust my Chamberlain garage door opener?”, you’re likely dealing with issues such as the door not closing fully, reversing suddenly, or not opening smoothly.
Chamberlain garage door openers are well-known for their reliability and smart home features. However, like any mechanical system, they sometimes require fine-tuning. This in-depth guide will walk you through how to adjust your Chamberlain opener’s travel limits, force settings, safety sensors, and more to ensure everything operates safely and efficiently.
Read too: How Many Remotes Can A Chamberlain Garage Door Opener Have? Understaanding the Limits and Options
Why Adjustment May Be Needed
Before diving into how to make adjustments, let’s explore some common reasons homeowners ask, “How do I adjust my Chamberlain garage door opener?”
- The door doesn’t close completely.
- The door reverses before touching the floor.
- The door won’t open all the way.
- The opener light flashes and the door refuses to move.
- The door doesn’t seal properly at the ground level.
- The auto-reverse feature triggers without obstruction.
These issues are often related to travel limits, force settings, or sensor alignment, all of which can be adjusted manually or electronically.
Safety First: Before You Adjust Your Chamberlain Opener
Before performing any adjustments, follow these safety precautions:
- Disconnect power when working with wiring or sensors.
- Never place fingers near moving parts or tracks.
- Keep children and pets away from the area.
- Use a stable ladder or step stool for overhead controls.
- Read the owner’s manual to identify model-specific components.
Most Chamberlain garage door openers have similar adjustment methods, but details may vary slightly by model (especially between chain drive, belt drive, and wall-mounted openers).
Tools You May Need
- A Phillips head screwdriver
- Step ladder
- Flashlight (for better visibility)
- Clean cloth (for wiping sensor lenses)
- Your Chamberlain remote or wall control panel
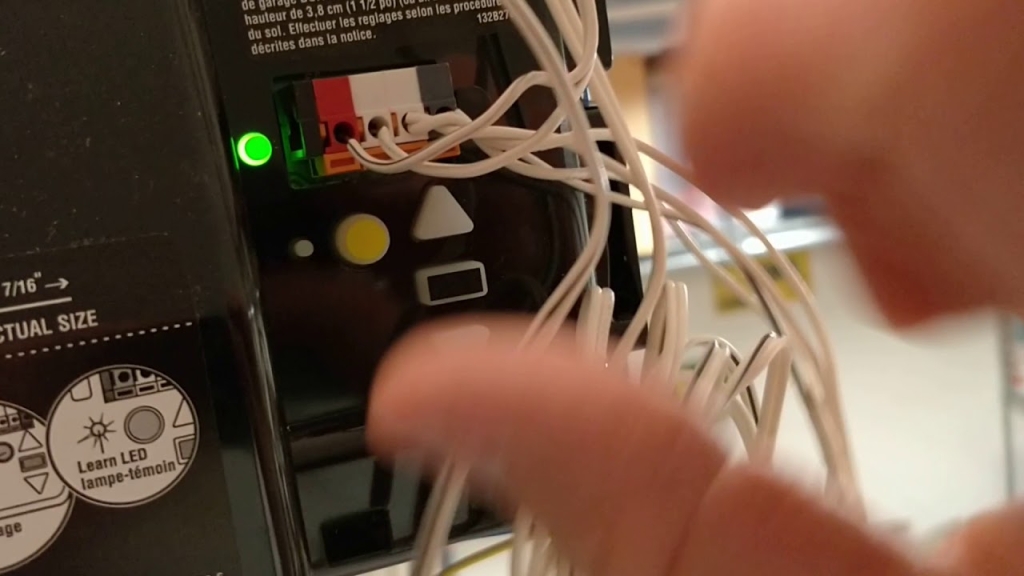
Understanding Your Chamberlain Garage Door Opener Controls
Most Chamberlain openers have two primary types of controls:
- Manual Adjustment Screws or Dials – Typically found on older models.
- Electronic Adjustment Buttons – Located under the light cover or on the side of newer units.
Labels include:
- Up Limit / Down Limit
- Up Force / Down Force
- Learn / Adjust / Arrow Buttons
- Sensor Alignment Indicators
Understanding these terms will help when answering the question: “How do I adjust my Chamberlain garage door opener?”
How Do I Adjust My Chamberlain Garage Door Opener? Step-by-Step Guide
Step 1: Adjusting Travel Limits
Travel limits control how far the door opens or closes.
For Models With Manual Adjustment Screws:
- Locate the “Up” and “Down” travel screws.
- Turn the Up Travel Screw clockwise to increase the opening distance, counterclockwise to reduce.
- Turn the Down Travel Screw clockwise to make the door close further, counterclockwise to shorten.
For Models With Electronic Controls:
- Press and hold the “Adjustment” or “Learn” button until the up-arrow flashes.
- Use the up-arrow to raise the door to the desired fully open position.
- Press the “Adjustment” button again; the down-arrow will flash.
- Use the down-arrow to lower the door to the fully closed position.
- Press “Adjustment” again to save settings.
Test the door to ensure it opens and closes completely without hitting the floor too hard or stopping prematurely.
Step 2: Adjusting Force Settings
Force settings control how much power the opener uses to open or close the door. If the door is too heavy or has friction points, adjusting the force is critical.
For Manual Models:
- Locate Force Adjustment Screws (marked “Up” and “Down”).
- Increase force by turning clockwise, decrease by turning counterclockwise.
For Digital Models:
- Press the “Learn” or “Adjustment” button.
- Wait for the opener to automatically test and calibrate the force based on travel settings.
- You may need to activate the door and let the system auto-calibrate itself.
Force adjustments are essential if your door reverses without obstruction or doesn’t close all the way.
Step 3: Sensor Alignment and Adjustment
Safety reversing sensors are placed near the bottom rails of the garage and must be properly aligned.
- Make sure both sensor lenses are clean.
- Both LEDs on the sensors should be lit (usually green and amber).
- If one is off or flickering, adjust the angle or height until both lights remain solid.
- Tighten mounting brackets securely.
Misaligned sensors can cause the opener to stop or reverse unexpectedly.
Step 4: Reset and Reprogram if Needed
If manual and electronic adjustments don’t work as expected, a reset may help.
To reset:
- Unplug the opener for 1 minute.
- Plug it back in and press and hold the “Learn” button until the light goes off (about 6 seconds).
- Reprogram your travel limits and remotes as needed.
Step 5: Test the Safety Reversal Feature
The safety reverse feature ensures your garage door doesn’t close on people or pets.
- Open the garage door fully.
- Place a 2×4 piece of wood flat on the ground under the door.
- Close the door using the remote.
- The door should automatically reverse upon contact with the wood.
If it doesn’t, increase the sensitivity or adjust the down travel setting. This is one of the most critical aspects of garage door opener safety.
Common Issues and How to Fix Them
Issue: Door Closes Then Reopens Immediately
Cause: Down limit set too low or safety sensors misaligned.
Solution: Increase the down travel limit and check sensor alignment.
Issue: Door Doesn’t Open Fully
Cause: Up travel limit too short or object blocking travel.
Solution: Adjust up travel screw or button.
Issue: Door Doesn’t Close All the Way
Cause: Down limit too short or weak down force.
Solution: Increase down travel and down force slightly.
Issue: Opener Light Flashes But Door Won’t Move
Cause: Sensor issue or obstruction.
Solution: Clear the area, realign sensors.
Maintenance Tips to Prevent Future Issues
Knowing how to adjust your Chamberlain garage door opener is great, but regular maintenance will prevent the need for frequent adjustments.
- Lubricate moving parts every 6 months (rollers, hinges, tracks).
- Inspect cables and springs for signs of wear.
- Tighten bolts and screws periodically.
- Clean sensor lenses monthly.
- Check balance by lifting the door manually halfway—if it stays, it’s balanced.
Frequently Asked Questions
Q: How often should I adjust my garage door opener?
A: Only when you notice operation issues like incomplete closing, unusual sounds, or sensor errors.
Q: Can I make adjustments from my MyQ app?
A: No. The MyQ app is for remote control and alerts but does not support physical adjustments like travel or force limits.
Q: What if I can’t fix the problem?
A: If you’ve followed all steps and the problem persists, contact Chamberlain support or hire a certified garage door technician.
Final Thoughts
When you’re wondering, “How do I adjust my Chamberlain garage door opener?”, the good news is most adjustments are simple, safe, and take only a few minutes with basic tools. By understanding how travel limits, force settings, and sensors work together, you can extend the life of your garage opener and ensure it functions reliably.
Don’t wait until something breaks—routine checks and fine-tuning will keep your system in top shape. Whether you’re a seasoned DIYer or a cautious beginner, this guide gives you the confidence to handle your Chamberlain garage door like a pro.
Leave a Reply